

Overview
Okta can contribute normalized user lifecycle, authentication, MFA, and administrative activity. Reviewed examples include:account.locked— account lockedmfa.factor.activated— activates additional MFA factorsauth.login.failed— fails to log in
/api/v1/users) and the system log (/api/v1/logs). See how integration data becomes signals.
Choose a connection method
Both methods need the same access, so the choice is about credential handling, not about what the platform can read.
Option A — API token (SSWS)
Recommended.What Living Security needs
Prerequisites
- You must be an Okta Super Administrator to create a service account user, assign administrator roles, and create API tokens.
1
Create a user to own the token
An Okta API token carries the permissions of the user who created it, and it stops working if that user is deactivated. Create a dedicated service account rather than using a personal admin account, so the connection survives staff changes.
- In the Admin Console, go to Directory → People.
- Click Add person and create a user such as
svc-livingsecurity@yourcompany.com. - Activate the account.
2
Assign the read-only administrator role
The platform only reads. Granting more than read access gives the token permissions it never uses.
- Go to Security → Administrators.
- Click Add administrator and select the user from the previous step.
- Assign the Read-only Administrator role.
- Save.
Without an administrator role, calls to the Okta Management API succeed with
200 OK and return an empty list. There is no 403 to tell you the role is missing — the streams simply stay empty.3
Create the API token
- Sign in to the Admin Console as the service account user from step 1. The token inherits whichever account creates it.
- Go to Security → API and open the Tokens tab.
- Click Create token, give it a name such as
Living Security Platform, and click Create token. - Copy the token value now — Okta shows it once and never again.
The address list above matters only if your Okta org restricts API access by network zone. Most orgs do not.
4
Find your tenant subdomain
Your Admin Console URL looks like
https://acme-admin.okta.com. The tenant subdomain is acme — without the -admin suffix, without .okta.com, and without https://.Troubleshooting
Connected, but every stream is empty
Connected, but every stream is empty
The token’s owner has no administrator role. Assign Read-only Administrator to the service account (step 2) — the API returns
200 OK with an empty list rather than an error when the role is missing.Syncs fail after a staff change
Syncs fail after a staff change
The token stops working if the user who created it is deactivated. This is why the token should belong to a service account, not to a person.
Option B — OAuth 2.0 service application
Use this method when your security policy does not allow long-lived API tokens. It replaces the token with a client ID and an RSA key pair you own. In the platform this is the Okta (OAuth 2.0) tile, under Settings → Integrations → Catalog. To authenticate with Okta using Client Credentials, you need the following:- Client ID - A unique identifier for your Okta API Services application.
- Private Key (JWK) - The RSA private key in JSON Web Key format, whose public key is registered in your Okta application.
- Okta Domain - Your Okta tenant subdomain only (e.g.
dev-12345678), not the full hostname. - Scopes - A space-separated list of Okta Management API scopes (e.g.
okta.users.read okta.logs.read).
private_key_jwt authentication.
Prerequisites:
- You must have an Okta account. Sign up for a free developer account at developer.okta.com.
Step 1: Creating your Okta API Services application
- Log in to your Okta Admin Console.
- In the left sidebar, navigate to Applications > Applications.
- Click Create App Integration.
- Select API Services as the sign-in method and click Next.
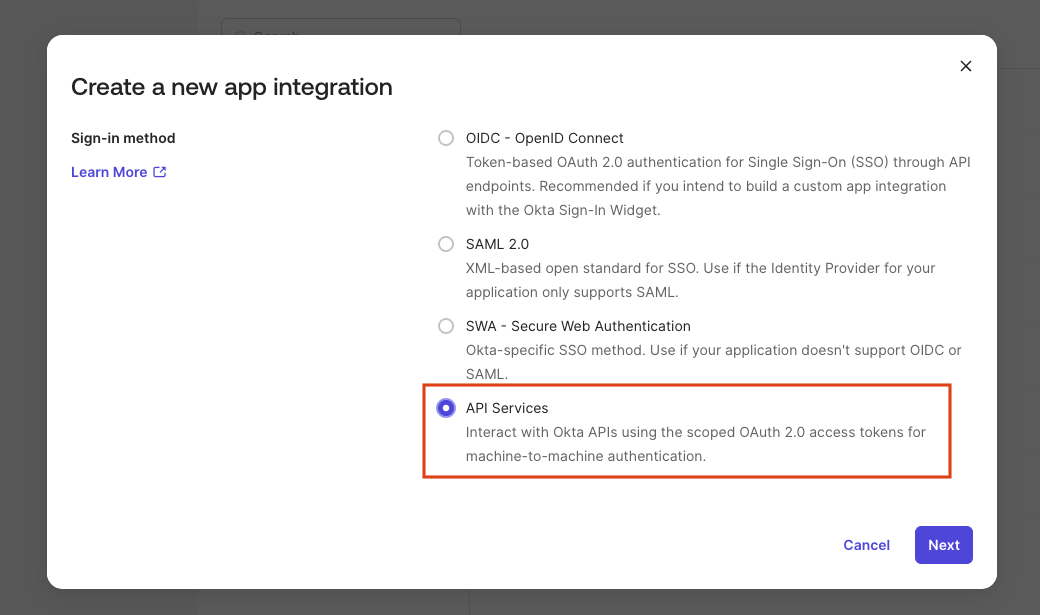
- Give your application a name and click Save.
- On the application’s General tab, find your Client ID — you will need it in the final step.
- Set Client authentication to Public key / Private key.
okta.*scopes are only supported with this authentication method.
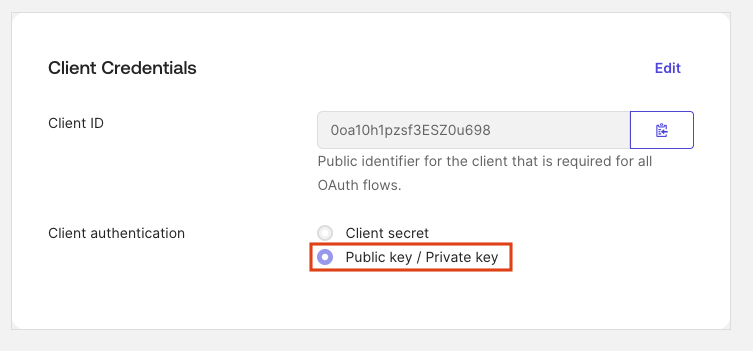
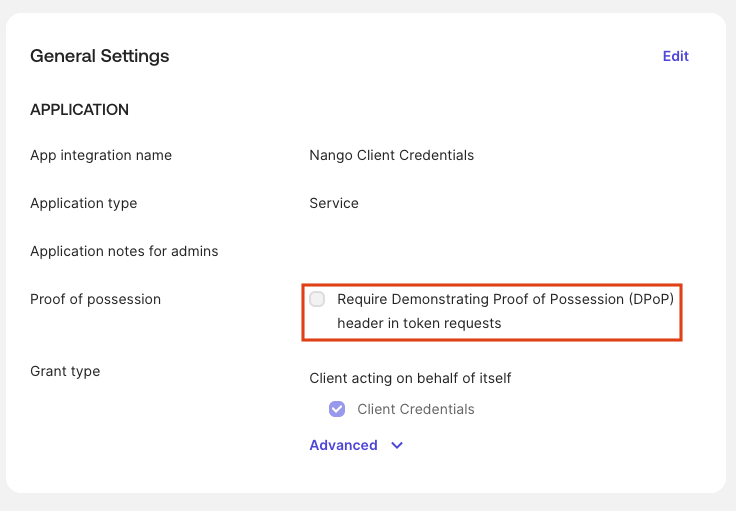
- Disable Proof of possession (DPoP) — it is not supported.
The application must be created as API Services.
Step 2: Generating and registering your RSA key pair
Use Okta key generator
Okta can generate the RSA key pair for you directly in the Admin Console:- In the Admin Console, open your API Services application.
- Go to the General tab and scroll to the PUBLIC KEYS section.
- Click Add Key, then select Generate new key.
- Click Save — Okta generates the key pair and displays the Private Key (JWK) once.
- Copy and save the private key JSON immediately — it will not be shown again.
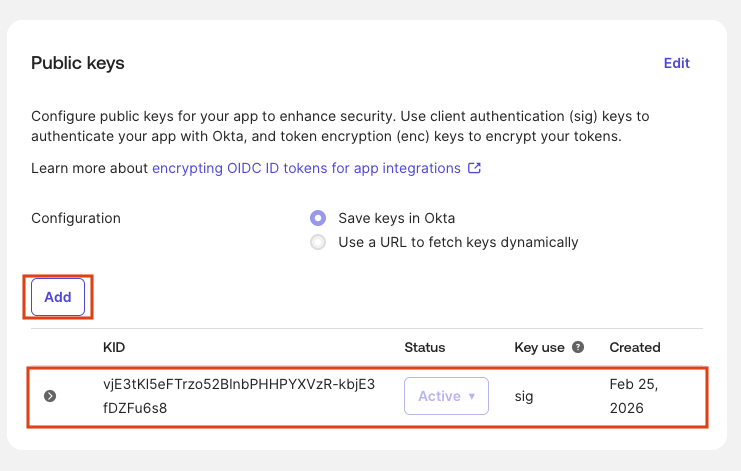
- The public key is automatically registered with your application.
Copy the private JWK before closing the dialog. Paste it into the Private Key field in the Living Security Platform in the final step.
Create your own key
Okta usesprivate_key_jwt for API Services apps. You generate an RSA key pair, register the public JWK with Okta, and provide the private JWK to the Living Security Platform.
Generate a private JWK using the following Node.js script (requires Node.js 18+):
- In the Admin Console, open your API Services application.
- Go to the General tab and scroll to the PUBLIC KEYS section.
- Click Add Key, paste the public JWK JSON output from the script above, and click Save.
The private JWK is what you paste into the Living Security Platform. It includes all key material (
d, p, q, dp, dq, qi) and the kid. Keep it secret.Step 3: Finding your Okta Domain
Enter your Okta tenant subdomain only — the part before.okta.com.
- In the Admin Console, your browser’s address bar will show a URL like
https://dev-12345678-admin.okta.com. - Your Okta Domain is the subdomain only (e.g.,
dev-12345678), notdev-12345678.okta.com. - Alternatively, go to Settings > Account in the Admin Console to find your Okta domain, then use the subdomain portion.
Step 4: Grant API scopes to your application
Okta requires at least one scope in every token request. Before your application can request specific scopes, they must be granted:- In the Admin Console, navigate to Applications > Applications and open your application.
- Click the Okta API Scopes tab.
- Grant the scopes your integration requires:
okta.users.readandokta.logs.read.
Step 5: Assign an admin role to your application
Granting scopes alone is not enough — Okta Management API endpoints (e.g./api/v1/users) silently return an empty 200 [] response if your application has no admin role. You must assign at least Read-Only Administrator:
- In the Admin Console, navigate to Security > Administrators (or go to Applications > Applications > your app > Admin roles).
- Click Add administrator assignment and select your API Services application.
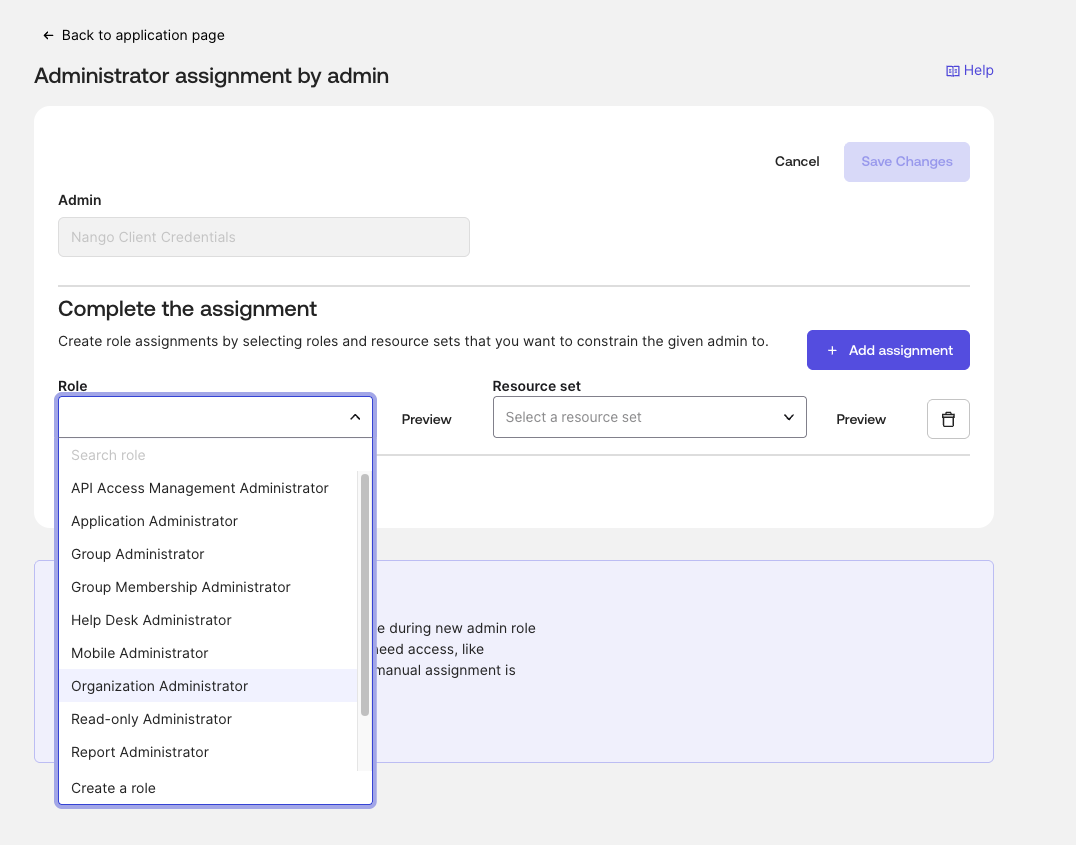
- Assign the Read-Only Administrator role (or higher, depending on the scopes you need).
- Click Save.
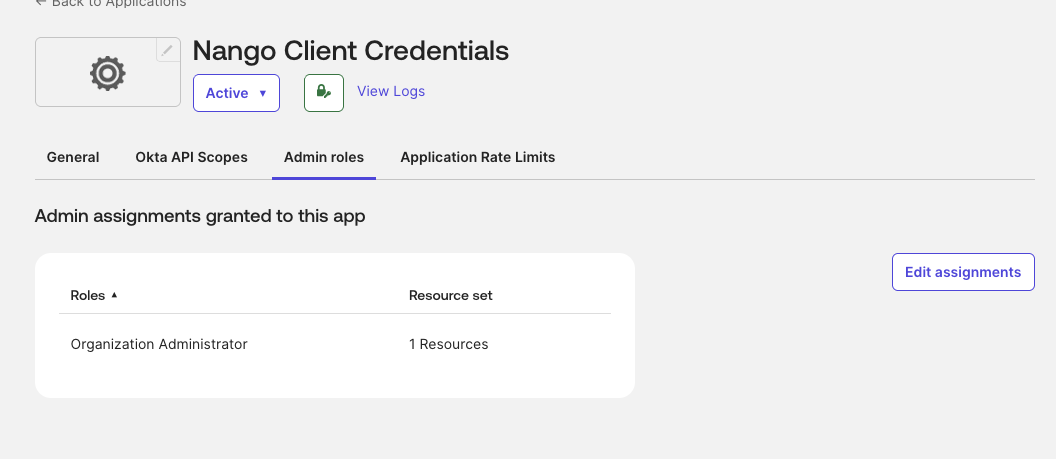
Without an admin role, API calls succeed with
200 OK but return empty results and there is no 403 error to indicate the problem.Step 6: Enter credentials in the Living Security Platform
Once you have your Client ID, Private Key (JWK), Okta Domain, and Scopes:- Open the form where you need to authenticate with Okta (Client Credentials).
- Enter your Client ID.
- Paste your Private Key (JWK) — the full JSON object from the script above (single-line or formatted).
- Enter your Okta Domain as the tenant subdomain only (e.g.,
dev-12345678). - Enter the Scopes as a space-separated list (e.g.,
okta.users.read okta.logs.read). - Submit the form, and you should be successfully authenticated.
Portions of this documentation are adapted from Nango, used under the Elastic License 2.0.