> ## Documentation Index
> Fetch the complete documentation index at: https://docs.livingsecurity.com/llms.txt
> Use this file to discover all available pages before exploring further.
# Auth0
> 將 Auth0 連接至 Living Security,以取得使用者、驗證、MFA 及管理活動的資料。
export const EgressIpAllowlistBothSets = ({system}) =>
{system} 需要兩組位址,而非一組。Living Security 會在自己的基礎架構上產生此整合的存取權杖並持續更新,因此設定流量與同步流量會從不同的網路送出。請在 {system} 中將兩組位址都加入允許清單,並持續保留——這並非僅在設定時才需要的要求。
整合同步流量——所有區域皆相同:
52.34.139.153/32, 54.69.127.183/32, 44.247.133.183/32,{' '}
52.26.211.56/32
平台流量——僅使用代管貴組織之區域所對應的那一列:
美國:98.91.60.249/32, 13.216.91.102/32
歐盟:34.246.236.210/32, 52.31.102.238/32
若僅將同步位址組加入允許清單,設定將永遠無法完成。若僅將平台位址組加入允許清單,設定雖會成功,但每次同步都會失敗。如需兩種失敗現象的說明及變更政策,請參閱{' '}
設定整合輸出 IP 位址
。
;
export const PublicIntegrationNextSteps = () => <>
相關資源
;
## 概觀
Auth0 可提供經過正規化的使用者、驗證、MFA 及管理活動資料。已審查的範例包括:
* `auth.login.failed` — 登入失敗
* `mfa.failed` — MFA 驗證挑戰失敗
* `auth.login.blocked` — 登入遭封鎖
請參閱[整合資料如何轉換為訊號](/zh-Hant/signals/data-sources)。
若要使用 Auth0(Client Credentials)進行驗證,您需要以下關鍵資訊:
1. **用戶端 ID** - 您的用戶端的唯一標識符。
2. **用戶端金鑰** - 用於驗證應用程式(用戶端)身分的機密金鑰。
3. **HostName** - 與您的 Auth0 租用戶相關聯的網域。
4. **Audience** - 權杖的目標對象,亦即您的 API。
5. **組織** - 您希望請求所關聯的組織名稱或標識符。
本指南將引導您在 Auth0 中尋找或產生這些認證資訊。
### 先決條件:
* 您必須擁有 Auth0 帳戶。
#### 步驟 1:尋找您的用戶端認證資訊
1. 登入您的 [Auth0](https://auth0.com/docs/authenticate/login) 帳戶。
2. 前往[應用程式設定](https://manage.auth0.com/?_gl=1*1shsko2*_gcl_au*MzYwMDE4ODE4LjE3NDU5OTY3NDA.*_ga*NTkyOTQ4NzA5LjE3NDU5OTY3NDE.*_ga_QKMSDV5369*MTc0NTk5Njc0MC4xLjEuMTc0NTk5OTI5My42MC4wLjA.#/applications)頁面。
3. 按一下 **Create Application** 按鈕。
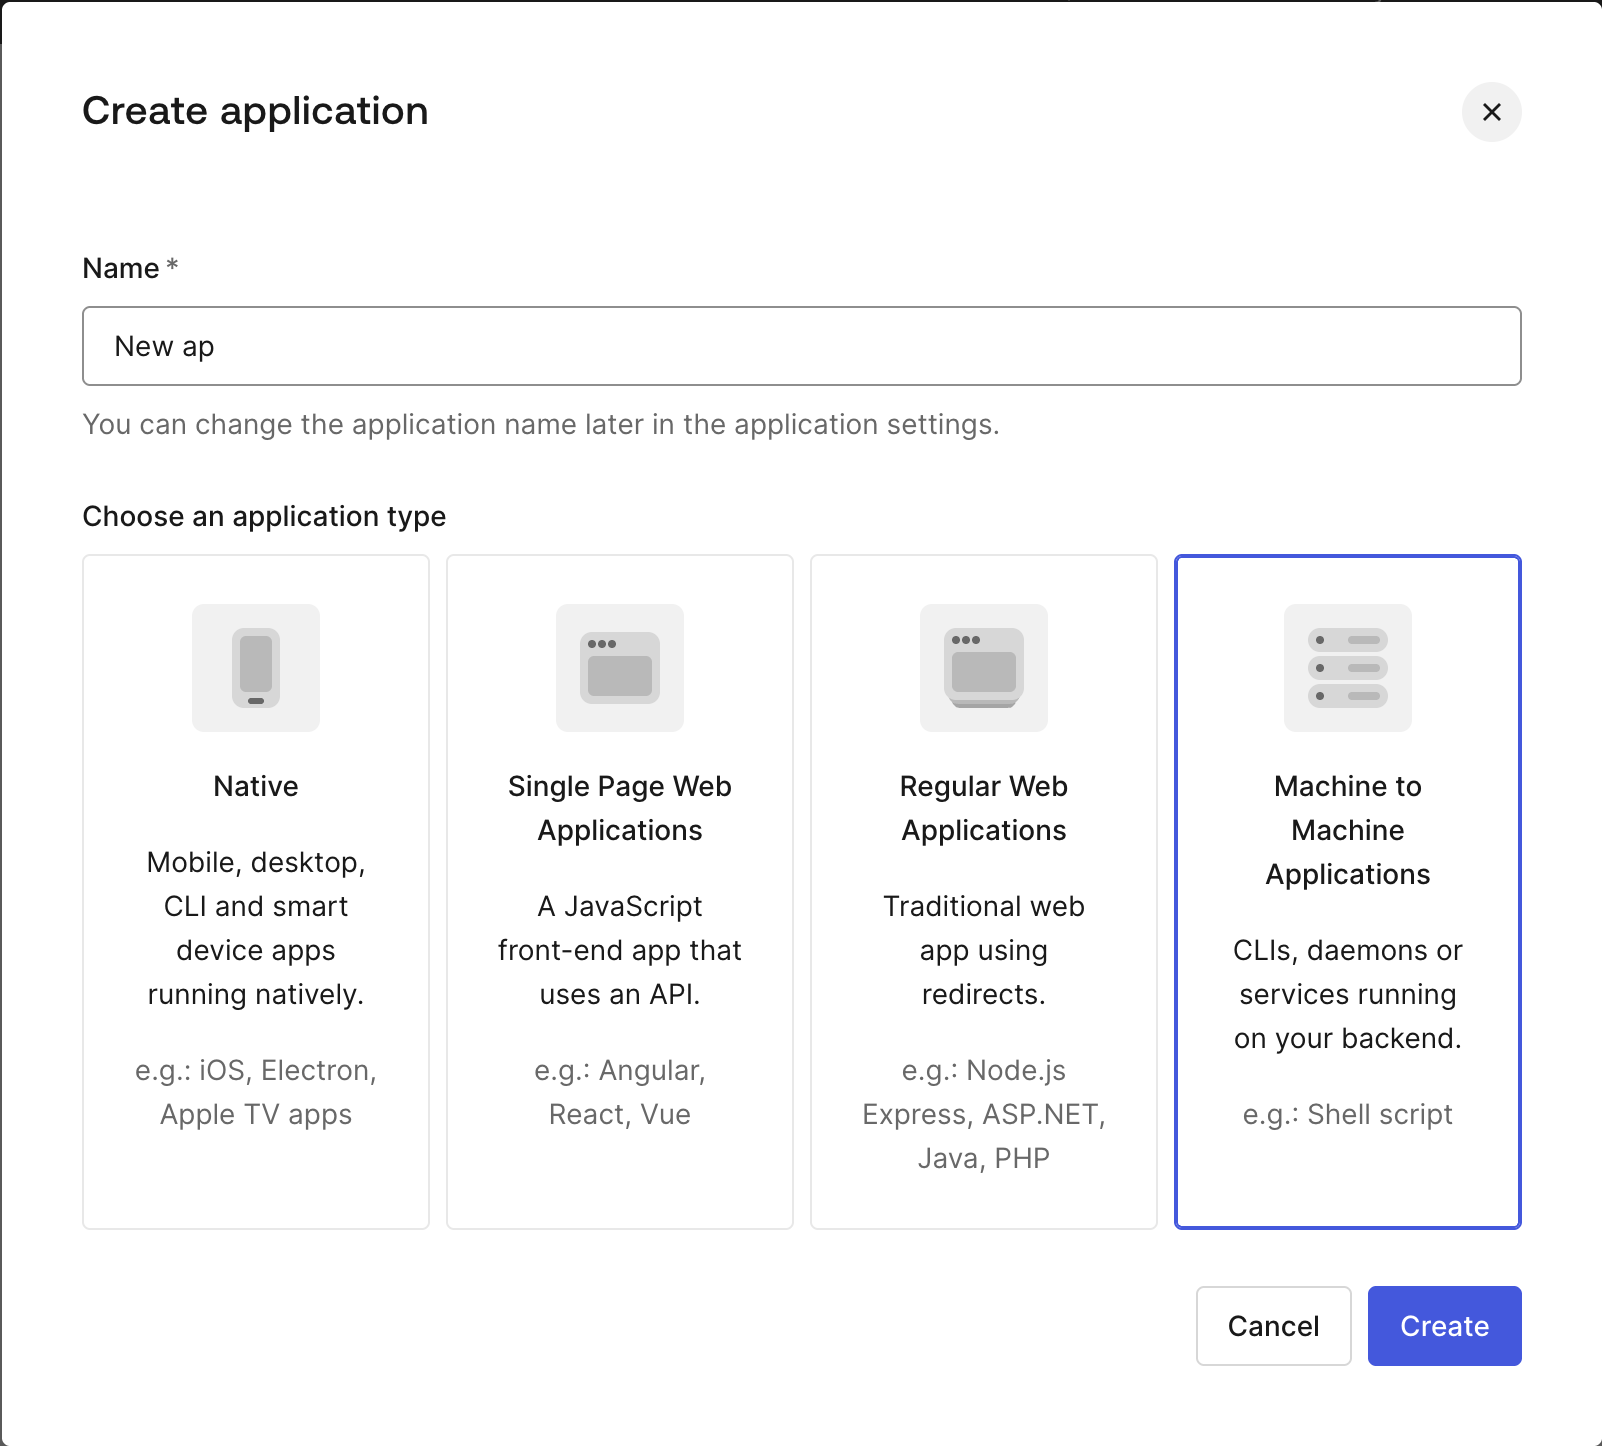
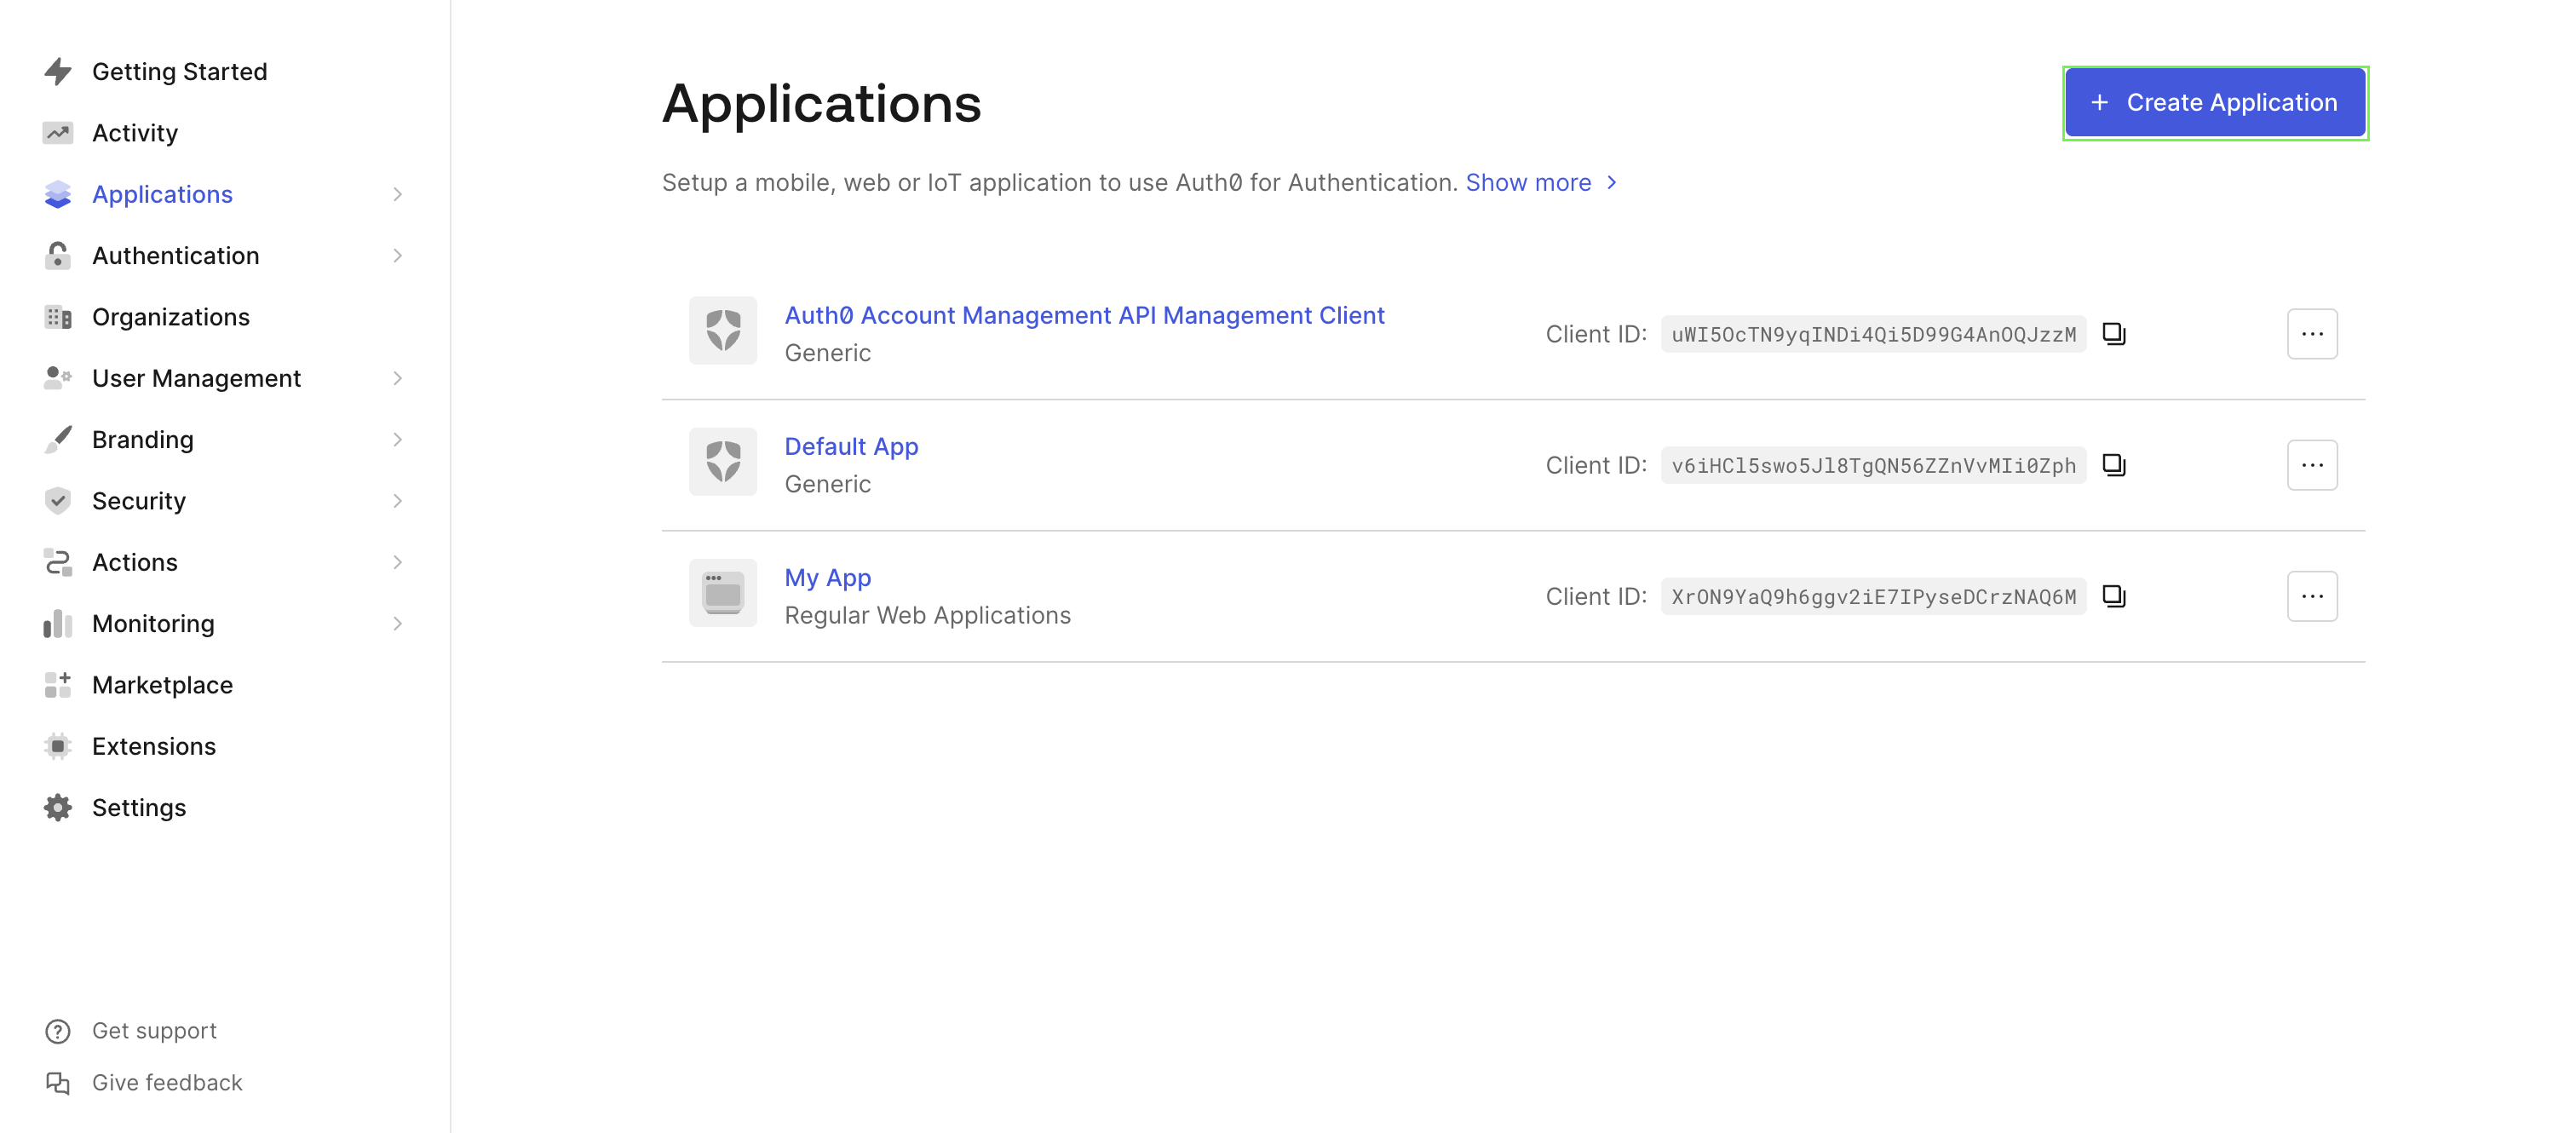 4. 為您的應用程式輸入唯一名稱,並選取 **Machine to Machine Applications**。
 5. 從下拉式選單中選取 **Auth0 Management API**,然後授予 `read:users` 和 `read:logs`。
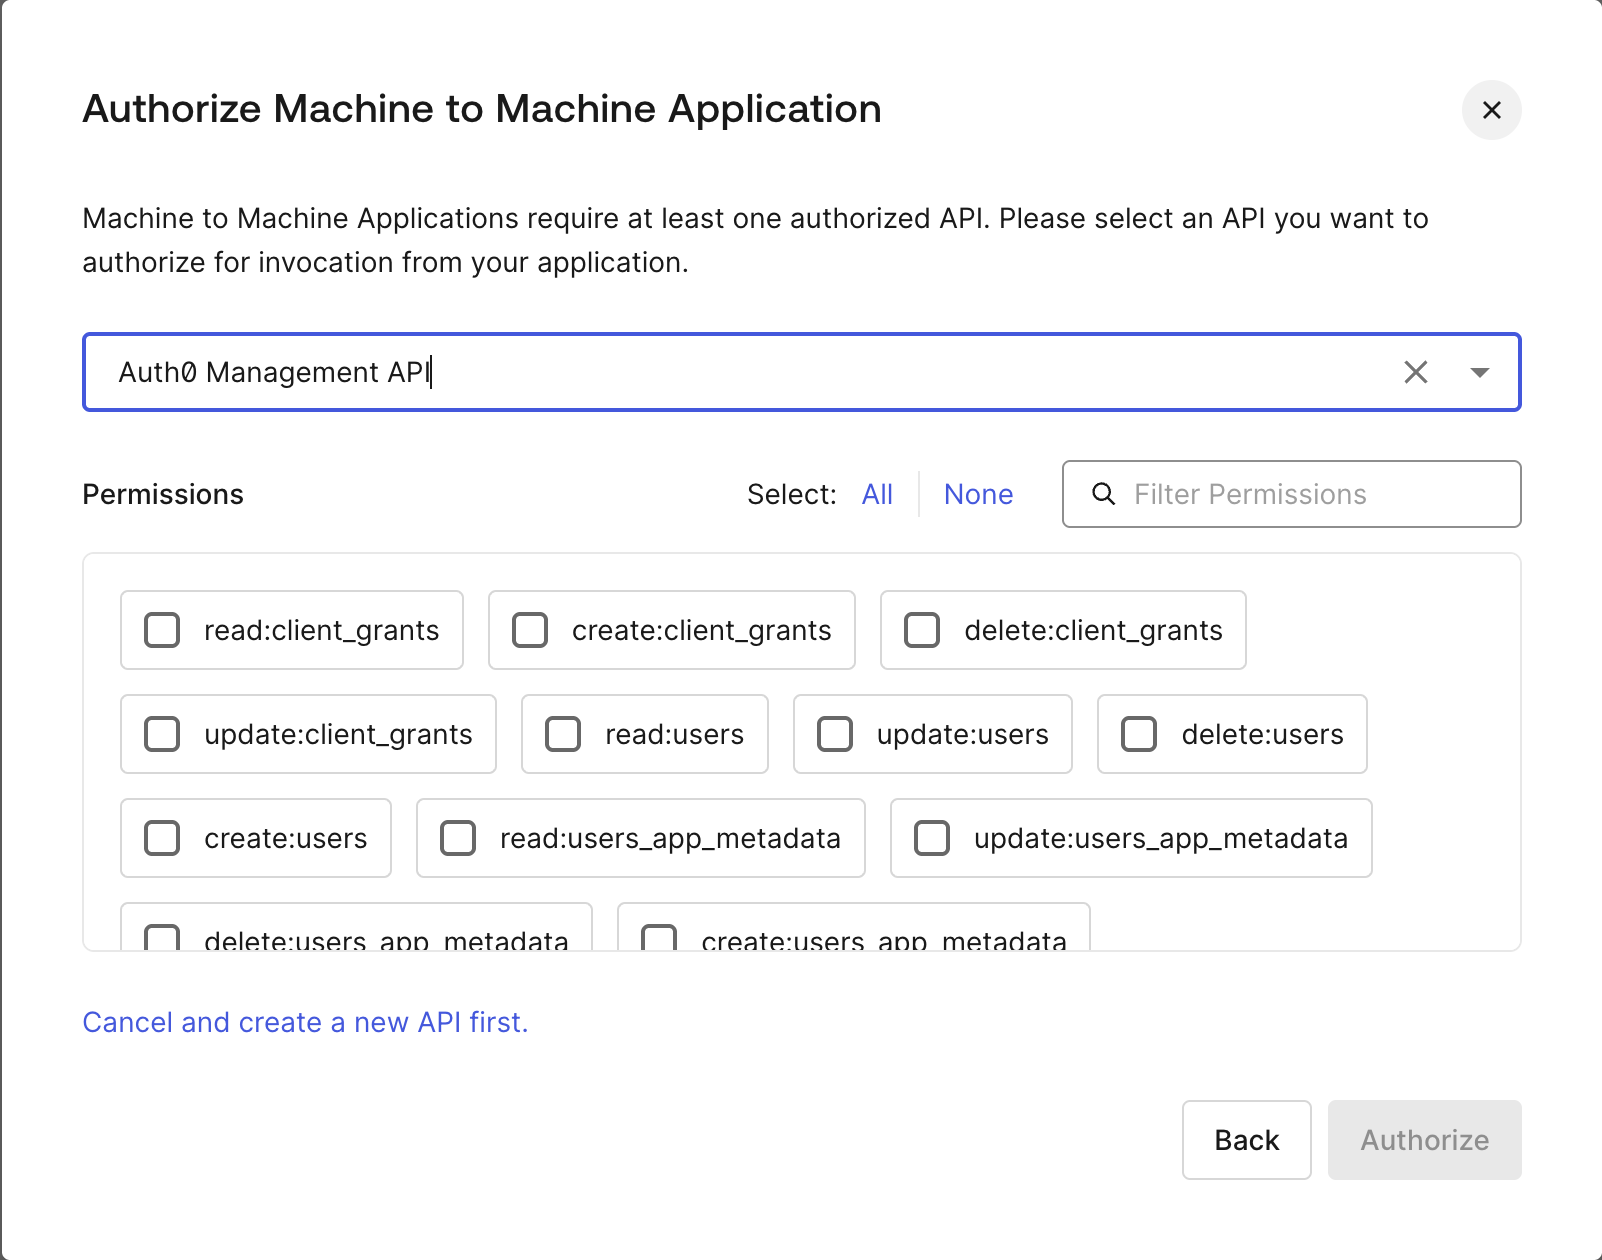 6. 按一下 **Authorize** 以建立您的新應用程式。
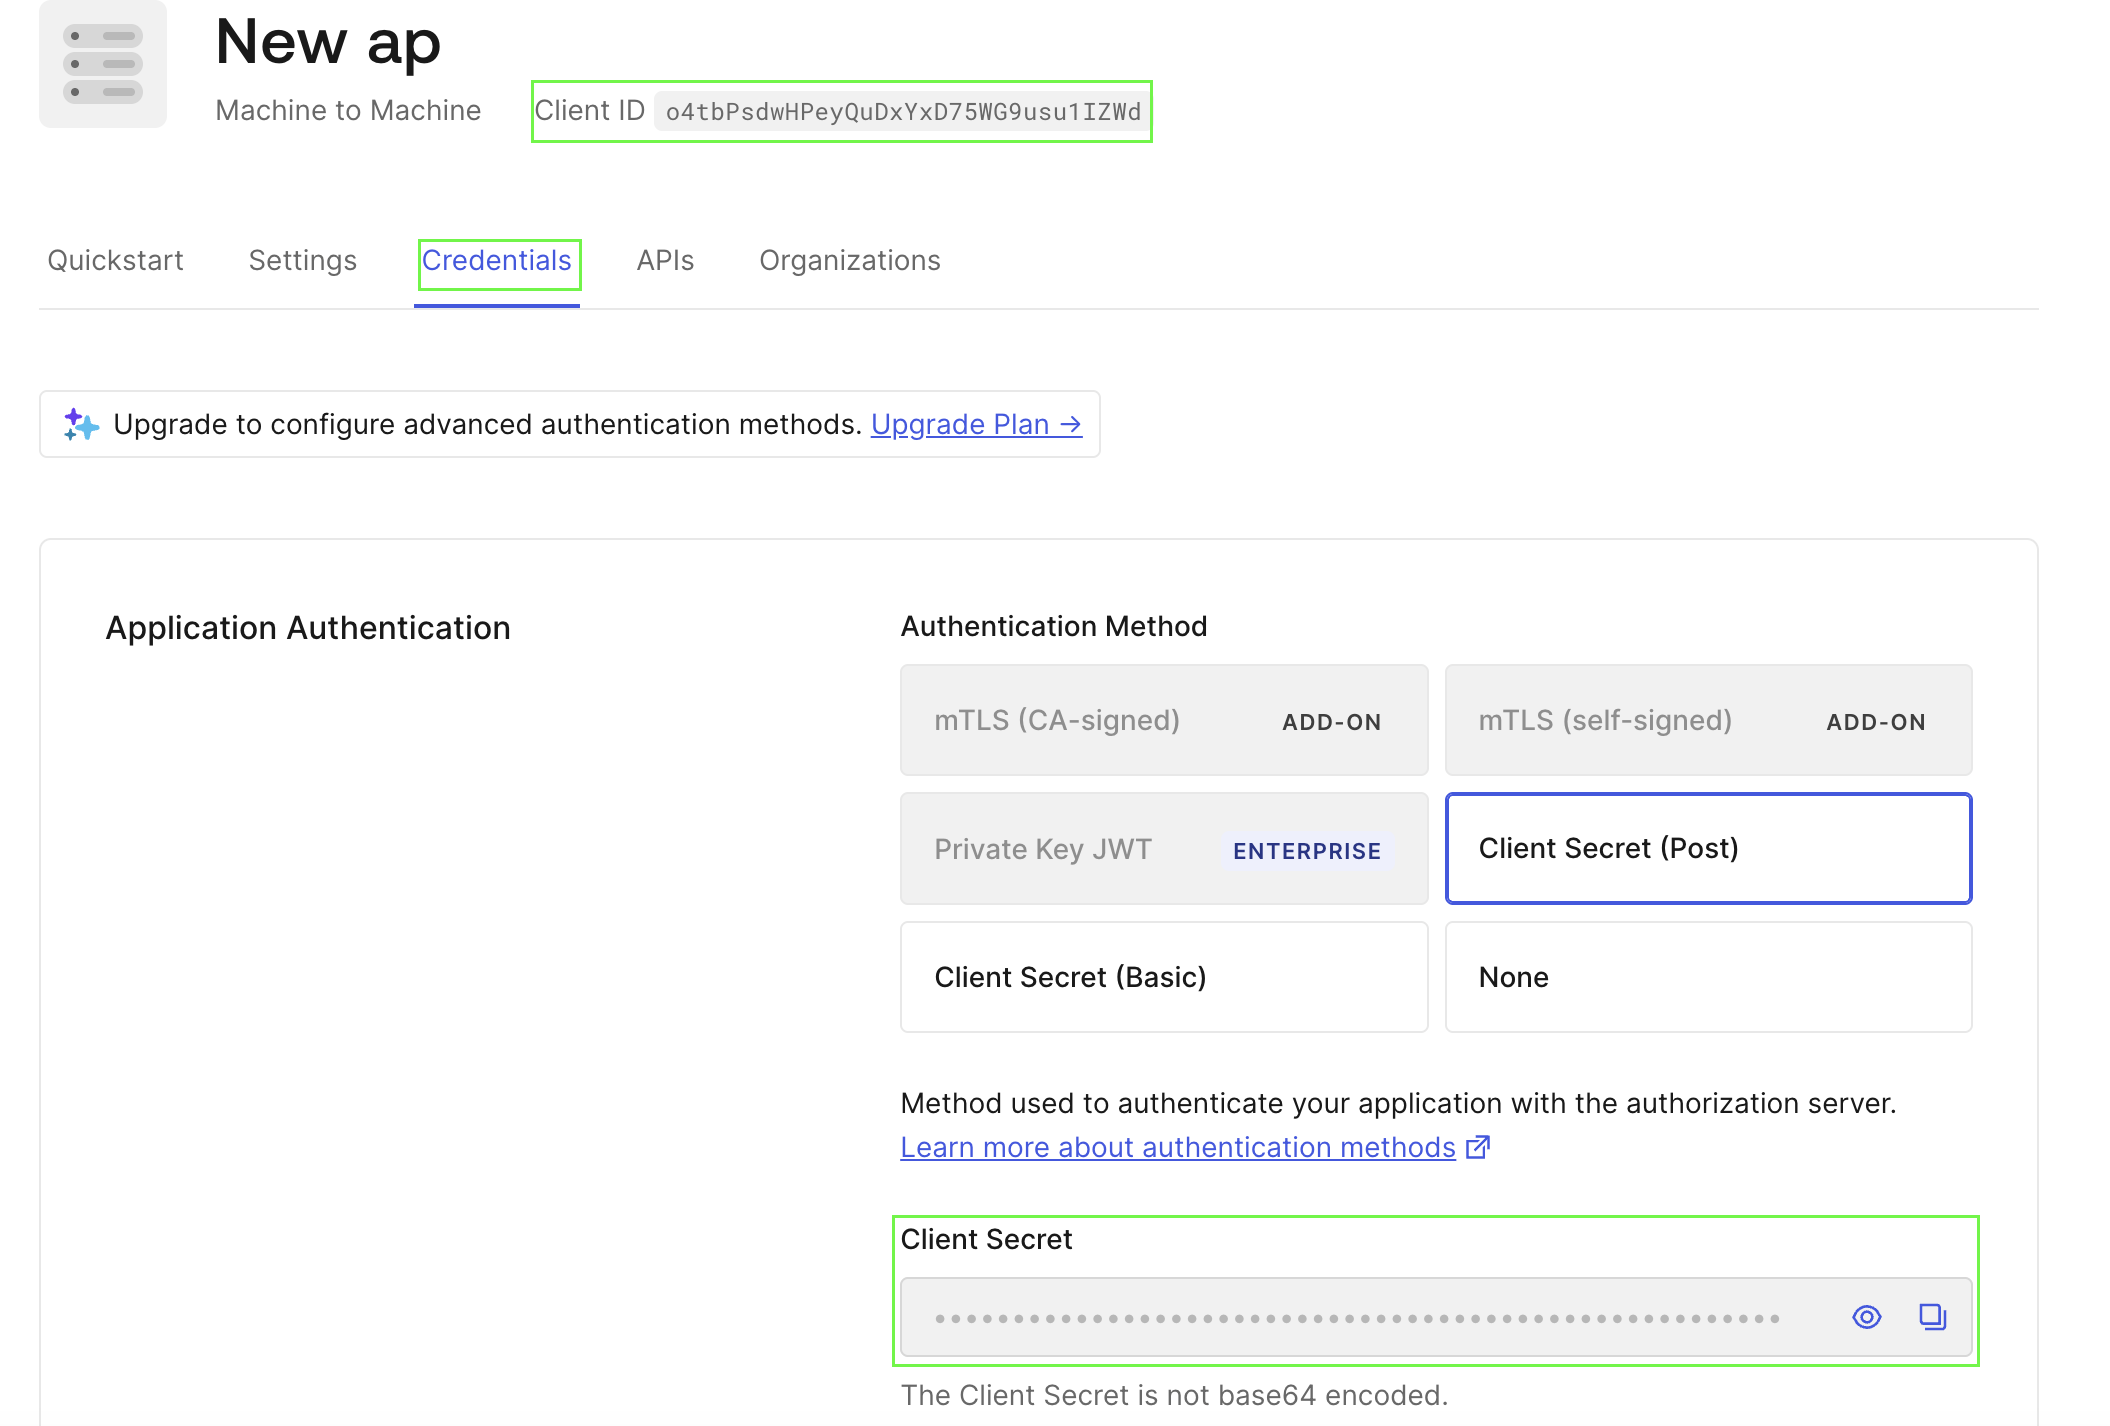
7. 在應用程式頁面中,前往 **Credentials** 區段。您的**用戶端金鑰**會顯示於此處,而**用戶端 ID** 則可在頁面頂端找到。
6. 按一下 **Authorize** 以建立您的新應用程式。
7. 在應用程式頁面中,前往 **Credentials** 區段。您的**用戶端金鑰**會顯示於此處,而**用戶端 ID** 則可在頁面頂端找到。
 #### 步驟 2:尋找您的 HostName
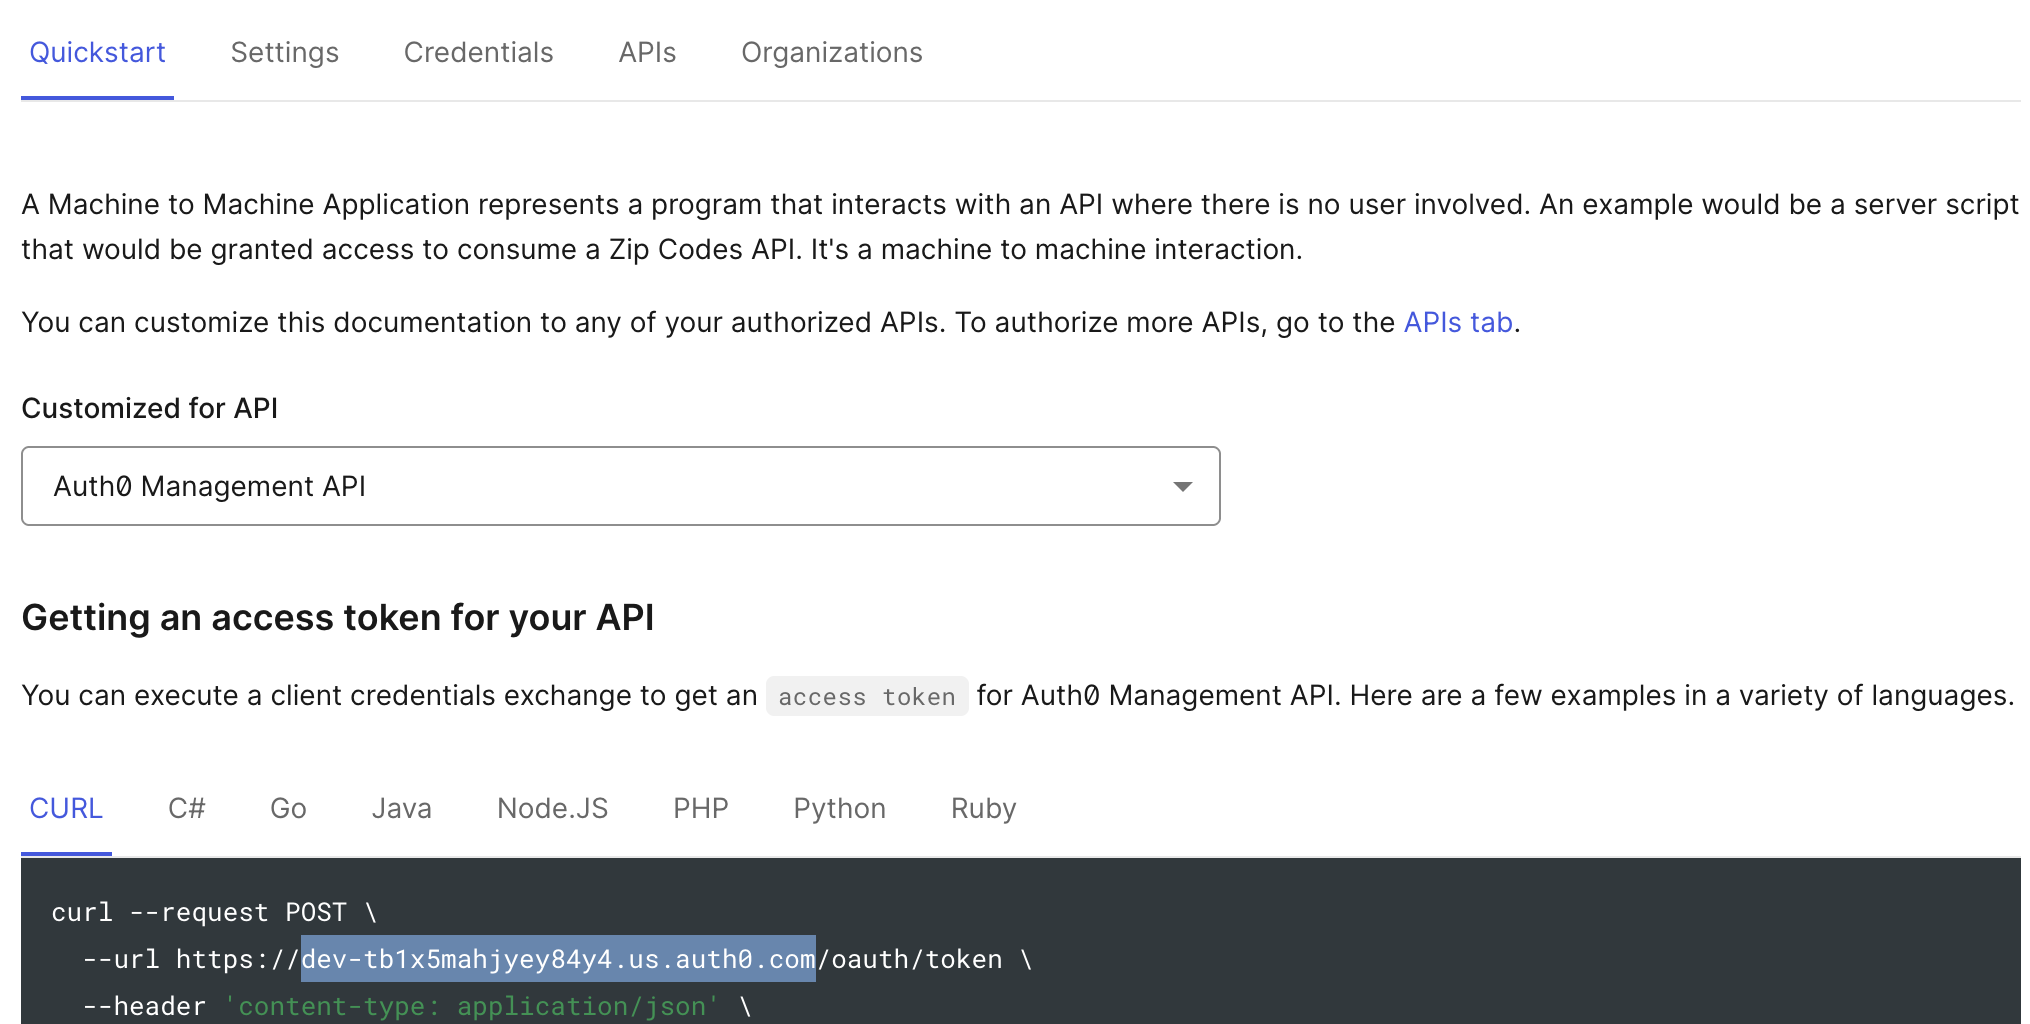
* 在您新建立之應用程式的 **Quickstart** 索引標籤中,Auth0 提供了取得存取權杖的範例請求。您的 **HostName** 是出現在 `https://` 之後、`/oauth/token` 之前的文字。
* 在下方的範例中,HostName 為 `dev-tb1x5mahjyey84y4.us.auth0.com`。
#### 步驟 2:尋找您的 HostName
* 在您新建立之應用程式的 **Quickstart** 索引標籤中,Auth0 提供了取得存取權杖的範例請求。您的 **HostName** 是出現在 `https://` 之後、`/oauth/token` 之前的文字。
* 在下方的範例中,HostName 為 `dev-tb1x5mahjyey84y4.us.auth0.com`。
 #### 步驟 3:尋找您的 Audience
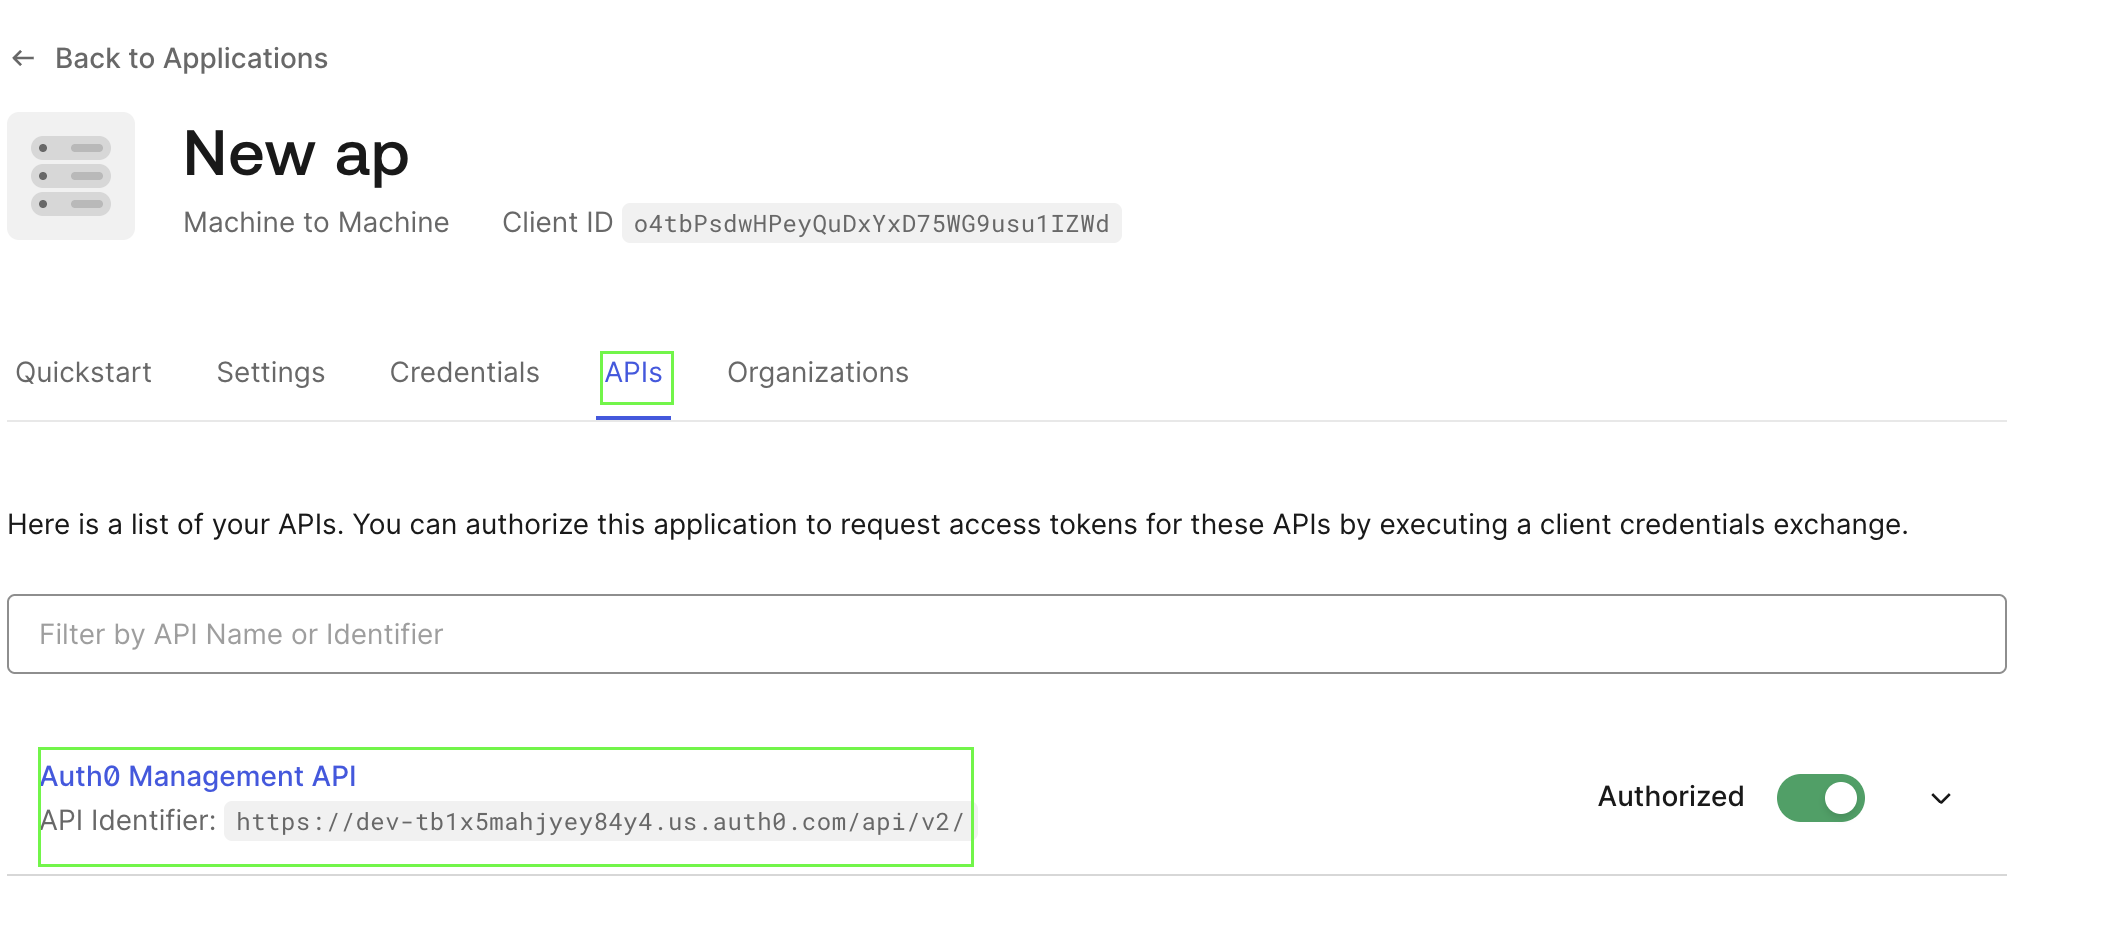
* 您可以在新建立之應用程式的 **APIs** 索引標籤下的**標識符**欄位中找到此資訊。
#### 步驟 3:尋找您的 Audience
* 您可以在新建立之應用程式的 **APIs** 索引標籤下的**標識符**欄位中找到此資訊。
 #### 步驟 4:尋找您的組織
* 此項目為選用。若您的租用戶已設定為使用**組織機構**,可從新建立之應用程式的**組織機構**頁面取得。
#### 步驟 5:在 Living Security Platform 中輸入認證資訊
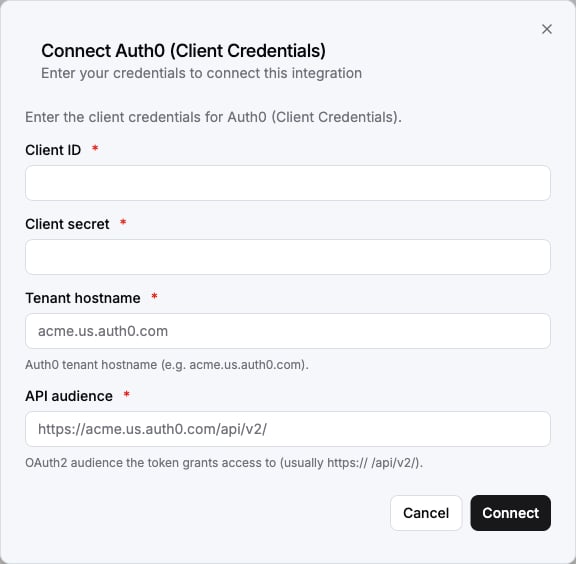
取得您的**用戶端 ID**、**用戶端金鑰**、**HostName**、**Audience** 和**組織**後:
1. 開啟需要使用 Auth0(Client Credentials)進行驗證的表單。
2. 在各自的欄位中輸入您的**用戶端 ID**、**用戶端金鑰**、**HostName**、**Audience** 和**組織**。
3. 提交表單後,即可成功完成驗證。
#### 步驟 4:尋找您的組織
* 此項目為選用。若您的租用戶已設定為使用**組織機構**,可從新建立之應用程式的**組織機構**頁面取得。
#### 步驟 5:在 Living Security Platform 中輸入認證資訊
取得您的**用戶端 ID**、**用戶端金鑰**、**HostName**、**Audience** 和**組織**後:
1. 開啟需要使用 Auth0(Client Credentials)進行驗證的表單。
2. 在各自的欄位中輸入您的**用戶端 ID**、**用戶端金鑰**、**HostName**、**Audience** 和**組織**。
3. 提交表單後,即可成功完成驗證。
 您現在已連接至 Auth0(Client Credentials)。
***
本文件的部分內容改編自 [Nango](https://nango.dev/docs/),並依據 [Elastic License 2.0](https://github.com/NangoHQ/nango?tab=License-1-ov-file#readme) 使用。
## 網路存取
除非您的 Auth0 租用戶依來源 IP 位址限制 Management API 存取,否則請略過本節。大多數租用戶並無此限制。
This documentation is built and hosted on [Mintlify](https://mintlify.com), a developer documentation platform.
您現在已連接至 Auth0(Client Credentials)。
***
本文件的部分內容改編自 [Nango](https://nango.dev/docs/),並依據 [Elastic License 2.0](https://github.com/NangoHQ/nango?tab=License-1-ov-file#readme) 使用。
## 網路存取
除非您的 Auth0 租用戶依來源 IP 位址限制 Management API 存取,否則請略過本節。大多數租用戶並無此限制。
This documentation is built and hosted on [Mintlify](https://mintlify.com), a developer documentation platform.