> ## Documentation Index
> Fetch the complete documentation index at: https://docs.livingsecurity.com/llms.txt
> Use this file to discover all available pages before exploring further.
# CrowdStrike Falcon 연동 설정
> 엔드포인트 탐지, 멀웨어 발견 사항, 호스트 및 인시던트 정보를 가져오기 위해 CrowdStrike Falcon을 Living Security에 연결합니다.
export const EgressIpAllowlistBothSets = ({system}) =>
{system}에는 하나가 아닌 두 세트의 주소가 필요합니다. Living Security는 자체 인프라에서 이 연동의 액세스 토큰을 발급하고 지속적으로 갱신하므로, 설정 트래픽과 동기화 트래픽은 서로 다른 네트워크에서 발생합니다. {system}에서 두 세트를 모두 허용 목록에 추가하고 계속 유지하십시오. 이는 설정 시에만 필요한 요구 사항이 아닙니다.
연동 동기화 트래픽 — 모든 리전에서 동일합니다.
52.34.139.153/32, 54.69.127.183/32, 44.247.133.183/32,{' '}
52.26.211.56/32
플랫폼 트래픽 — 조직이 호스팅되는 리전의 행만 사용하십시오.
미국: 98.91.60.249/32, 13.216.91.102/32
유럽 연합: 34.246.236.210/32, 52.31.102.238/32
동기화 세트만 허용 목록에 추가하면 설정이 완료되지 않습니다. 플랫폼 세트만 허용 목록에 추가하면 설정은 성공하지만 모든 동기화가 실패합니다. 두 가지 실패 유형과 변경 정책은{' '}
연동 송신 IP 주소 구성
{' '}
문서를 참조하십시오.
;
export const PublicIntegrationNextSteps = () => <>
관련 자료
;
# 개요
CrowdStrike Falcon은 정규화된 엔드포인트 탐지, 멀웨어 발견 사항, 호스트 컨텍스트 및 인시던트 활동을 제공할 수 있습니다. 검토된 예시는 다음과 같습니다.
* `detection.confirmed` — 탐지 확인됨
* `malware.detected` — 엔드포인트 멀웨어 탐지
* `incident.opened` — 인시던트 생성됨
[연동 데이터가 신호가 되는 방식](/ko/signals/data-sources)을 참조하십시오.
CrowdStrike로 인증하려면 다음 정보가 필요합니다.
1. **클라이언트 ID** - API 클라이언트의 고유 식별자입니다.
2. **클라이언트 비밀번호** - 애플리케이션(클라이언트)의 ID를 인증하는 데 사용되는 기밀 키입니다.
3. **기본 URL** - CrowdStrike 클라우드 환경의 API 기본 URL입니다.
이 가이드는 CrowdStrike에서 이러한 자격 증명을 얻는 방법을 안내합니다.
### 사전 요구 사항:
* CrowdStrike Falcon 콘솔에 접근할 수 있어야 합니다.
### 지침:
#### 1단계: API 클라이언트 생성
1. [CrowdStrike Falcon 콘솔](https://falcon.crowdstrike.com/)에 로그인합니다.
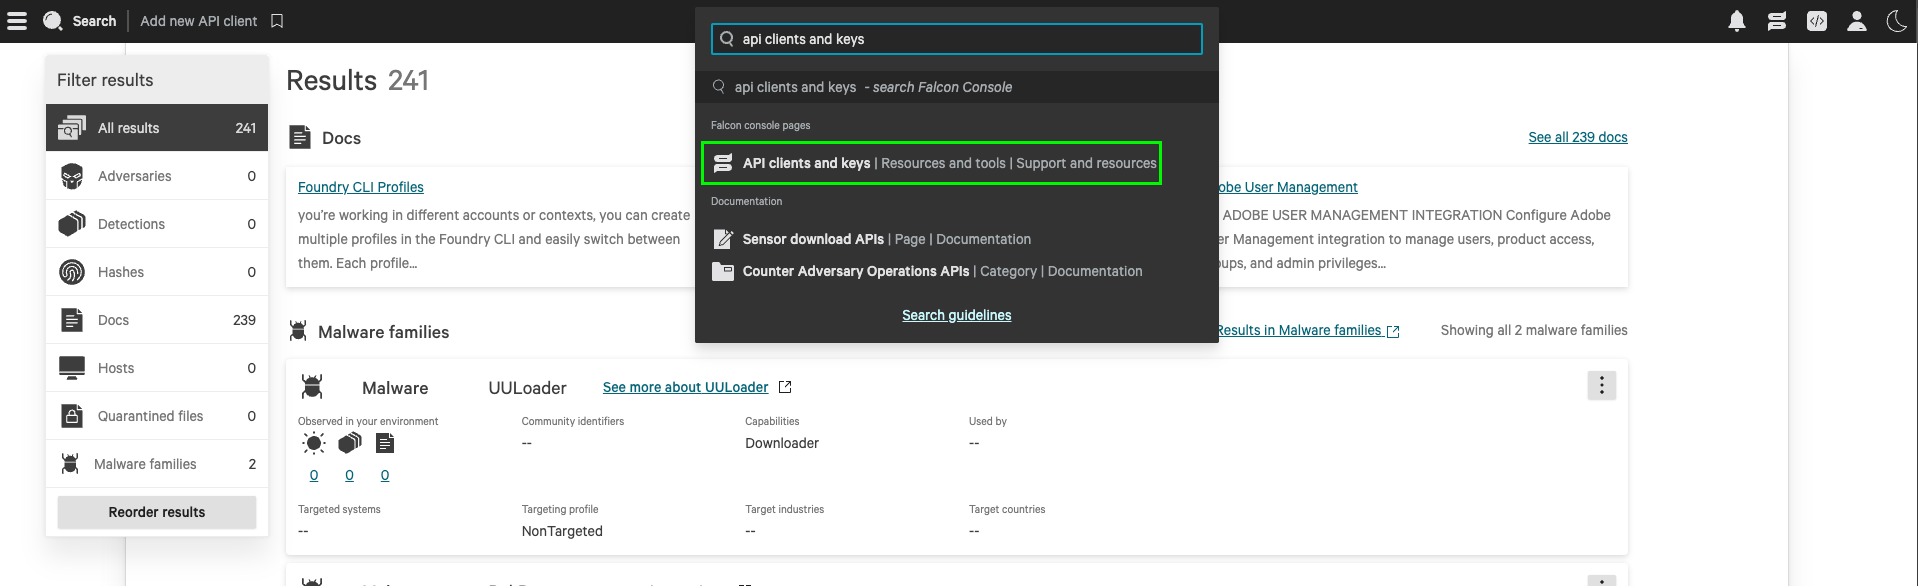
2. 검색 도구 모음에서 **API Clients and Keys**를 검색한 후 선택합니다.
 3. **Create API Client**를 클릭합니다.
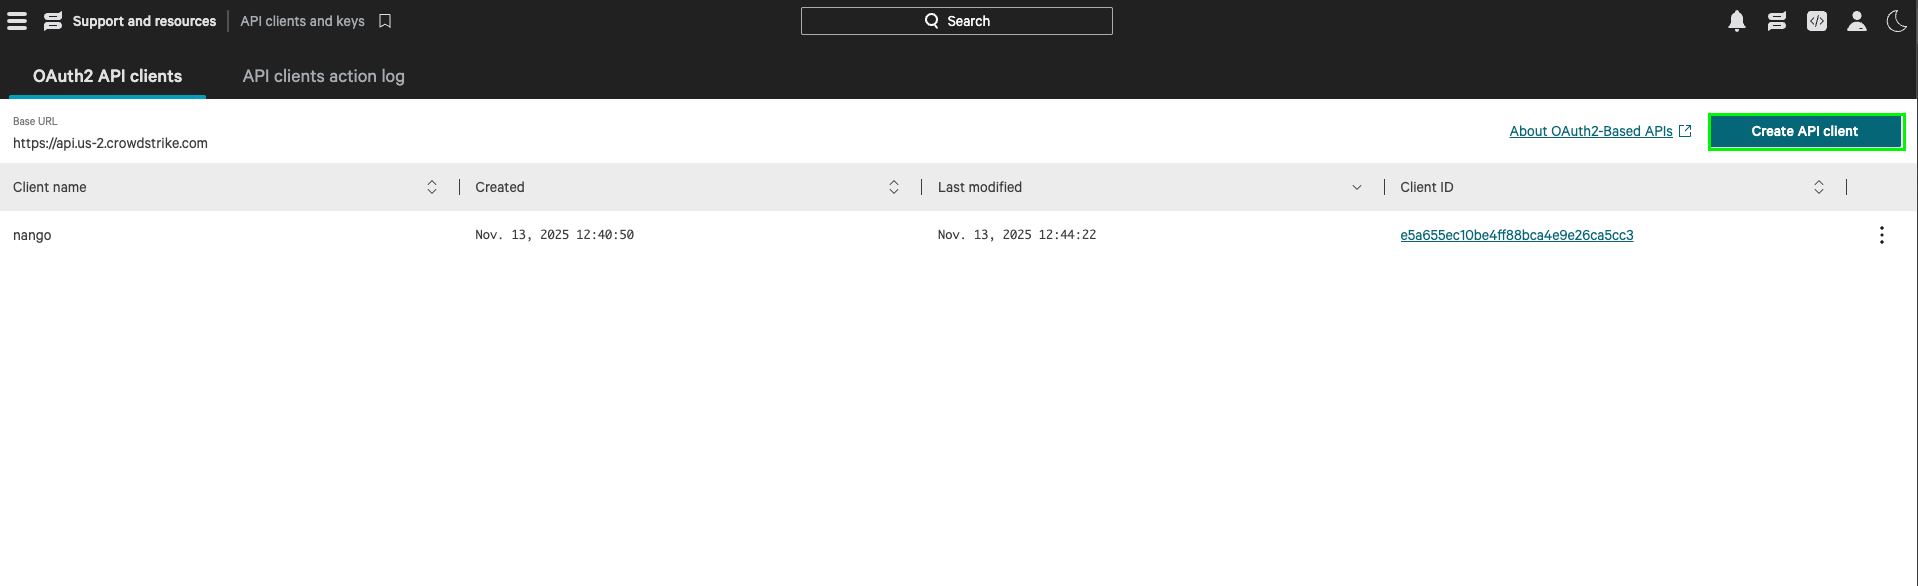 4. 이름과 설명을 입력하고 **Alerts: Read** 및 **Hosts: Read** 범위를 선택한 다음 **생성**을 클릭합니다.
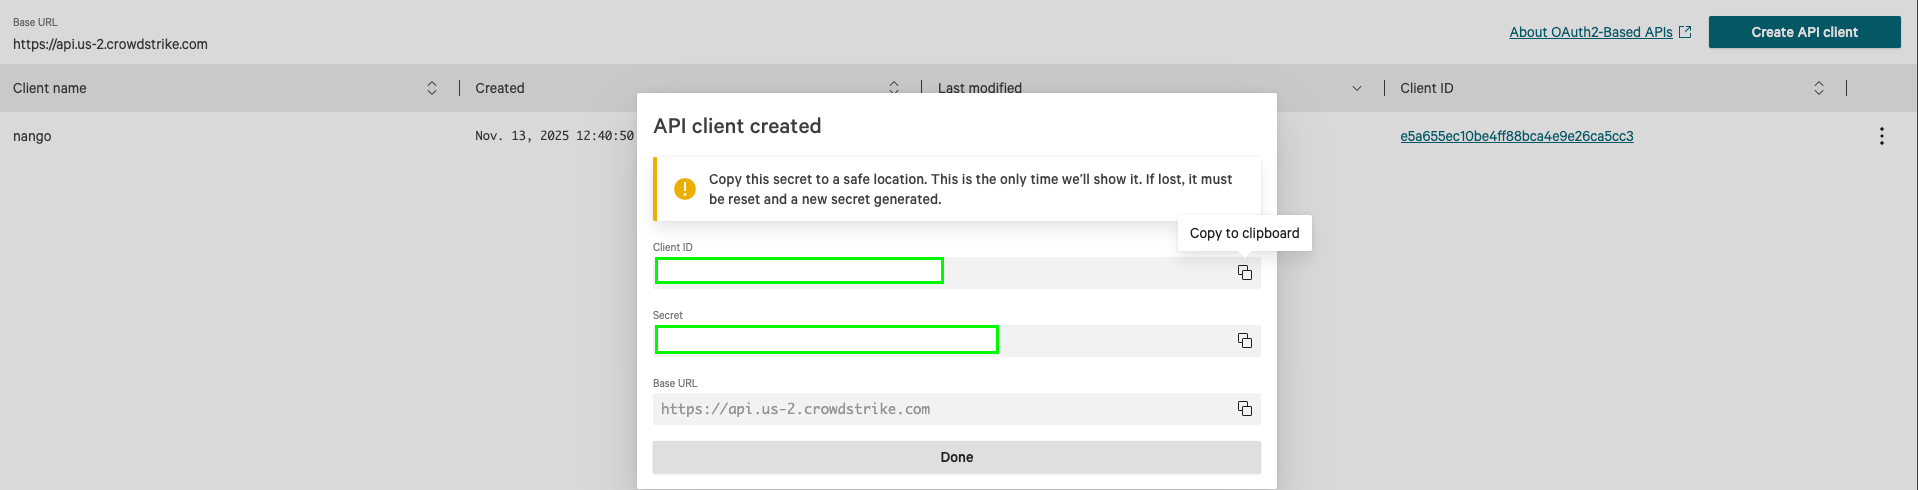
5. **클라이언트 ID**, **클라이언트 비밀번호**, **기본 URL**이 표시됩니다. **기본 URL**은 `https://` 접두사를 제외한 도메인 부분(예: `api.crowdstrike.com`)입니다.
4. 이름과 설명을 입력하고 **Alerts: Read** 및 **Hosts: Read** 범위를 선택한 다음 **생성**을 클릭합니다.
5. **클라이언트 ID**, **클라이언트 비밀번호**, **기본 URL**이 표시됩니다. **기본 URL**은 `https://` 접두사를 제외한 도메인 부분(예: `api.crowdstrike.com`)입니다.
 #### 2단계: Living Security Platform에 자격 증명 입력
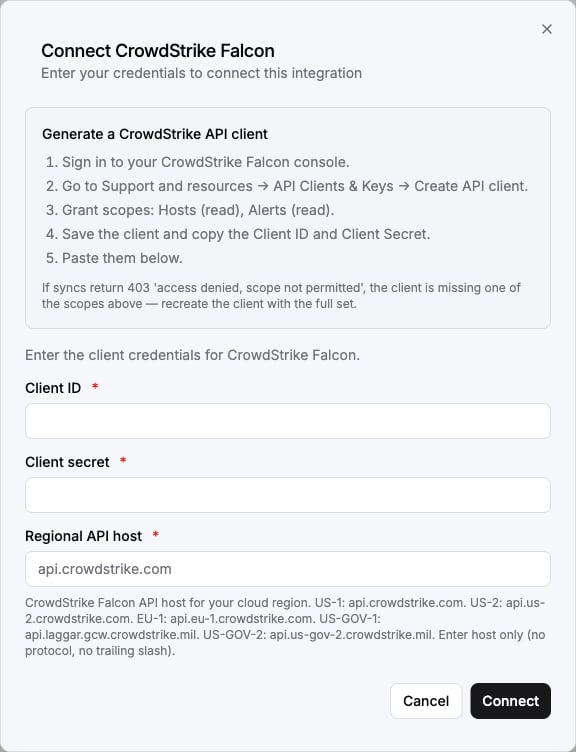
**클라이언트 ID**, **클라이언트 비밀번호**, **기본 URL**을 확인했다면 다음을 진행합니다.
1. CrowdStrike로 인증해야 하는 양식을 엽니다.
2. 해당 필드에 **기본 URL**, **클라이언트 ID**, **클라이언트 비밀번호**를 각각 입력합니다.
3. 양식을 제출하면 인증이 완료됩니다.
#### 2단계: Living Security Platform에 자격 증명 입력
**클라이언트 ID**, **클라이언트 비밀번호**, **기본 URL**을 확인했다면 다음을 진행합니다.
1. CrowdStrike로 인증해야 하는 양식을 엽니다.
2. 해당 필드에 **기본 URL**, **클라이언트 ID**, **클라이언트 비밀번호**를 각각 입력합니다.
3. 양식을 제출하면 인증이 완료됩니다.
 이제 CrowdStrike에 연결되었습니다.
***
이 문서의 일부는 [Elastic License 2.0](https://github.com/NangoHQ/nango?tab=License-1-ov-file#readme)에 따라 사용이 허가된 [Nango](https://nango.dev/docs/) 문서를 바탕으로 수정되었습니다.
## 네트워크 접근
Falcon 테넌트에서 소스 IP 주소를 기준으로 API 접근을 제한하는 경우가 아니라면 이 섹션은 건너뛰어도 됩니다. 대부분의 테넌트는 해당하지 않습니다.
This documentation is built and hosted on [Mintlify](https://mintlify.com), a developer documentation platform.
이제 CrowdStrike에 연결되었습니다.
***
이 문서의 일부는 [Elastic License 2.0](https://github.com/NangoHQ/nango?tab=License-1-ov-file#readme)에 따라 사용이 허가된 [Nango](https://nango.dev/docs/) 문서를 바탕으로 수정되었습니다.
## 네트워크 접근
Falcon 테넌트에서 소스 IP 주소를 기준으로 API 접근을 제한하는 경우가 아니라면 이 섹션은 건너뛰어도 됩니다. 대부분의 테넌트는 해당하지 않습니다.
This documentation is built and hosted on [Mintlify](https://mintlify.com), a developer documentation platform.