> ## Documentation Index
> Fetch the complete documentation index at: https://docs.livingsecurity.com/llms.txt
> Use this file to discover all available pages before exploring further.
# Abnormal Security 연동 설정
> Abnormal Security를 연결하여 이메일 위협 및 피싱 캠페인 데이터를 가져옵니다.
export const PublicIntegrationNextSteps = () => <>
관련 자료
;
export const EgressIpSafelist = ({system}) =>
Living Security 동기화 송신 IP 주소 4개를 모두 {system}의 허용 목록에 추가하십시오. {system}에서 CIDR 표기법을 요구하는 경우 각 주소를 /32를 붙인 단일 호스트로 입력하십시오.
52.34.139.153/32, 54.69.127.183/32, 44.247.133.183/32,{' '}
52.26.211.56/32
트래픽은 4개의 주소 중 어느 것에서든 발생할 수 있으므로 일부만 허용 목록에 추가하면 간헐적으로 동기화 오류가 발생합니다. 이 4개의 주소는 모든 Living Security 리전에서 동일합니다. 전체 목록, 변경 정책 및 문제 해결 방법은{' '}
연동 송신 IP 주소 구성
{' '}
문서를 참조하십시오.
;
export const ConnectInPlatform = ({tile, children}) =>
Living Security 액세스 권한을 보유한 담당자(프로그램 소유자 또는 초대된 경우 시스템
관리자(위임된 설정))가 완료합니다.
-
설정 → 통합 → 카탈로그로 이동하여{' '}
{tile} 타일을 찾은 다음 연결을 클릭합니다.
-
아래 필드를 입력한 다음 연결을 클릭합니다.
{children}
;
export const SystemAdminBanner = ({system, recommendDelegated}) =>
이 가이드는 {system} 관리자를 위한 문서입니다. {system} 내에서 API
자격 증명을 생성하는 방법을 다루며, 이 작업에는 Living Security Platform이 아닌 {system}에 대한
관리자 권한이 필요합니다.
Living Security 프로그램 소유자이면서 {system}을(를) 관리하지 않는 경우,
이 페이지를 {system}을(를) 관리하는 담당자에게 전달하십시오. 담당자가 A부를 완료한 후 자격 증명을 귀하에게 전달하거나
(플랫폼에 초대한 경우에는 담당자가 직접 입력할 수도 있습니다).
{recommendDelegated && <>
{' '}설정 과정에서 민감한 키 정보가 생성되므로, 시크릿이 귀하에게 전달되지 않도록{' '}
위임 설정 방식을 권장합니다.
}
;
## 이 연동이 제공하는 데이터
Abnormal Security는 정규화된 이메일 위협, 전달, 차단 및 직원 신고 활동을 제공할 수 있습니다. 검토된 예시는 다음과 같습니다.
* `phishing.real.blocked` — 전달되기 전에 차단된 실제 피싱
* `phishing.real.delivered` — 받은 편지함으로 전달된 실제 피싱
* `phishing.real.reported` — 실제 피싱 이메일을 신고함
이러한 예시는 Living Security가 사용할 수 있는 정규화된 활동의 유형을 보여 줍니다. [연동 데이터가 신호가 되는 방식](/ko/signals/data-sources)을 참조하십시오.
## Living Security에 필요한 정보
| 자격 증명 | 설명 |
| - | - |
| **API 키** | Abnormal Portal에서 생성한 REST API 베어러 토큰 |
| **지역 API 호스트** | 사용 중인 Abnormal Security 환경의 호스트 이름 |
**범위:** `Abuse Campaigns (AI Security Mailbox)` 및 `Threats`에 대한 **읽기** 권한이 있는 Custom Access
**필요한 역할:** Abnormal Security의 **Security Admin** 또는 **Super Admin**
### 사전 요구 사항
* API 토큰을 생성하고 관리하려면 Abnormal Security에서 **Security Admin** 또는 **Super Admin** 권한이 있어야 합니다.
***
## 파트 A — Abnormal Security에서 진행
*Abnormal Security 관리자가 다음 단계를 완료합니다.*
1. Abnormal Security 포털에 로그인합니다.
2. 왼쪽 탐색 메뉴에서 **설정**을 클릭한 다음 **통합**을 선택합니다.
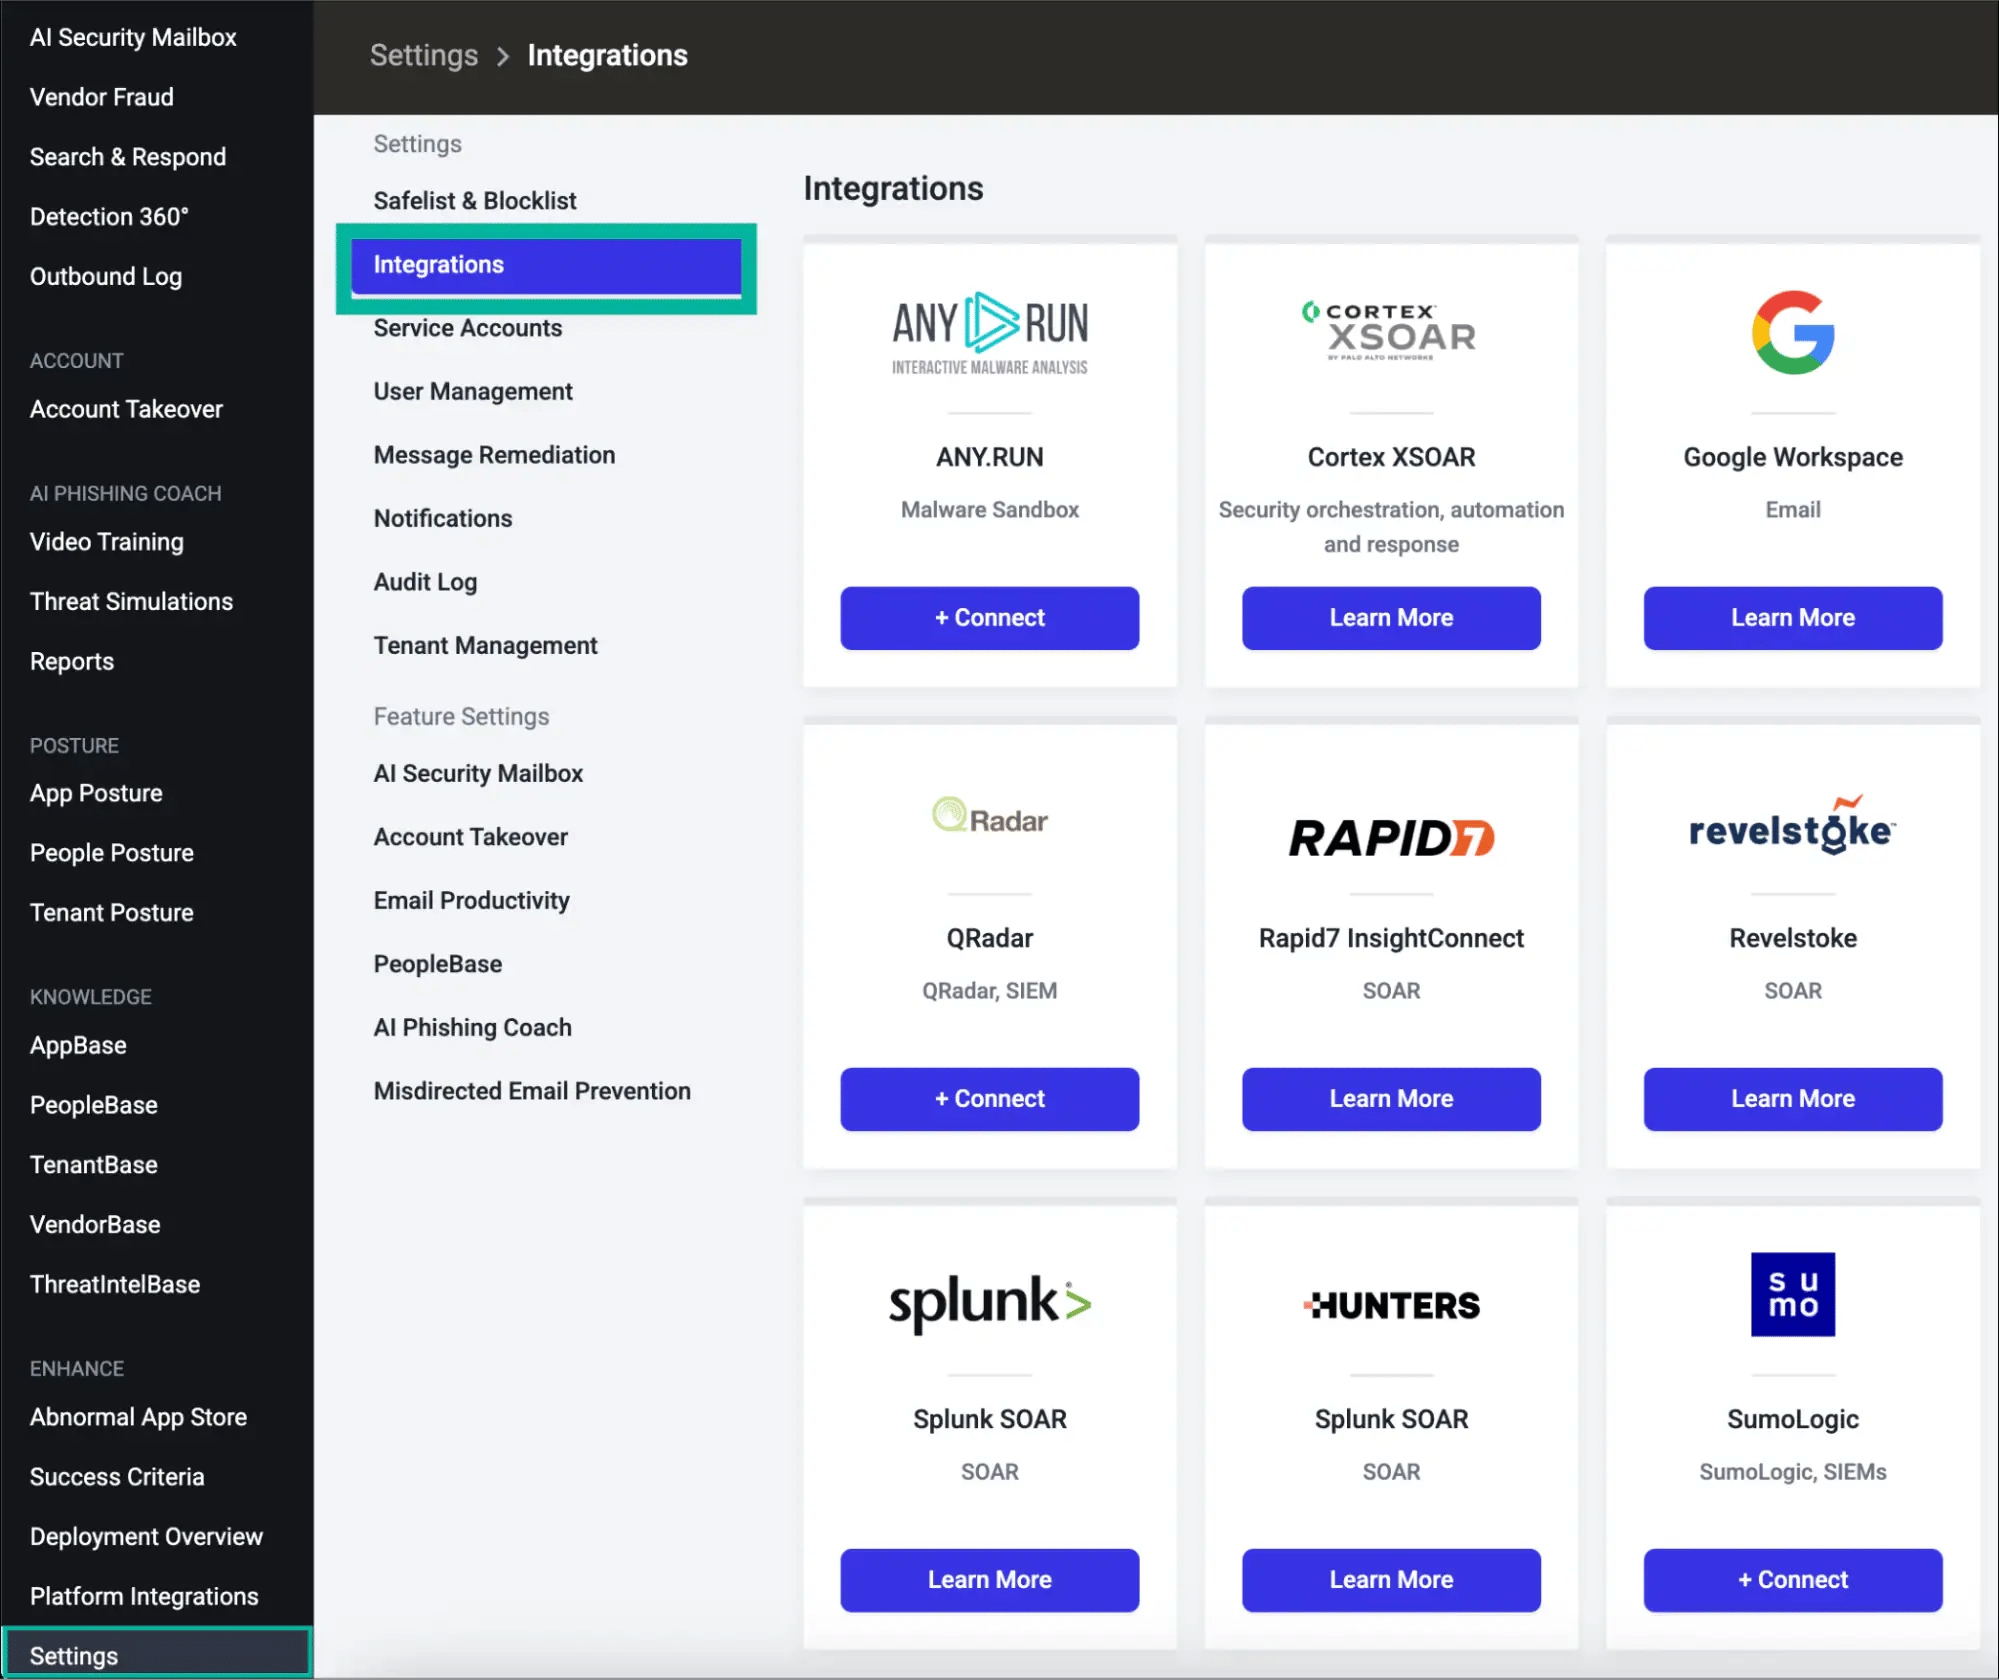 3. 통합 페이지 하단에 있는 **API Token Management** 섹션까지 아래로 스크롤합니다.
4. **+ Create New Token**을 클릭합니다.
3. 통합 페이지 하단에 있는 **API Token Management** 섹션까지 아래로 스크롤합니다.
4. **+ Create New Token**을 클릭합니다.
 통합 유형으로 **REST API**를 선택한 다음 **다음**을 클릭합니다.
토큰 범위를 선택한 다음 **다음**을 클릭합니다.
* **고객 (현재 및 향후 모든 테넌트)** — Abnormal 계정에서 여러 테넌트를 관리하는 경우 사용합니다. 이 토큰은 현재 및 향후 모든 테넌트를 자동으로 포함합니다.
* **Tenant (Single Tenant)** — 토큰을 특정 테넌트 하나로 제한하려는 경우 사용합니다.
Abnormal 테넌트가 하나인 대부분의 조직에서는 어느 옵션을 선택해도 됩니다. 확실하지 않다면 **고객**을 선택하십시오.
**Custom Access**를 선택하고 두 엔드포인트 그룹 모두에 대해 **읽기**를 활성화합니다.
| 엔드포인트 그룹 | 필요한 액세스 수준 |
| - | - |
| **Abuse Campaigns (AI Security Mailbox)** | 읽기 |
| **Threats** | 읽기 |
그런 다음 **다음**을 클릭합니다.
**읽기** 액세스는 민감하지 않은 위협 및 캠페인 데이터를 반환합니다. **Read Sensitive**는 추가로 PII, 첨부 파일 및 직원 데이터를 노출합니다. **쓰기**는 조치 요청을 제출합니다. 사용 사례에서 특별히 더 많은 권한이 필요하지 않다면 **읽기**만 부여하십시오.
다음 필드를 입력합니다.
* **Token Name** — 알아보기 쉬운 이름(예: `Living Security Platform`)
* **설명** — 선택 사항인 부가 정보(예: `Read access for Living Security HRM platform`)
* **Token Expiry** — 교체 정책에 맞게 **90일**, **180일** 또는 **365일**을 선택합니다. 토큰이 만료되기 전에 교체할 수 있도록 캘린더 알림을 설정하십시오.
* **IP Safelist** — Living Security 송신 IP 범위를 항목당 하나씩 입력합니다. 각 항목을 입력한 후 **추가**를 클릭합니다.
**IP 허용 목록은 필수입니다.** Abnormal Security는 허용 목록에 없는 주소에서 오는 모든 API 요청을 거부합니다. 연결 대화 상자에서는 연결이 성공하지만, 올바른 IP가 허용 목록에 추가될 때까지 데이터 동기화는 `401 Unauthorized` 오류로 실패합니다.
그런 다음 **다음**을 클릭합니다.
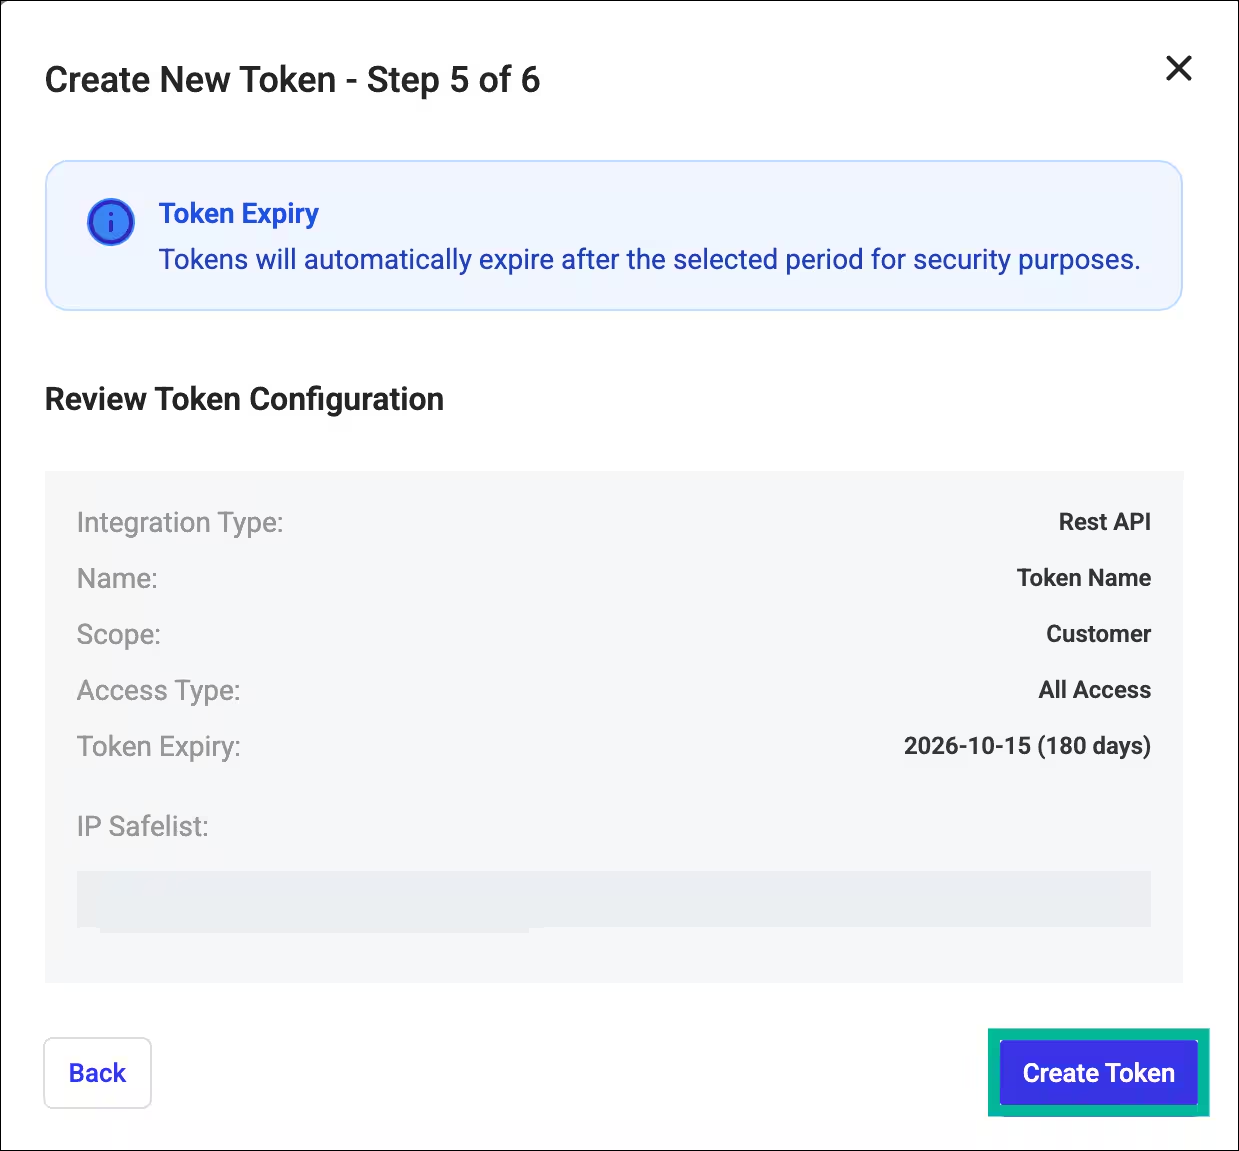
토큰 구성 요약을 검토한 다음 **Create Token**을 클릭합니다.
통합 유형으로 **REST API**를 선택한 다음 **다음**을 클릭합니다.
토큰 범위를 선택한 다음 **다음**을 클릭합니다.
* **고객 (현재 및 향후 모든 테넌트)** — Abnormal 계정에서 여러 테넌트를 관리하는 경우 사용합니다. 이 토큰은 현재 및 향후 모든 테넌트를 자동으로 포함합니다.
* **Tenant (Single Tenant)** — 토큰을 특정 테넌트 하나로 제한하려는 경우 사용합니다.
Abnormal 테넌트가 하나인 대부분의 조직에서는 어느 옵션을 선택해도 됩니다. 확실하지 않다면 **고객**을 선택하십시오.
**Custom Access**를 선택하고 두 엔드포인트 그룹 모두에 대해 **읽기**를 활성화합니다.
| 엔드포인트 그룹 | 필요한 액세스 수준 |
| - | - |
| **Abuse Campaigns (AI Security Mailbox)** | 읽기 |
| **Threats** | 읽기 |
그런 다음 **다음**을 클릭합니다.
**읽기** 액세스는 민감하지 않은 위협 및 캠페인 데이터를 반환합니다. **Read Sensitive**는 추가로 PII, 첨부 파일 및 직원 데이터를 노출합니다. **쓰기**는 조치 요청을 제출합니다. 사용 사례에서 특별히 더 많은 권한이 필요하지 않다면 **읽기**만 부여하십시오.
다음 필드를 입력합니다.
* **Token Name** — 알아보기 쉬운 이름(예: `Living Security Platform`)
* **설명** — 선택 사항인 부가 정보(예: `Read access for Living Security HRM platform`)
* **Token Expiry** — 교체 정책에 맞게 **90일**, **180일** 또는 **365일**을 선택합니다. 토큰이 만료되기 전에 교체할 수 있도록 캘린더 알림을 설정하십시오.
* **IP Safelist** — Living Security 송신 IP 범위를 항목당 하나씩 입력합니다. 각 항목을 입력한 후 **추가**를 클릭합니다.
**IP 허용 목록은 필수입니다.** Abnormal Security는 허용 목록에 없는 주소에서 오는 모든 API 요청을 거부합니다. 연결 대화 상자에서는 연결이 성공하지만, 올바른 IP가 허용 목록에 추가될 때까지 데이터 동기화는 `401 Unauthorized` 오류로 실패합니다.
그런 다음 **다음**을 클릭합니다.
토큰 구성 요약을 검토한 다음 **Create Token**을 클릭합니다.
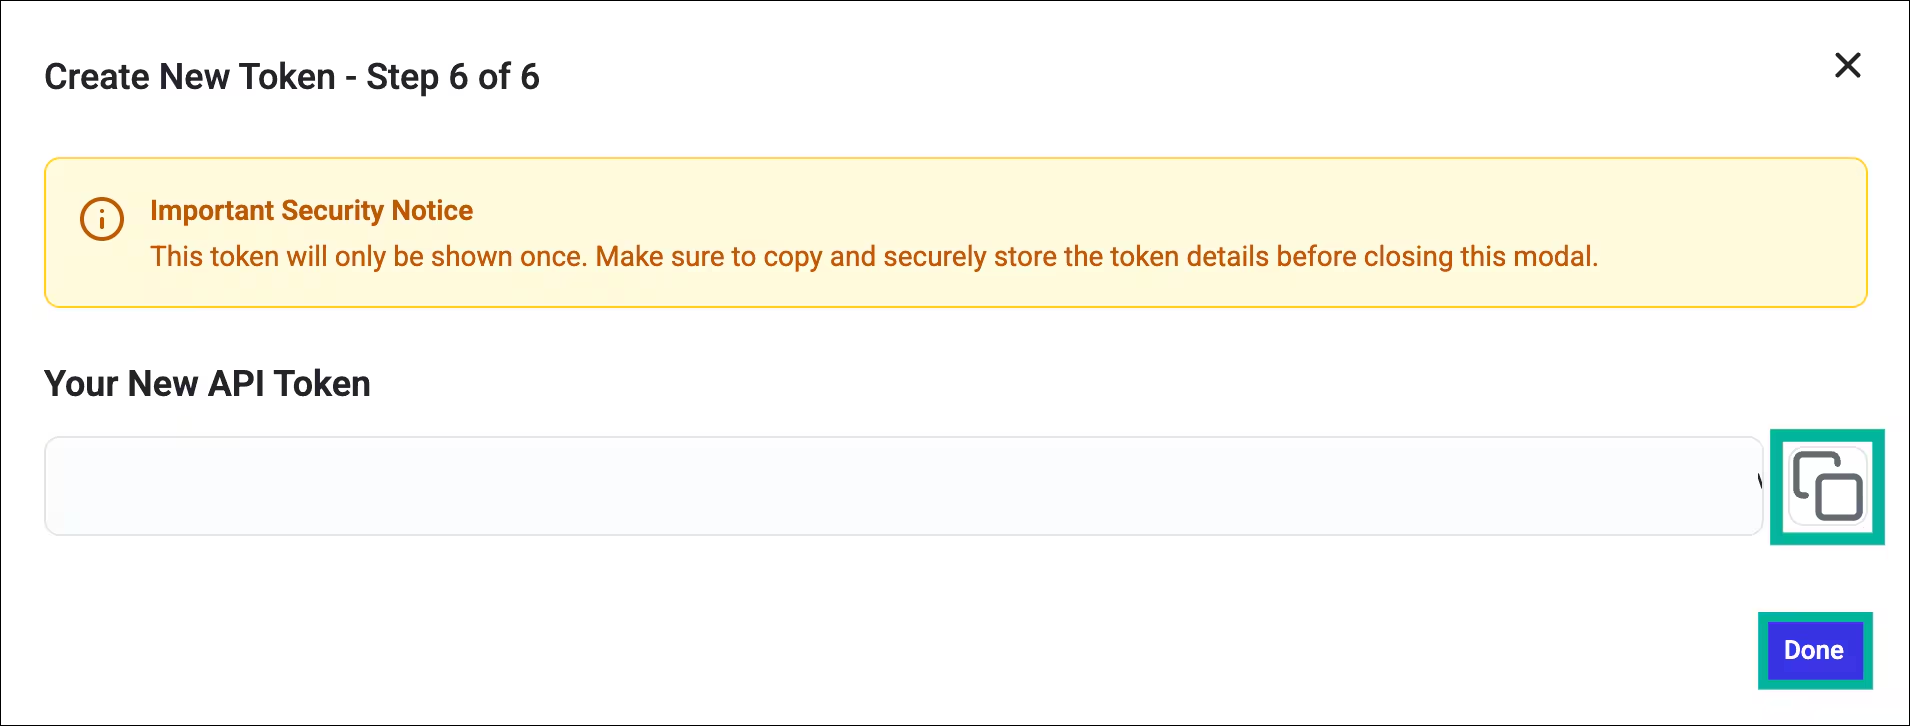 **토큰을 즉시 복사**하여 안전한 위치(예: 비밀번호 보관소 또는 시크릿 관리자)에 저장한 다음 **완료**를 클릭합니다.
 Abnormal Portal은 토큰 값을 **한 번만** 표시합니다. 복사하지 않고 다른 페이지로 이동한 경우 새 토큰을 생성하고 이전 토큰을 해지해야 합니다.
사용 중인 Abnormal Security 환경에 맞는 API 호스트를 확인합니다.
| 환경 | 지역 API 호스트 |
| - | - |
| 기본값(미국 상용) | `api.abnormalplatform.com` |
| EU | `eu.rest.abnormalsecurity.com` |
| FedRAMP | `rest.abnormalsecurity.us` |
**호스트만** 입력하십시오. `https://` 접두사와 끝의 슬래시는 포함하지 않습니다.
조직에서 어떤 환경을 사용하는지 확실하지 않다면 Abnormal 포털 URL을 확인하거나 Abnormal Security 계정 담당 팀에 문의하십시오.
***
## 파트 B — Living Security Platform에서 진행
*프로그램 소유자가 이 단계를 완료하며, 위임된 설정을 사용하는 경우에는 시스템 관리자가 완료합니다.*
| 필드 | 값 |
| - | - |
| **API 키** | 파트 A, 7단계에서 복사한 토큰 |
| **지역 API 호스트** | 파트 A, 8단계에서 확인한 호스트(미국 기본값: `api.abnormalplatform.com`) |
Abnormal Portal은 토큰 값을 **한 번만** 표시합니다. 복사하지 않고 다른 페이지로 이동한 경우 새 토큰을 생성하고 이전 토큰을 해지해야 합니다.
사용 중인 Abnormal Security 환경에 맞는 API 호스트를 확인합니다.
| 환경 | 지역 API 호스트 |
| - | - |
| 기본값(미국 상용) | `api.abnormalplatform.com` |
| EU | `eu.rest.abnormalsecurity.com` |
| FedRAMP | `rest.abnormalsecurity.us` |
**호스트만** 입력하십시오. `https://` 접두사와 끝의 슬래시는 포함하지 않습니다.
조직에서 어떤 환경을 사용하는지 확실하지 않다면 Abnormal 포털 URL을 확인하거나 Abnormal Security 계정 담당 팀에 문의하십시오.
***
## 파트 B — Living Security Platform에서 진행
*프로그램 소유자가 이 단계를 완료하며, 위임된 설정을 사용하는 경우에는 시스템 관리자가 완료합니다.*
| 필드 | 값 |
| - | - |
| **API 키** | 파트 A, 7단계에서 복사한 토큰 |
| **지역 API 호스트** | 파트 A, 8단계에서 확인한 호스트(미국 기본값: `api.abnormalplatform.com`) |
 이제 Abnormal Security에 연결되었습니다.
***
## 문제 해결
토큰에 필요한 액세스 권한 중 하나 또는 둘 모두(**Abuse Campaigns** 또는 **Threats**)가 없습니다. 통합 유형, 범위 및 액세스 수준은 토큰 생성 후에 변경할 수 없으므로, 올바른 설정으로 새 토큰을 생성하고 이전 토큰을 해지해야 합니다.
토큰이 유효하지 않거나 만료되었거나, 요청 IP가 허용 목록에 없는 경우입니다. 다음을 확인하십시오.
1. 토큰이 해지되거나 만료되지 않았는지 확인합니다.
2. [Living Security 송신 IP 주소](/ko/integrations/managing/egress-ip-addresses) 네 개가 모두 허용 목록에 있는지 확인합니다.
이전에는 동기화가 정상적으로 작동했지만 현재 `401` 오류로 실패한다면 송신 IP 주소가 변경되었을 수 있습니다. [연동 송신 IP 주소 구성](/ko/integrations/managing/egress-ip-addresses)을 확인하고 허용 목록이 일치하는지 검증하십시오.
셀프 서비스 Token Management 환경이 도입되기 전에 생성된 API 토큰이 조직에 있는 경우, 해당 토큰은 대시보드에 **Legacy**로 표시됩니다. 레거시 토큰은 계속 작동하지만 교체할 수 없으며 IP 허용 목록만 업데이트할 수 있습니다. 모든 레거시 토큰은 **2027년 4월 30일**에 자동으로 만료됩니다. 해당 날짜 이전에 레거시 토큰을 새 토큰으로 교체하십시오.
This documentation is built and hosted on [Mintlify](https://mintlify.com), a developer documentation platform.
이제 Abnormal Security에 연결되었습니다.
***
## 문제 해결
토큰에 필요한 액세스 권한 중 하나 또는 둘 모두(**Abuse Campaigns** 또는 **Threats**)가 없습니다. 통합 유형, 범위 및 액세스 수준은 토큰 생성 후에 변경할 수 없으므로, 올바른 설정으로 새 토큰을 생성하고 이전 토큰을 해지해야 합니다.
토큰이 유효하지 않거나 만료되었거나, 요청 IP가 허용 목록에 없는 경우입니다. 다음을 확인하십시오.
1. 토큰이 해지되거나 만료되지 않았는지 확인합니다.
2. [Living Security 송신 IP 주소](/ko/integrations/managing/egress-ip-addresses) 네 개가 모두 허용 목록에 있는지 확인합니다.
이전에는 동기화가 정상적으로 작동했지만 현재 `401` 오류로 실패한다면 송신 IP 주소가 변경되었을 수 있습니다. [연동 송신 IP 주소 구성](/ko/integrations/managing/egress-ip-addresses)을 확인하고 허용 목록이 일치하는지 검증하십시오.
셀프 서비스 Token Management 환경이 도입되기 전에 생성된 API 토큰이 조직에 있는 경우, 해당 토큰은 대시보드에 **Legacy**로 표시됩니다. 레거시 토큰은 계속 작동하지만 교체할 수 없으며 IP 허용 목록만 업데이트할 수 있습니다. 모든 레거시 토큰은 **2027년 4월 30일**에 자동으로 만료됩니다. 해당 날짜 이전에 레거시 토큰을 새 토큰으로 교체하십시오.
This documentation is built and hosted on [Mintlify](https://mintlify.com), a developer documentation platform.