> ## Documentation Index
> Fetch the complete documentation index at: https://docs.livingsecurity.com/llms.txt
> Use this file to discover all available pages before exploring further.
# Okta integration setup
> Connect Okta to Living Security for user lifecycle, authentication, MFA, and administrative activity.
export const PublicIntegrationNextSteps = () => <>
Related resources
;
export const EgressIpSafelist = ({system}) =>
Add all four Living Security sync egress IP addresses to the allowlist in{' '}
{system}. Enter each as a single host with /32 if {system} expects CIDR notation:
52.34.139.153/32, 54.69.127.183/32, 44.247.133.183/32,{' '}
52.26.211.56/32
Traffic can leave from any of the four, so allowlisting only some of them causes intermittent
sync failures. These four are the same in every Living Security region. See{' '}
Configuring Integration Egress IP Addresses
{' '}
for the full list, change policy, and troubleshooting.
;
export const ConnectInPlatform = ({tile, children}) =>
Completed by whoever holds Living Security access — the program owner, or the system
admin if they've been invited (delegated setup).
-
Go to Settings → Integrations → Catalog, find the{' '}
{tile} tile, click Connect.
-
Fill in the fields below, then click Connect.
{children}
;
## Overview
Okta can contribute normalized user lifecycle, authentication, MFA, and administrative activity. Reviewed examples include:
* `account.locked` — account locked
* `mfa.factor.activated` — activates additional MFA factors
* `auth.login.failed` — fails to log in
Both connection methods read the same two streams — the user directory (`/api/v1/users`) and the system log (`/api/v1/logs`). See [how integration data becomes signals](/signals/data-sources).
## Choose a connection method
| | **Okta (SSWS)** | **Okta (OAuth 2.0)** |
| ------------------- | ------------------------------------------------------ | ------------------------------------------------------- |
| Credential | An API token you create in the Admin Console | A client ID and a private JWK you generate and register |
| Setup | Three steps, no key material to generate | Nine steps, including an RSA key pair |
| Admin role required | Read-only administrator, assigned to the token's owner | Read-only administrator, assigned to the application |
| Token lifetime | Deactivates after 30 days without use | No expiry; the key pair is yours to rotate |
| Use it when | This is the recommended path for most organizations | Your security policy forbids long-lived API tokens |
Both methods need the same access, so the choice is about credential handling, not about what the platform can read.
***
## Option A — API token (SSWS)
*Recommended.*
### What Living Security needs
| Credential | Description |
| -------------------- | ---------------------------------------------------------------------------- |
| **API key** | An Okta API token. The connect dialog labels this field **API key** |
| **Tenant subdomain** | The `` in `.okta.com` — the bare subdomain, not the full URL |
### Prerequisites
* You must be an Okta **Super Administrator** to create a service account user, assign administrator roles, and create API tokens.
An Okta API token carries the permissions of the user who created it, and it stops working if that user is deactivated. Create a dedicated service account rather than using a personal admin account, so the connection survives staff changes.
1. In the Admin Console, go to **Directory** → **People**.
2. Click **Add person** and create a user such as `svc-livingsecurity@yourcompany.com`.
3. Activate the account.
The platform only reads. Granting more than read access gives the token permissions it never uses.
1. Go to **Security** → **Administrators**.
2. Click **Add administrator** and select the user from the previous step.
3. Assign the **Read-only Administrator** role.
4. Save.
Without an administrator role, calls to the Okta Management API succeed with `200 OK` and return an empty list. There is no `403` to tell you the role is missing — the streams simply stay empty.
1. Sign in to the Admin Console **as the service account user** from step 1. The token inherits whichever account creates it.
2. Go to **Security** → **API** and open the **Tokens** tab.
3. Click **Create token**, give it a name such as `Living Security Platform`, and click **Create token**.
4. Copy the token value now — Okta shows it once and never again.
Okta deactivates an API token after **30 days without use**. The syncs in this integration run at least once a day, so a live connection keeps its own token alive. A connection left paused for a month needs a new token.
The address list above matters only if your Okta org restricts API access by **network zone**. Most orgs do not.
Your Admin Console URL looks like `https://acme-admin.okta.com`. The tenant subdomain is `acme` — without the `-admin` suffix, without `.okta.com`, and without `https://`.
| Field | Value |
| -------------------- | --------------------------------------- |
| **API key** | The API token from step 3 |
| **Tenant subdomain** | The subdomain from step 4 (e.g. `acme`) |
You are now connected to Okta (SSWS).
### Troubleshooting
The token is invalid, was revoked, or has been deactivated after 30 days of inactivity. Create a new token as the service account user and re-enter it on the connection.
The token's owner has no administrator role. Assign **Read-only Administrator** to the service account (step 2) — the API returns `200 OK` with an empty list rather than an error when the role is missing.
The token stops working if the user who created it is deactivated. This is why the token should belong to a service account, not to a person.
***
## Option B — OAuth 2.0 service application
Use this method when your security policy does not allow long-lived API tokens. It replaces the token with a client ID and an RSA key pair you own. In the platform this is the **Okta (OAuth 2.0)** tile, under **Settings → Integrations → Catalog**.
To authenticate with Okta using Client Credentials, you need the following:
1. **Client ID** - A unique identifier for your Okta API Services application.
2. **Private Key (JWK)** - The RSA private key in JSON Web Key format, whose public key is registered in your Okta application.
3. **Okta Domain** - Your Okta tenant subdomain only (e.g. `dev-12345678`), not the full hostname.
4. **Scopes** - A space-separated list of Okta Management API scopes (e.g. `okta.users.read okta.logs.read`).
This guide will walk you through creating an API Services application in Okta with `private_key_jwt` authentication.
### Prerequisites:
* You must have an Okta account. Sign up for a free developer account at [developer.okta.com](https://developer.okta.com/signup/).
#### Step 1: Creating your Okta API Services application
1. Log in to your [Okta Admin Console](https://login.okta.com/).
2. In the left sidebar, navigate to **Applications** > **Applications**.
3. Click **Create App Integration**.
4. Select **API Services** as the sign-in method and click **Next**.
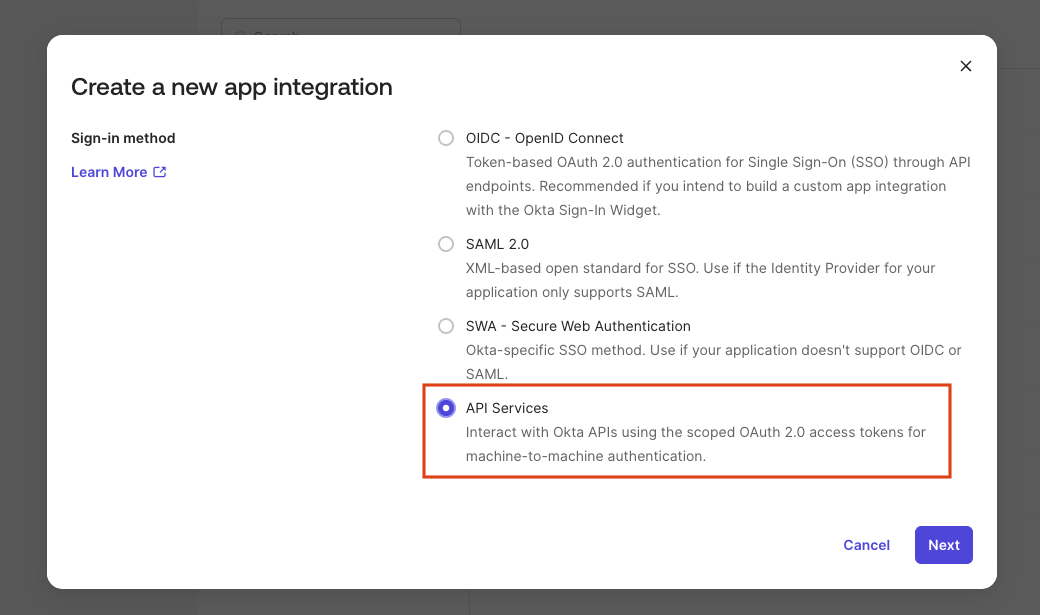 5. Give your application a name and click **Save**.
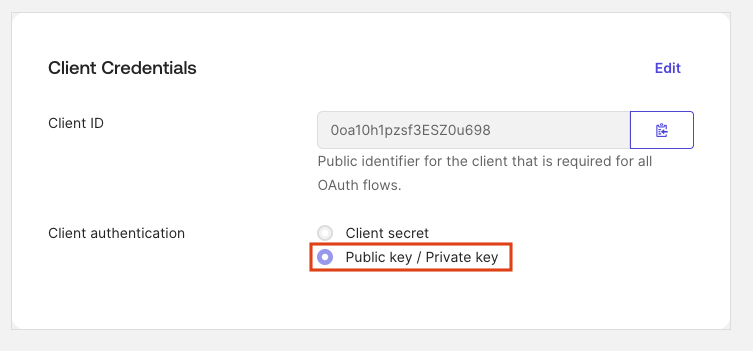
6. On the application's **General** tab, find your **Client ID** — you will need it in the final step.
7. Set Client authentication to **Public key / Private key**. `okta.*` scopes are only supported with this authentication method.
5. Give your application a name and click **Save**.
6. On the application's **General** tab, find your **Client ID** — you will need it in the final step.
7. Set Client authentication to **Public key / Private key**. `okta.*` scopes are only supported with this authentication method.
 8. Disable **Proof of possession (DPoP)** — it is not supported.
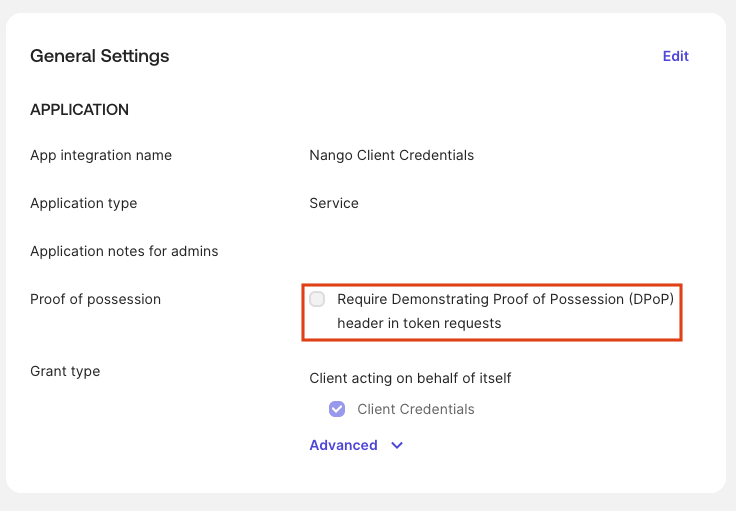 The application must be created as **API Services**.
#### Step 2: Generating and registering your RSA key pair
##### Use Okta key generator
Okta can generate the RSA key pair for you directly in the Admin Console:
1. In the Admin Console, open your API Services application.
2. Go to the **General** tab and scroll to the **PUBLIC KEYS** section.
3. Click **Add Key**, then select **Generate new key**.
4. Click **Save** — Okta generates the key pair and displays the **Private Key (JWK)** once.
5. Copy and save the private key JSON immediately — it will not be shown again.
The application must be created as **API Services**.
#### Step 2: Generating and registering your RSA key pair
##### Use Okta key generator
Okta can generate the RSA key pair for you directly in the Admin Console:
1. In the Admin Console, open your API Services application.
2. Go to the **General** tab and scroll to the **PUBLIC KEYS** section.
3. Click **Add Key**, then select **Generate new key**.
4. Click **Save** — Okta generates the key pair and displays the **Private Key (JWK)** once.
5. Copy and save the private key JSON immediately — it will not be shown again.
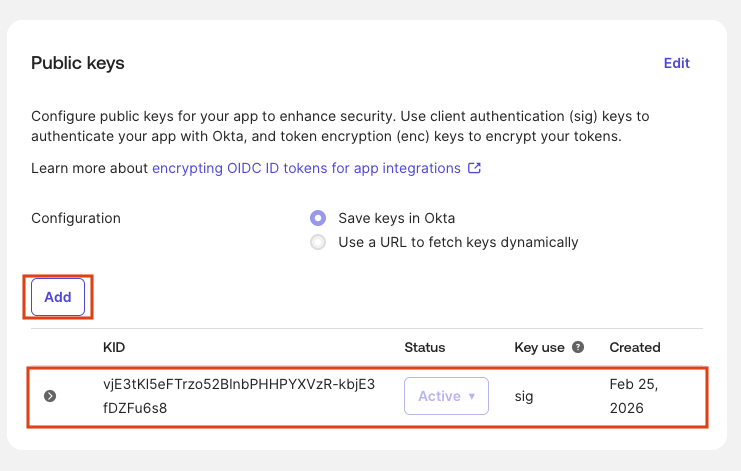 6. The public key is automatically registered with your application.
Copy the private JWK before closing the dialog. Paste it into the **Private Key** field in the Living Security Platform in the final step.
##### Create your own key
Okta uses `private_key_jwt` for API Services apps. You generate an RSA key pair, register the **public** JWK with Okta, and provide the **private** JWK to the Living Security Platform.
**Generate a private JWK** using the following Node.js script (requires Node.js 18+):
```javascript theme={null}
const { generateKeyPairSync } = require('crypto');
const { privateKey, publicKey } = generateKeyPairSync('rsa', { modulusLength: 2048 });
const privateJwk = privateKey.export({ format: 'jwk' });
const publicJwk = publicKey.export({ format: 'jwk' });
// Assign a kid — must match between private and public JWK
const kid = require('crypto').randomUUID();
privateJwk.kid = kid;
publicJwk.kid = kid;
console.log('=== PUBLIC JWK (upload to Okta) ===');
console.log(JSON.stringify(publicJwk, null, 2));
console.log('\n=== PRIVATE JWK (paste into the Living Security Platform) ===');
console.log(JSON.stringify(privateJwk));
```
**Register the public JWK in Okta:**
1. In the Admin Console, open your API Services application.
2. Go to the **General** tab and scroll to the **PUBLIC KEYS** section.
3. Click **Add Key**, paste the **public JWK JSON** output from the script above, and click **Save**.
The private JWK is what you paste into the Living Security Platform. It includes all key material (`d`, `p`, `q`, `dp`, `dq`, `qi`) and the `kid`. Keep it secret.
#### Step 3: Finding your Okta Domain
Enter your Okta tenant subdomain only — the part before `.okta.com`.
* In the Admin Console, your browser's address bar will show a URL like `https://dev-12345678-admin.okta.com`.
* Your **Okta Domain** is the subdomain only (e.g., `dev-12345678`), not `dev-12345678.okta.com`.
* Alternatively, go to **Settings** > **Account** in the Admin Console to find your Okta domain, then use the subdomain portion.
#### Step 4: Grant API scopes to your application
Okta requires at least one scope in every token request. Before your application can request specific scopes, they must be granted:
1. In the Admin Console, navigate to **Applications** > **Applications** and open your application.
2. Click the **Okta API Scopes** tab.
3. Grant the scopes your integration requires: `okta.users.read` and `okta.logs.read`.
A full list of available scopes is in the [Okta Management API reference](https://developer.okta.com/docs/api/oauth2/#okta-admin-management).
#### Step 5: Assign an admin role to your application
Granting scopes alone is not enough — Okta Management API endpoints (e.g. `/api/v1/users`) silently return an empty `200 []` response if your application has no admin role. You must assign at least **Read-Only Administrator**:
1. In the Admin Console, navigate to **Security** > **Administrators** (or go to **Applications** > **Applications** > your app > **Admin roles**).
2. Click **Add administrator assignment** and select your API Services application.
6. The public key is automatically registered with your application.
Copy the private JWK before closing the dialog. Paste it into the **Private Key** field in the Living Security Platform in the final step.
##### Create your own key
Okta uses `private_key_jwt` for API Services apps. You generate an RSA key pair, register the **public** JWK with Okta, and provide the **private** JWK to the Living Security Platform.
**Generate a private JWK** using the following Node.js script (requires Node.js 18+):
```javascript theme={null}
const { generateKeyPairSync } = require('crypto');
const { privateKey, publicKey } = generateKeyPairSync('rsa', { modulusLength: 2048 });
const privateJwk = privateKey.export({ format: 'jwk' });
const publicJwk = publicKey.export({ format: 'jwk' });
// Assign a kid — must match between private and public JWK
const kid = require('crypto').randomUUID();
privateJwk.kid = kid;
publicJwk.kid = kid;
console.log('=== PUBLIC JWK (upload to Okta) ===');
console.log(JSON.stringify(publicJwk, null, 2));
console.log('\n=== PRIVATE JWK (paste into the Living Security Platform) ===');
console.log(JSON.stringify(privateJwk));
```
**Register the public JWK in Okta:**
1. In the Admin Console, open your API Services application.
2. Go to the **General** tab and scroll to the **PUBLIC KEYS** section.
3. Click **Add Key**, paste the **public JWK JSON** output from the script above, and click **Save**.
The private JWK is what you paste into the Living Security Platform. It includes all key material (`d`, `p`, `q`, `dp`, `dq`, `qi`) and the `kid`. Keep it secret.
#### Step 3: Finding your Okta Domain
Enter your Okta tenant subdomain only — the part before `.okta.com`.
* In the Admin Console, your browser's address bar will show a URL like `https://dev-12345678-admin.okta.com`.
* Your **Okta Domain** is the subdomain only (e.g., `dev-12345678`), not `dev-12345678.okta.com`.
* Alternatively, go to **Settings** > **Account** in the Admin Console to find your Okta domain, then use the subdomain portion.
#### Step 4: Grant API scopes to your application
Okta requires at least one scope in every token request. Before your application can request specific scopes, they must be granted:
1. In the Admin Console, navigate to **Applications** > **Applications** and open your application.
2. Click the **Okta API Scopes** tab.
3. Grant the scopes your integration requires: `okta.users.read` and `okta.logs.read`.
A full list of available scopes is in the [Okta Management API reference](https://developer.okta.com/docs/api/oauth2/#okta-admin-management).
#### Step 5: Assign an admin role to your application
Granting scopes alone is not enough — Okta Management API endpoints (e.g. `/api/v1/users`) silently return an empty `200 []` response if your application has no admin role. You must assign at least **Read-Only Administrator**:
1. In the Admin Console, navigate to **Security** > **Administrators** (or go to **Applications** > **Applications** > your app > **Admin roles**).
2. Click **Add administrator assignment** and select your API Services application.
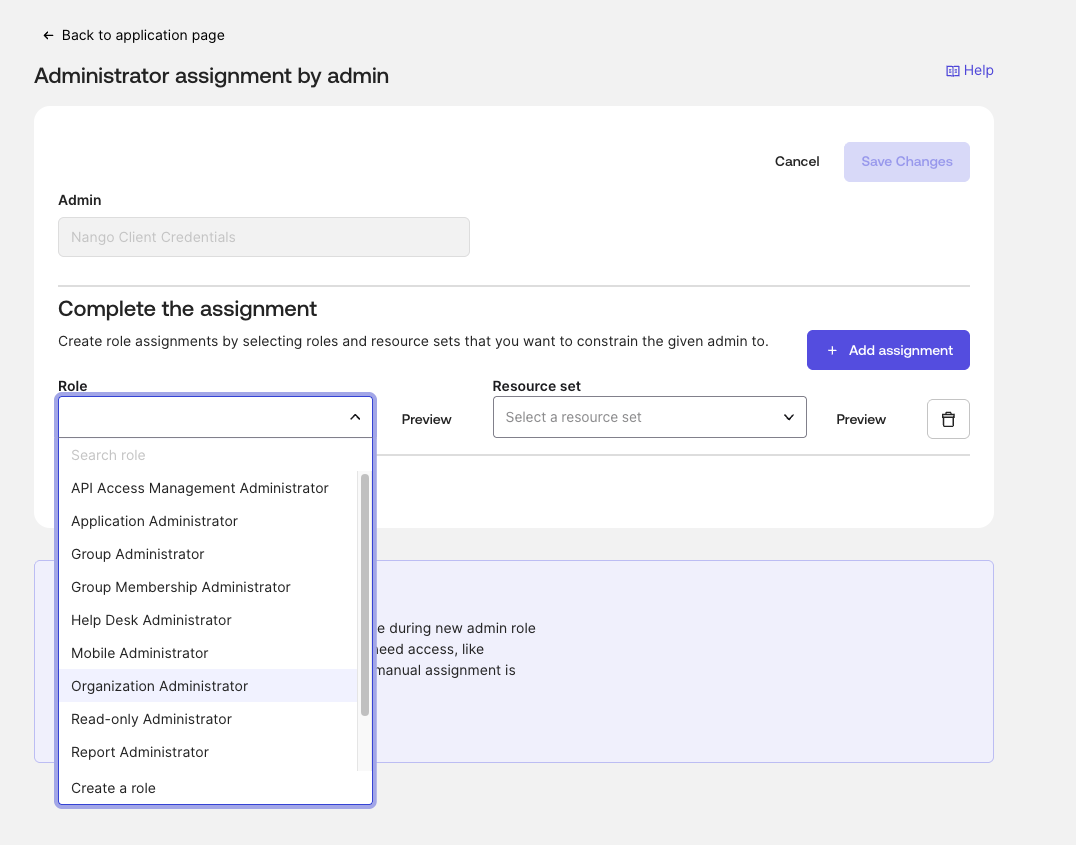 3. Assign the **Read-Only Administrator** role (or higher, depending on the scopes you need).
4. Click **Save**.
3. Assign the **Read-Only Administrator** role (or higher, depending on the scopes you need).
4. Click **Save**.
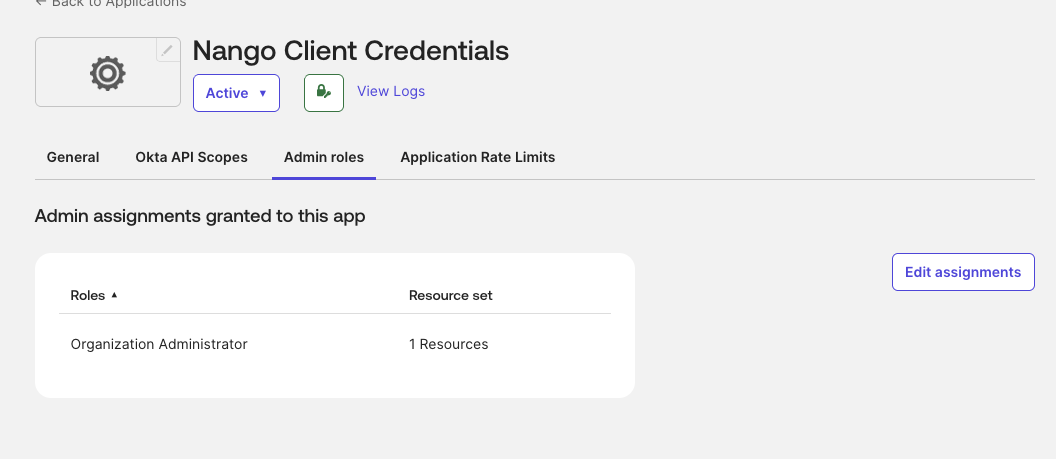 Without an admin role, API calls succeed with `200 OK` but return empty results and there is no `403` error to indicate the problem.
#### Step 6: Enter credentials in the Living Security Platform
Once you have your **Client ID**, **Private Key (JWK)**, **Okta Domain**, and **Scopes**:
1. Open the form where you need to authenticate with Okta (Client Credentials).
2. Enter your **Client ID**.
3. Paste your **Private Key (JWK)** — the full JSON object from the script above (single-line or formatted).
4. Enter your **Okta Domain** as the tenant subdomain only (e.g., `dev-12345678`).
5. Enter the **Scopes** as a space-separated list (e.g., `okta.users.read okta.logs.read`).
6. Submit the form, and you should be successfully authenticated.
You are now connected to Okta (Client Credentials).
***
Portions of this documentation are adapted from [Nango](https://nango.dev/docs/), used under the [Elastic License 2.0](https://github.com/NangoHQ/nango?tab=License-1-ov-file#readme).
Without an admin role, API calls succeed with `200 OK` but return empty results and there is no `403` error to indicate the problem.
#### Step 6: Enter credentials in the Living Security Platform
Once you have your **Client ID**, **Private Key (JWK)**, **Okta Domain**, and **Scopes**:
1. Open the form where you need to authenticate with Okta (Client Credentials).
2. Enter your **Client ID**.
3. Paste your **Private Key (JWK)** — the full JSON object from the script above (single-line or formatted).
4. Enter your **Okta Domain** as the tenant subdomain only (e.g., `dev-12345678`).
5. Enter the **Scopes** as a space-separated list (e.g., `okta.users.read okta.logs.read`).
6. Submit the form, and you should be successfully authenticated.
You are now connected to Okta (Client Credentials).
***
Portions of this documentation are adapted from [Nango](https://nango.dev/docs/), used under the [Elastic License 2.0](https://github.com/NangoHQ/nango?tab=License-1-ov-file#readme).