> ## Documentation Index
> Fetch the complete documentation index at: https://docs.livingsecurity.com/llms.txt
> Use this file to discover all available pages before exploring further.
# Okta (Client Credentials)
> Connect Okta using client credentials authentication to import user and system log data.
export const ConnectInPlatform = ({tile, children}) =>
Completed by whoever holds Living Security access — the program owner, or the system
admin if they've been invited (delegated setup).
-
Go to Settings → Integrations → Catalog, find the{' '}
{tile} tile, click Connect.
-
Fill in the fields below, then click Connect.
{children}
;
export const SystemAdminBanner = ({system, recommendDelegated}) =>
This guide is for your {system} administrator. It covers creating API
credentials inside {system}, which requires admin access to {system} — not to the
Living Security Platform.
If you're the Living Security program owner and don't administer {system},
send this page to whoever does. They complete Part A and hand the credentials back to you
(or enter them directly if you've invited them into the platform).
{recommendDelegated && <>
{' '}Because setup produces sensitive key material, we recommend the{' '}
delegated setup path so the secret is never sent back to you.
}
;
## What Living Security needs
| Credential | Description |
| --------------------- | -------------------------------------------------------------- |
| **Client ID** | The unique identifier for your Okta API Services application |
| **Private Key (JWK)** | The RSA private key in JSON Web Key format |
| **Okta Domain** | The subdomain of your Okta organization (e.g., `dev-12345678`) |
| **Scopes** | Space-separated list of Okta Management API scopes |
**Scopes:** `okta.users.read` `okta.logs.read` — `okta.users.read` backs the users sync and `okta.logs.read` backs the system log sync; both are required.
**Required role:** **Super Administrator** in Okta (to create apps and assign admin roles)
### Prerequisites
* You must have **Super Administrator** access in Okta to create API Services applications and assign administrator roles.
***
## Part A — In Okta
*Your Okta administrator completes these steps.*
1. Log in to your [Okta Admin Console](https://login.okta.com/).
2. In the left sidebar, navigate to **Applications** → **Applications**.
3. Click **Create App Integration**.
4. Select **API Services** as the sign-in method and click **Next**.
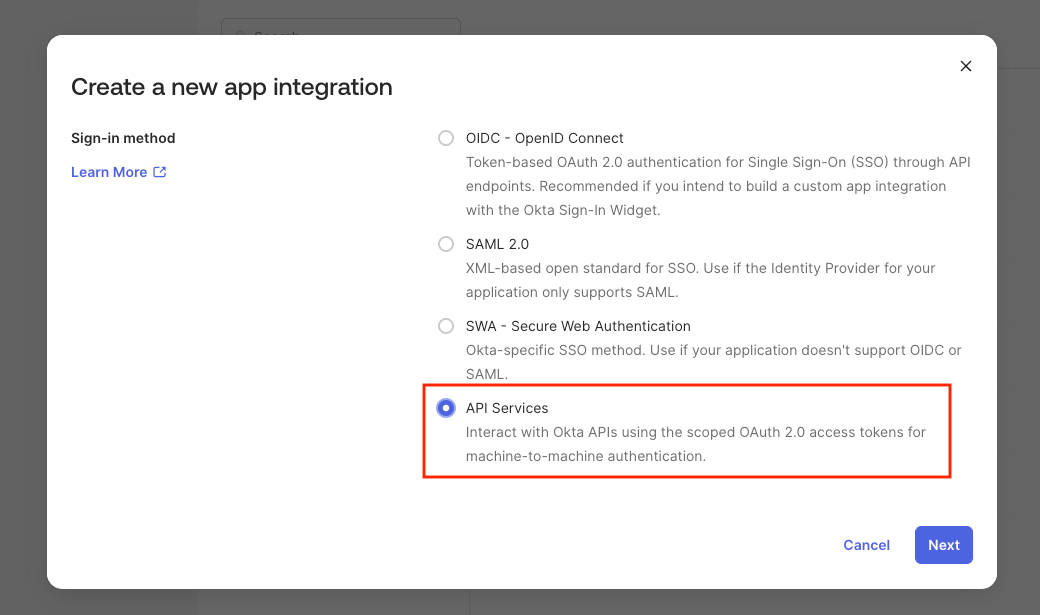 5. Give your application a name (e.g., `Living Security`) and click **Save**.
6. On the application's **General** tab, find your **Client ID** — you'll need it in Part B.
1. On the **General** tab, set **Client authentication** to **Public key / Private key**.
5. Give your application a name (e.g., `Living Security`) and click **Save**.
6. On the application's **General** tab, find your **Client ID** — you'll need it in Part B.
1. On the **General** tab, set **Client authentication** to **Public key / Private key**.
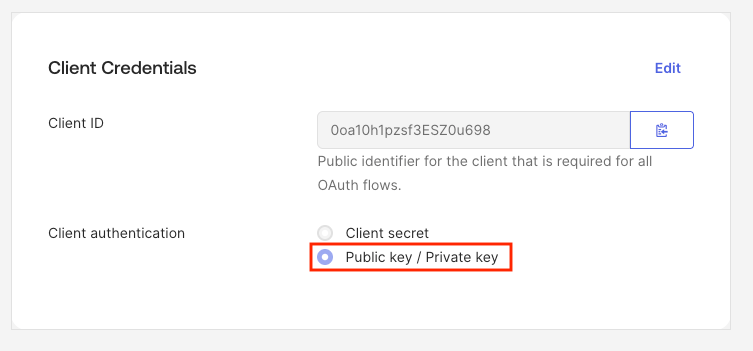 2. Disable **Proof of possession (DPoP)** — it is not supported.
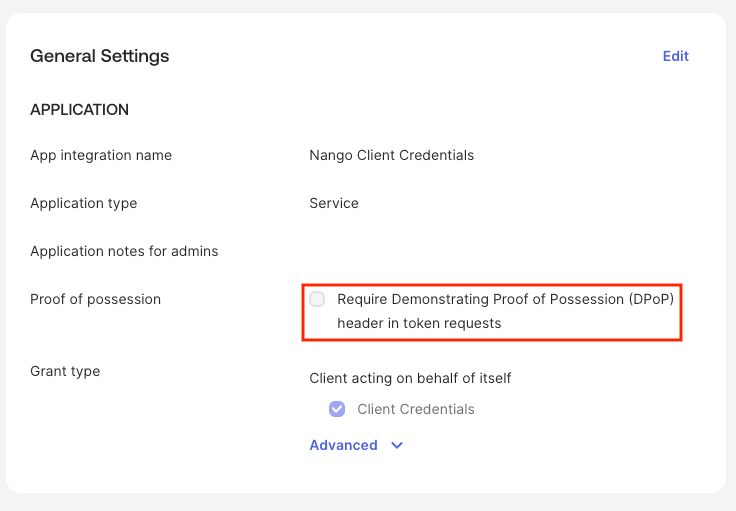 The application must use **Public key / Private key** authentication. `okta.*` scopes are only supported with this authentication method.
**Option A: Use Okta's key generator (recommended)**
1. On the **General** tab, scroll to the **PUBLIC KEYS** section.
2. Click **Add Key**, then select **Generate new key**.
3. Click **Save** — Okta generates the key pair and displays the **Private Key (JWK)** once.
4. **Copy and save the private key JSON immediately** — it will not be shown again.
The application must use **Public key / Private key** authentication. `okta.*` scopes are only supported with this authentication method.
**Option A: Use Okta's key generator (recommended)**
1. On the **General** tab, scroll to the **PUBLIC KEYS** section.
2. Click **Add Key**, then select **Generate new key**.
3. Click **Save** — Okta generates the key pair and displays the **Private Key (JWK)** once.
4. **Copy and save the private key JSON immediately** — it will not be shown again.
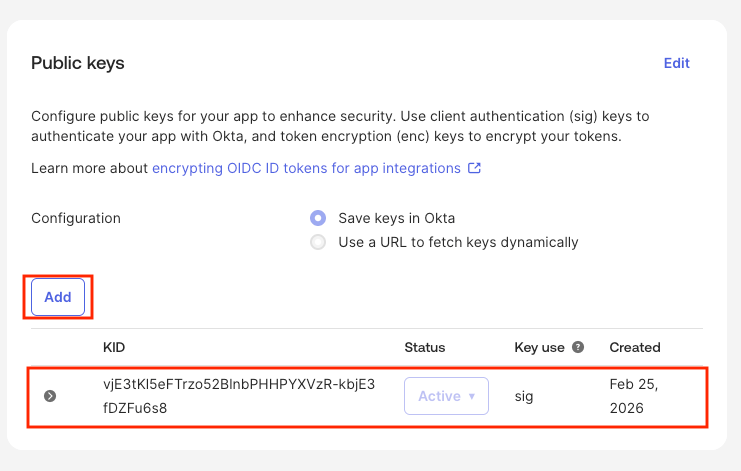 The private key is sensitive credential material. Store it in a password vault or secrets manager. **Do not email it** — use delegated setup so the admin enters it directly into the platform.
**Option B: Generate your own key**
If you prefer to generate keys yourself, use this Node.js script (requires Node.js 18+):
```javascript theme={null}
const { generateKeyPairSync } = require('crypto');
const { privateKey, publicKey } = generateKeyPairSync('rsa', { modulusLength: 2048 });
const privateJwk = privateKey.export({ format: 'jwk' });
const publicJwk = publicKey.export({ format: 'jwk' });
// Assign a kid — must match between private and public JWK
const kid = require('crypto').randomUUID();
privateJwk.kid = kid;
publicJwk.kid = kid;
console.log('=== PUBLIC JWK (upload to Okta) ===');
console.log(JSON.stringify(publicJwk, null, 2));
console.log('\n=== PRIVATE JWK (paste into the Living Security Platform) ===');
console.log(JSON.stringify(privateJwk));
```
Then register the **public JWK** in Okta:
1. On the **General** tab, scroll to the **PUBLIC KEYS** section.
2. Click **Add Key**, paste the **public JWK JSON**, and click **Save**.
Your Okta Domain is the subdomain of your Okta organization URL:
* In the Admin Console, your browser shows a URL like `https://dev-12345678-admin.okta.com`
* Your **Okta Domain** is the part before `.okta.com`, ignoring `-admin` (e.g., `dev-12345678`)
* Alternatively, go to **Settings** → **Account** in the Admin Console
1. In the Admin Console, navigate to **Applications** → **Applications** and open your application.
2. Click the **Okta API Scopes** tab.
3. Grant the required scopes:
* `okta.users.read`
* `okta.logs.read`
See the [Okta Management API reference](https://developer.okta.com/docs/api/oauth2/#okta-admin-management) for the full list of available scopes.
Granting scopes alone is not enough — Okta Management API endpoints silently return empty results if your application has no admin role. You must assign at least **Read-Only Administrator**:
1. In the Admin Console, navigate to **Security** → **Administrators**.
2. Click **Add administrator assignment** and select your API Services application.
The private key is sensitive credential material. Store it in a password vault or secrets manager. **Do not email it** — use delegated setup so the admin enters it directly into the platform.
**Option B: Generate your own key**
If you prefer to generate keys yourself, use this Node.js script (requires Node.js 18+):
```javascript theme={null}
const { generateKeyPairSync } = require('crypto');
const { privateKey, publicKey } = generateKeyPairSync('rsa', { modulusLength: 2048 });
const privateJwk = privateKey.export({ format: 'jwk' });
const publicJwk = publicKey.export({ format: 'jwk' });
// Assign a kid — must match between private and public JWK
const kid = require('crypto').randomUUID();
privateJwk.kid = kid;
publicJwk.kid = kid;
console.log('=== PUBLIC JWK (upload to Okta) ===');
console.log(JSON.stringify(publicJwk, null, 2));
console.log('\n=== PRIVATE JWK (paste into the Living Security Platform) ===');
console.log(JSON.stringify(privateJwk));
```
Then register the **public JWK** in Okta:
1. On the **General** tab, scroll to the **PUBLIC KEYS** section.
2. Click **Add Key**, paste the **public JWK JSON**, and click **Save**.
Your Okta Domain is the subdomain of your Okta organization URL:
* In the Admin Console, your browser shows a URL like `https://dev-12345678-admin.okta.com`
* Your **Okta Domain** is the part before `.okta.com`, ignoring `-admin` (e.g., `dev-12345678`)
* Alternatively, go to **Settings** → **Account** in the Admin Console
1. In the Admin Console, navigate to **Applications** → **Applications** and open your application.
2. Click the **Okta API Scopes** tab.
3. Grant the required scopes:
* `okta.users.read`
* `okta.logs.read`
See the [Okta Management API reference](https://developer.okta.com/docs/api/oauth2/#okta-admin-management) for the full list of available scopes.
Granting scopes alone is not enough — Okta Management API endpoints silently return empty results if your application has no admin role. You must assign at least **Read-Only Administrator**:
1. In the Admin Console, navigate to **Security** → **Administrators**.
2. Click **Add administrator assignment** and select your API Services application.
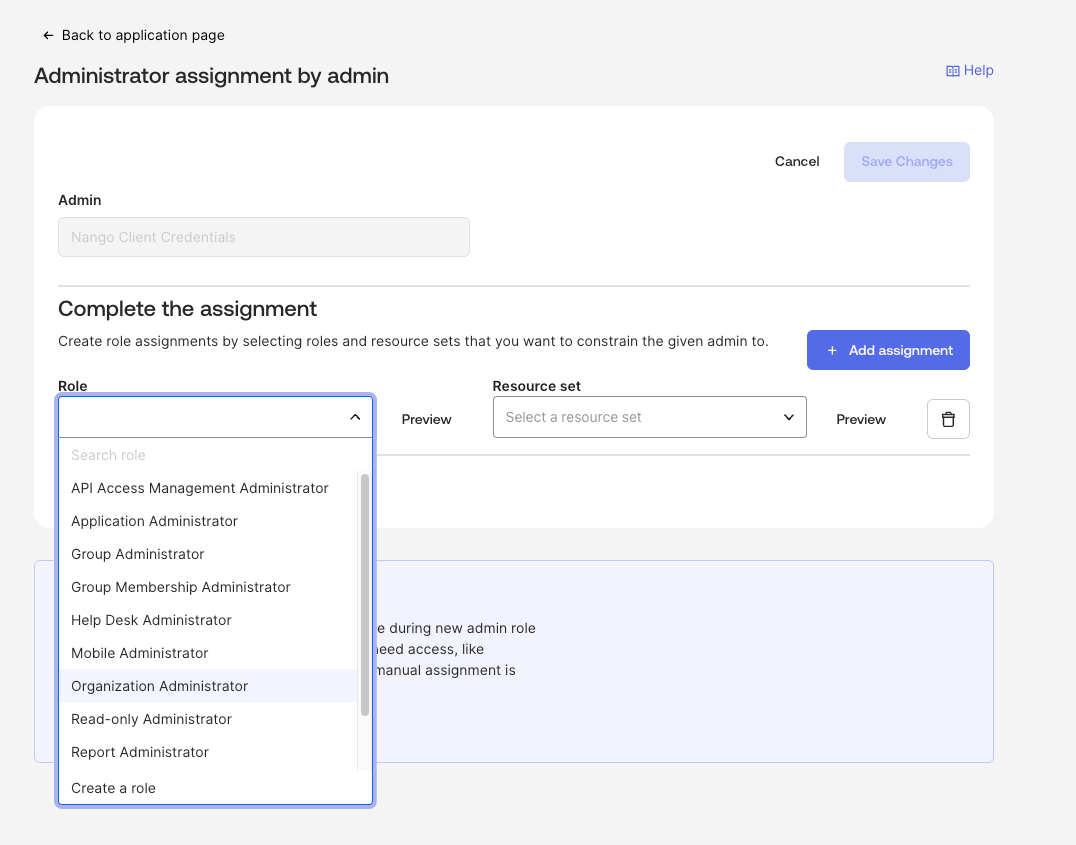 3. Assign the **Read-Only Administrator** role.
4. Click **Save**.
3. Assign the **Read-Only Administrator** role.
4. Click **Save**.
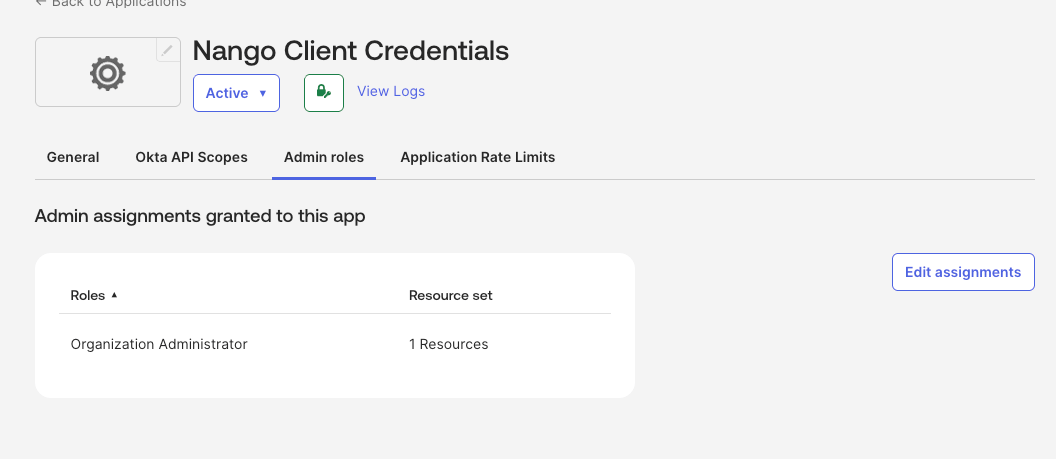 Without an admin role, API calls succeed with `200 OK` but return empty results — there is no `403` error to indicate the problem.
***
## Part B — In the Living Security Platform
*The program owner completes this step, or the system admin if using delegated setup.*
| Field | Value |
| --------------------- | ------------------------------------------------------------------- |
| **Client ID** | The Client ID from Part A, Step 1 |
| **Private Key (JWK)** | The full JSON object from Part A, Step 3 (single-line or formatted) |
| **Okta Domain** | The subdomain from Part A, Step 4 (e.g., `dev-12345678`) |
| **Scopes** | Space-separated list: `okta.users.read okta.logs.read` |
You are now connected to Okta (Client Credentials).
***
## Troubleshooting
The application is missing an admin role assignment. Okta Management API endpoints return empty arrays instead of errors when the application lacks permissions.
**Fix:** Assign at least **Read-Only Administrator** to the application in **Security → Administrators**.
The credentials are invalid. Check:
1. Client ID is correct
2. Private key matches the public key registered in Okta
3. Okta Domain is correct (no `https://`, no `-admin` suffix)
The application is missing required scopes. Verify that `okta.users.read` and `okta.logs.read` are granted in **Applications → \[Your App] → Okta API Scopes**.
DPoP (Demonstrating Proof of Possession) is enabled but not supported. Disable DPoP in the application's **General** settings.
***
Portions of this documentation are adapted from [Nango](https://nango.dev/docs/), used under the [Elastic License 2.0](https://github.com/NangoHQ/nango?tab=License-1-ov-file#readme).
Without an admin role, API calls succeed with `200 OK` but return empty results — there is no `403` error to indicate the problem.
***
## Part B — In the Living Security Platform
*The program owner completes this step, or the system admin if using delegated setup.*
| Field | Value |
| --------------------- | ------------------------------------------------------------------- |
| **Client ID** | The Client ID from Part A, Step 1 |
| **Private Key (JWK)** | The full JSON object from Part A, Step 3 (single-line or formatted) |
| **Okta Domain** | The subdomain from Part A, Step 4 (e.g., `dev-12345678`) |
| **Scopes** | Space-separated list: `okta.users.read okta.logs.read` |
You are now connected to Okta (Client Credentials).
***
## Troubleshooting
The application is missing an admin role assignment. Okta Management API endpoints return empty arrays instead of errors when the application lacks permissions.
**Fix:** Assign at least **Read-Only Administrator** to the application in **Security → Administrators**.
The credentials are invalid. Check:
1. Client ID is correct
2. Private key matches the public key registered in Okta
3. Okta Domain is correct (no `https://`, no `-admin` suffix)
The application is missing required scopes. Verify that `okta.users.read` and `okta.logs.read` are granted in **Applications → \[Your App] → Okta API Scopes**.
DPoP (Demonstrating Proof of Possession) is enabled but not supported. Disable DPoP in the application's **General** settings.
***
Portions of this documentation are adapted from [Nango](https://nango.dev/docs/), used under the [Elastic License 2.0](https://github.com/NangoHQ/nango?tab=License-1-ov-file#readme).