> ## Documentation Index
> Fetch the complete documentation index at: https://docs.livingsecurity.com/llms.txt
> Use this file to discover all available pages before exploring further.
# Auth0
> Connect Auth0 using client credentials to import user and identity data.
export const ConnectInPlatform = ({tile, children}) =>
Completed by whoever holds Living Security access — the program owner, or the system
admin if they've been invited (delegated setup).
-
Go to Settings → Integrations → Catalog, find the{' '}
{tile} tile, click Connect.
-
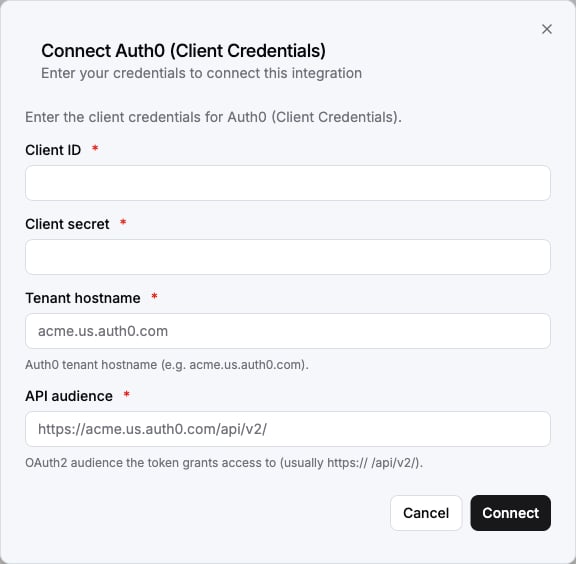
Fill in the fields below, then click Connect.
{children}
;
export const SystemAdminBanner = ({system, recommendDelegated}) =>
This guide is for your {system} administrator. It covers creating API
credentials inside {system}, which requires admin access to {system} — not to the
Living Security Platform.
If you're the Living Security program owner and don't administer {system},
send this page to whoever does. They complete Part A and hand the credentials back to you
(or enter them directly if you've invited them into the platform).
{recommendDelegated && <>
{' '}Because setup produces sensitive key material, we recommend the{' '}
delegated setup path so the secret is never sent back to you.
}
;
## What Living Security needs
| Credential | Description |
| ----------------- | ------------------------------------------------------------------------------------------------------- |
| **Client ID** | The unique identifier for your Auth0 Machine-to-Machine application |
| **Client Secret** | The confidential key used to authenticate the application |
| **HostName** | The domain associated with your Auth0 tenant (e.g., `dev-xxxxx.us.auth0.com`) |
| **Audience** | The API identifier (audience) for the token — usually `https:///api/v2/` for the Management API |
| **Organization** | *(Optional)* The organization name if your tenant uses Auth0 Organizations |
**Scopes:** `read:users` `read:logs` on the **Auth0 Management API** — `read:users` backs the users sync (`/api/v2/users`) and `read:logs` backs the log-events sync (`/api/v2/logs`).
**Required role:** **Admin** or **Owner** in Auth0 (to create applications and manage API permissions)
### Prerequisites
* You must have **Admin** or **Owner** access in your Auth0 tenant to create Machine-to-Machine applications and manage API permissions.
***
## Part A — In Auth0
*Your Auth0 administrator completes these steps.*
1. Log in to your [Auth0 Dashboard](https://manage.auth0.com/).
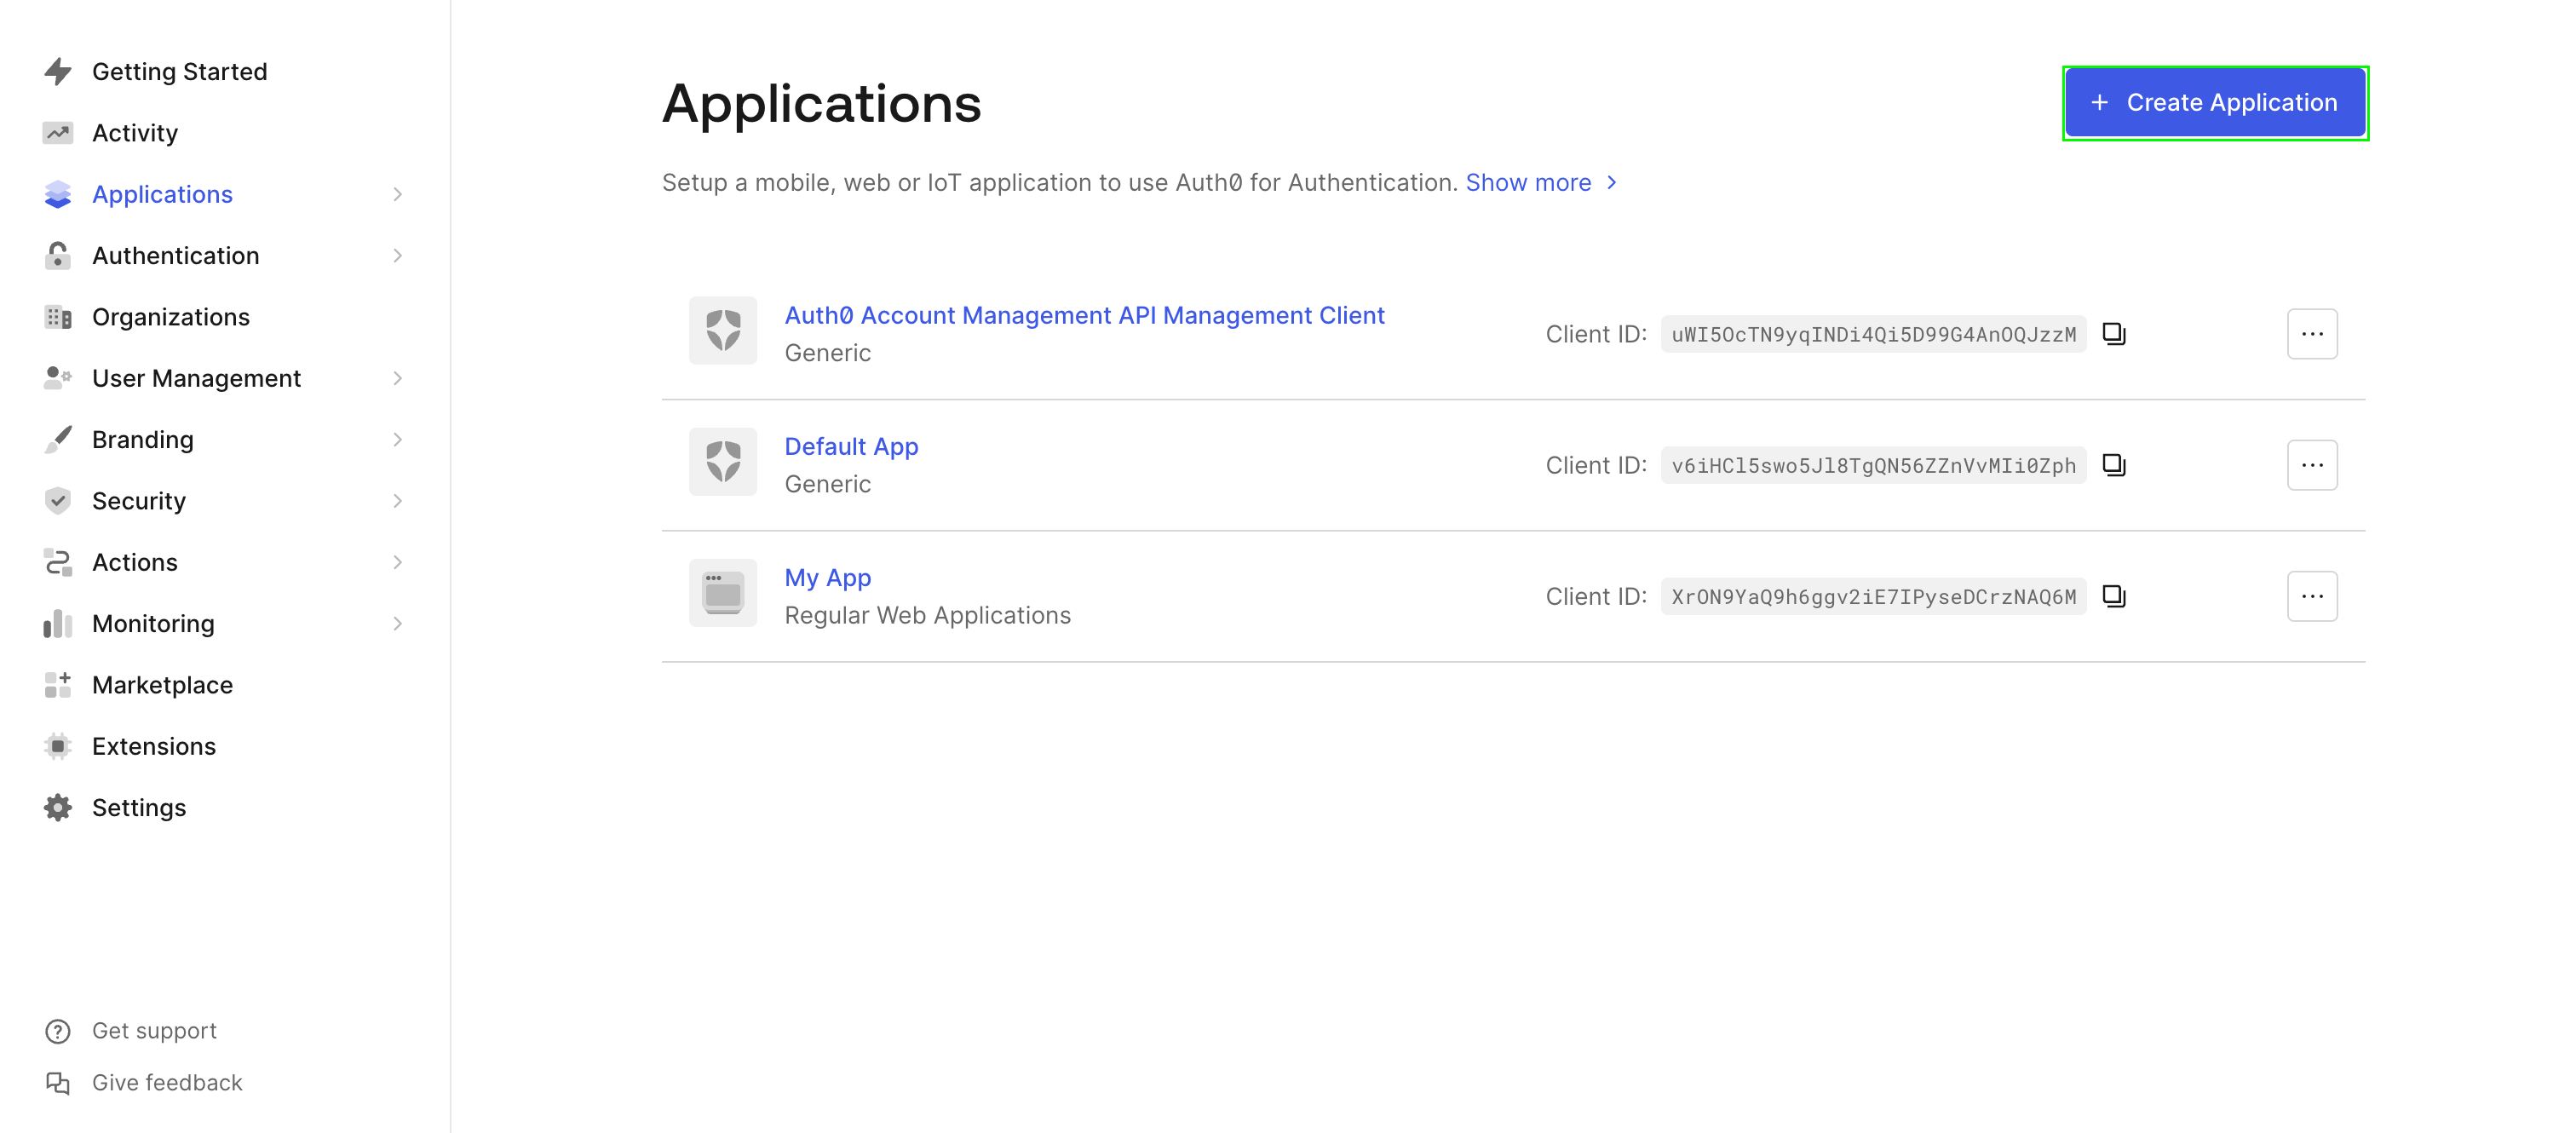
2. Navigate to **Applications** → **Applications**.
3. Click **Create Application**.
 4. Enter a unique name for your application (e.g., `Living Security Platform`).
5. Select **Machine to Machine Applications** as the application type.
4. Enter a unique name for your application (e.g., `Living Security Platform`).
5. Select **Machine to Machine Applications** as the application type.
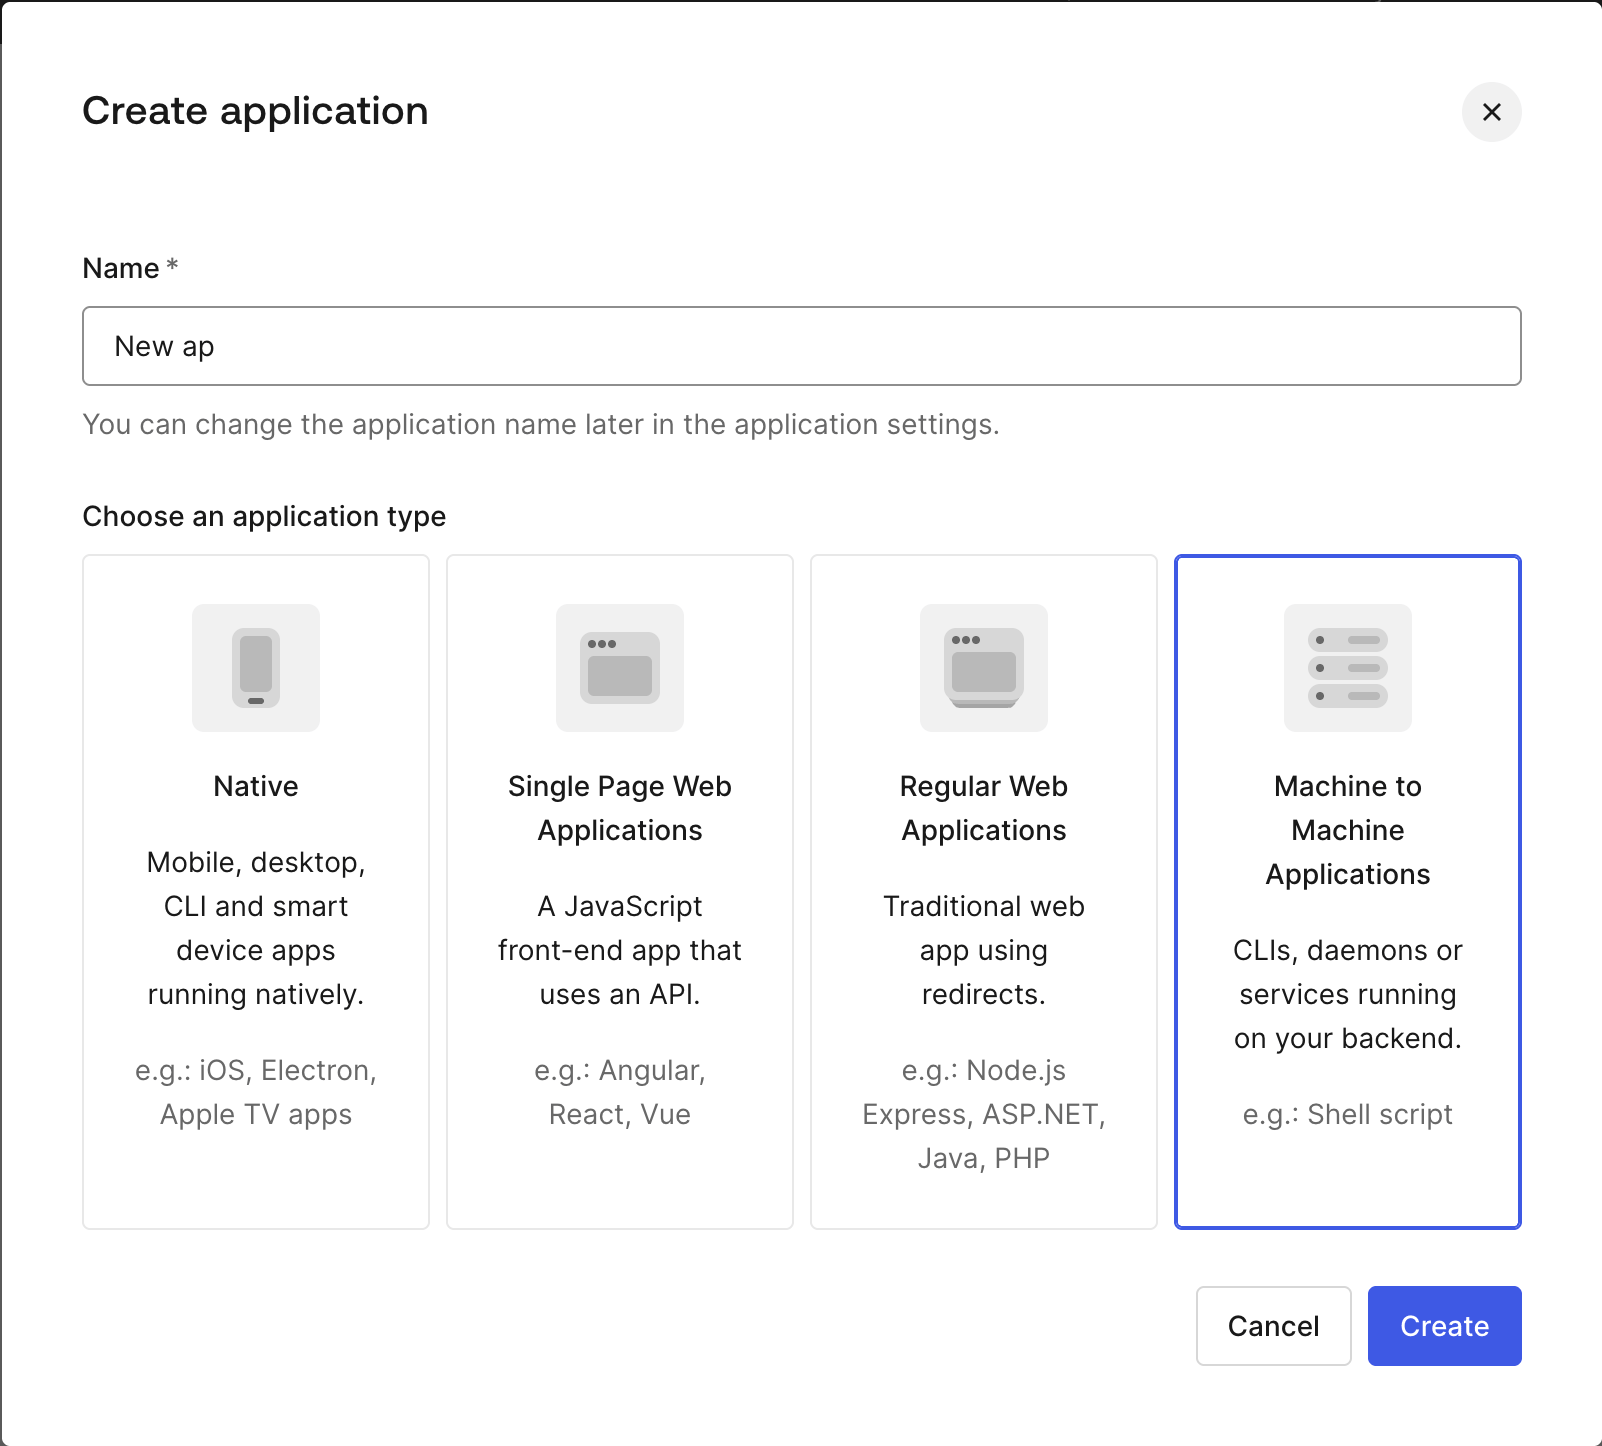 6. Click **Create**.
1. From the dropdown menu, choose the **Auth0 Management API**.
2. Select the **Permissions** `read:users` and `read:logs`.
6. Click **Create**.
1. From the dropdown menu, choose the **Auth0 Management API**.
2. Select the **Permissions** `read:users` and `read:logs`.
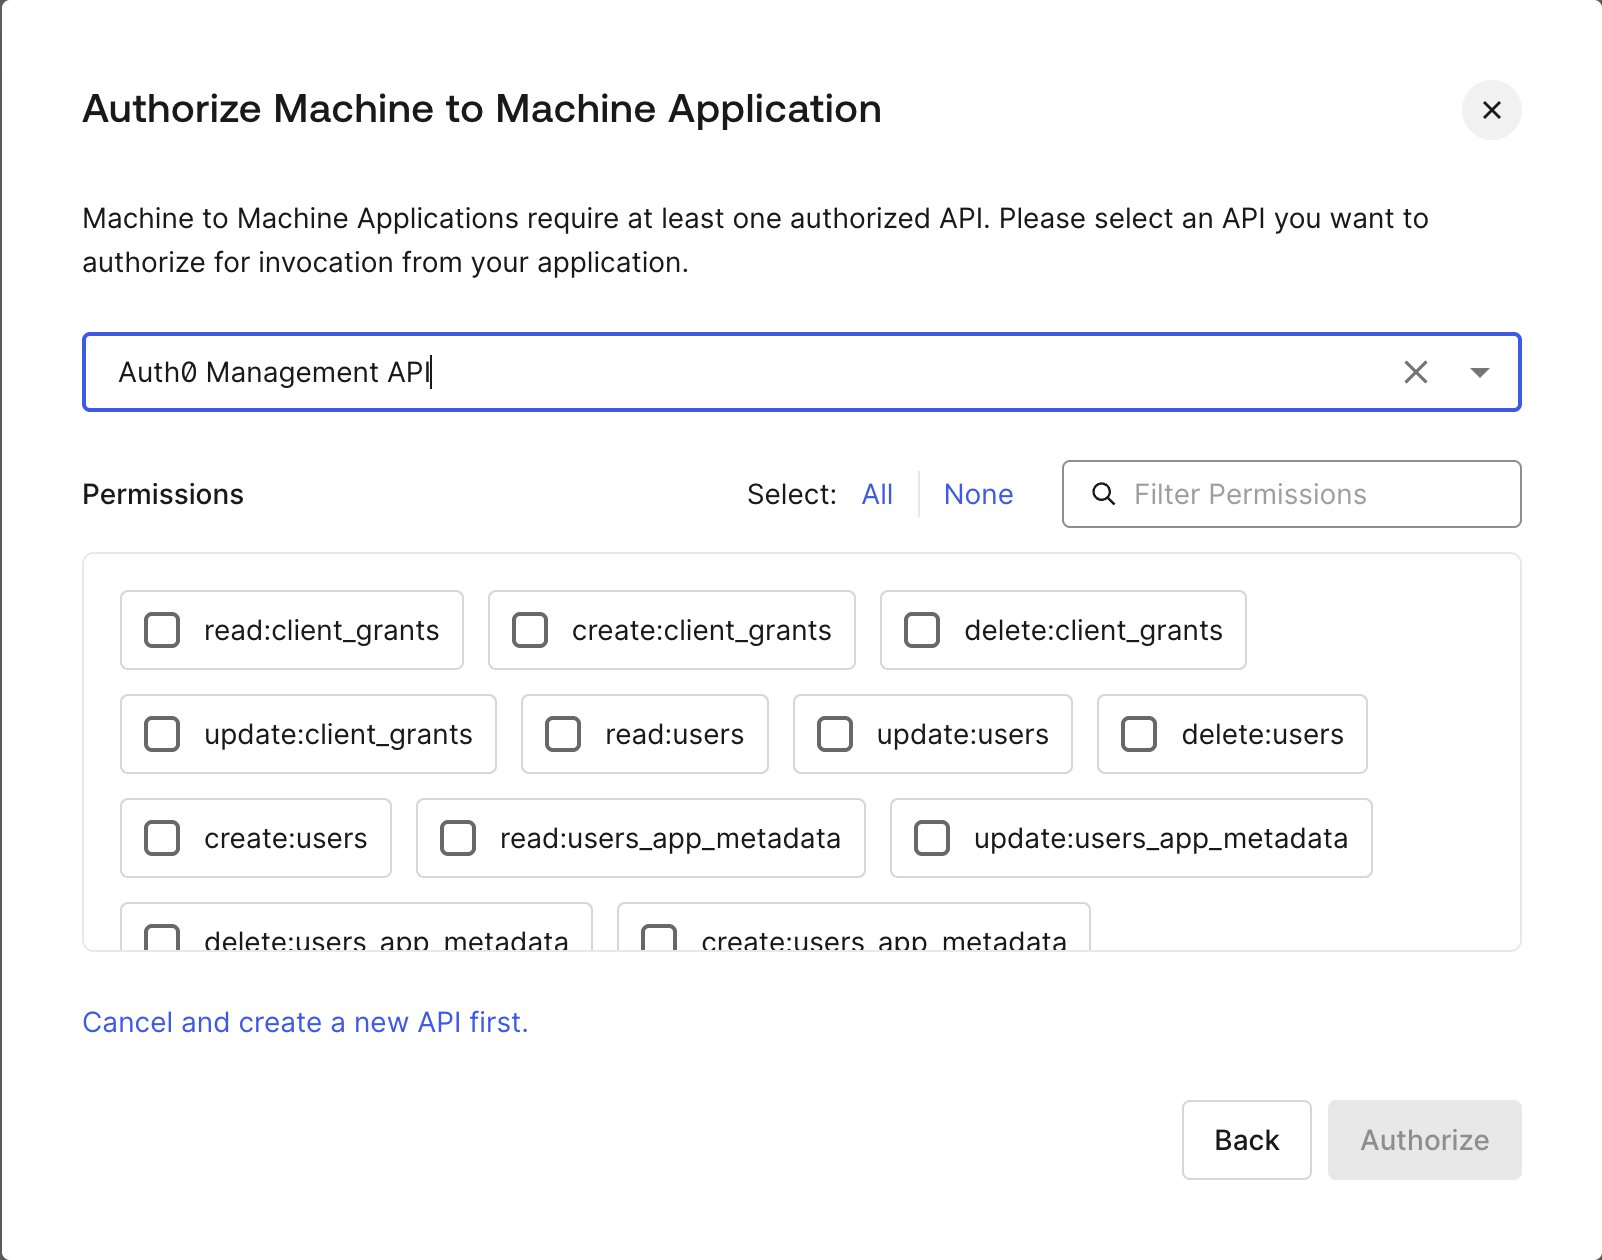 3. Click **Authorize** to complete the application setup.
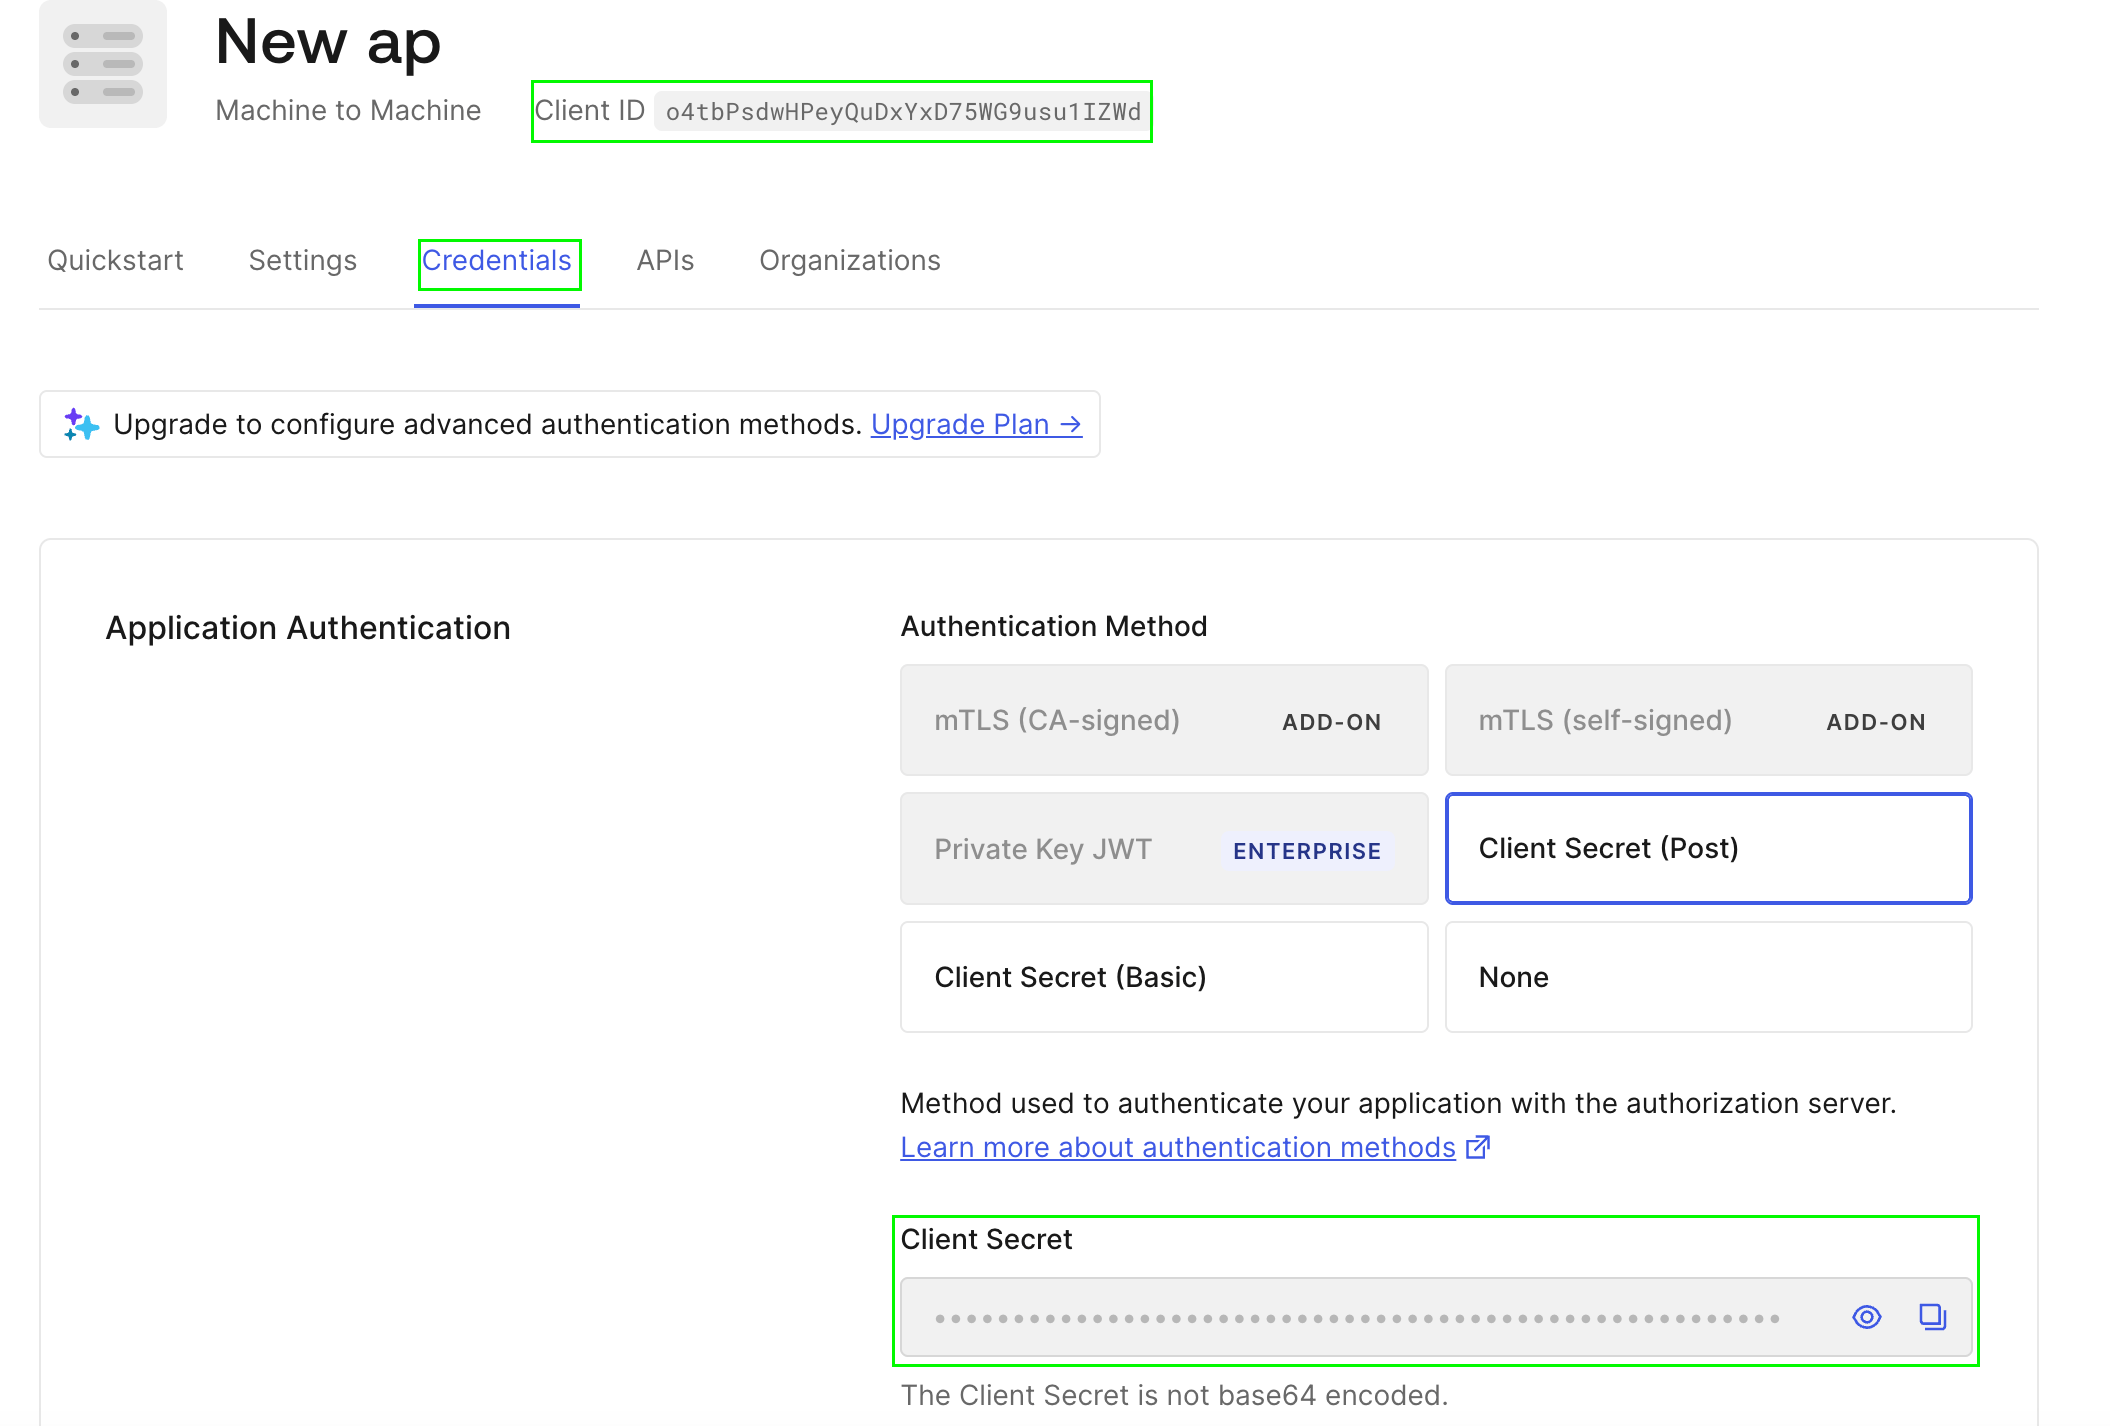
1. On the application page, navigate to the **Settings** tab.
2. Find your **Client ID** at the top of the page.
3. Scroll to the **Credentials** section to find your **Client Secret**.
3. Click **Authorize** to complete the application setup.
1. On the application page, navigate to the **Settings** tab.
2. Find your **Client ID** at the top of the page.
3. Scroll to the **Credentials** section to find your **Client Secret**.
 The Client Secret is sensitive credential material. Store it in a password vault or secrets manager. **Do not email it** — use delegated setup so the admin enters it directly into the platform.
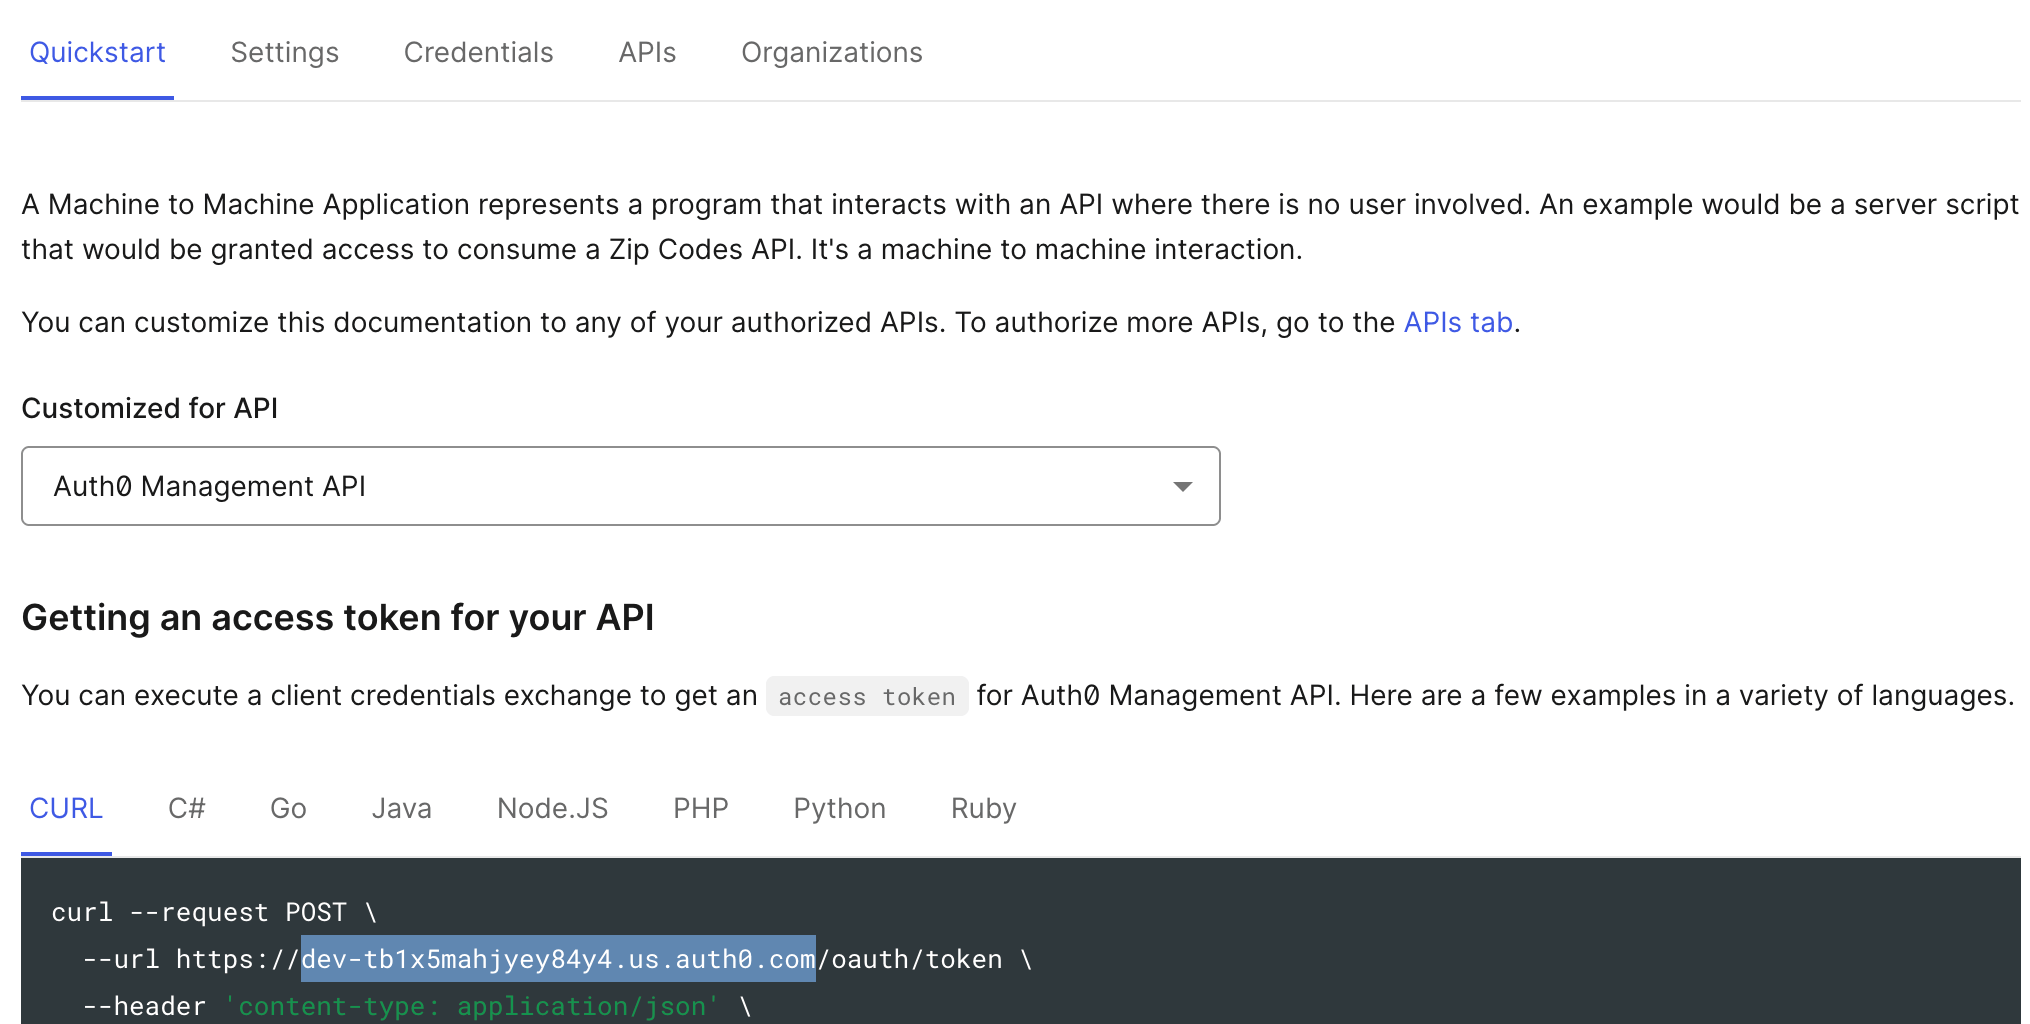
From the **Quickstart** tab of your application, Auth0 provides an example token request. Your **HostName** is the domain that appears after `https://` and before `/oauth/token`.
For example, in `https://dev-tb1x5mahjyey84y4.us.auth0.com/oauth/token`, the HostName is `dev-tb1x5mahjyey84y4.us.auth0.com`.
The Client Secret is sensitive credential material. Store it in a password vault or secrets manager. **Do not email it** — use delegated setup so the admin enters it directly into the platform.
From the **Quickstart** tab of your application, Auth0 provides an example token request. Your **HostName** is the domain that appears after `https://` and before `/oauth/token`.
For example, in `https://dev-tb1x5mahjyey84y4.us.auth0.com/oauth/token`, the HostName is `dev-tb1x5mahjyey84y4.us.auth0.com`.
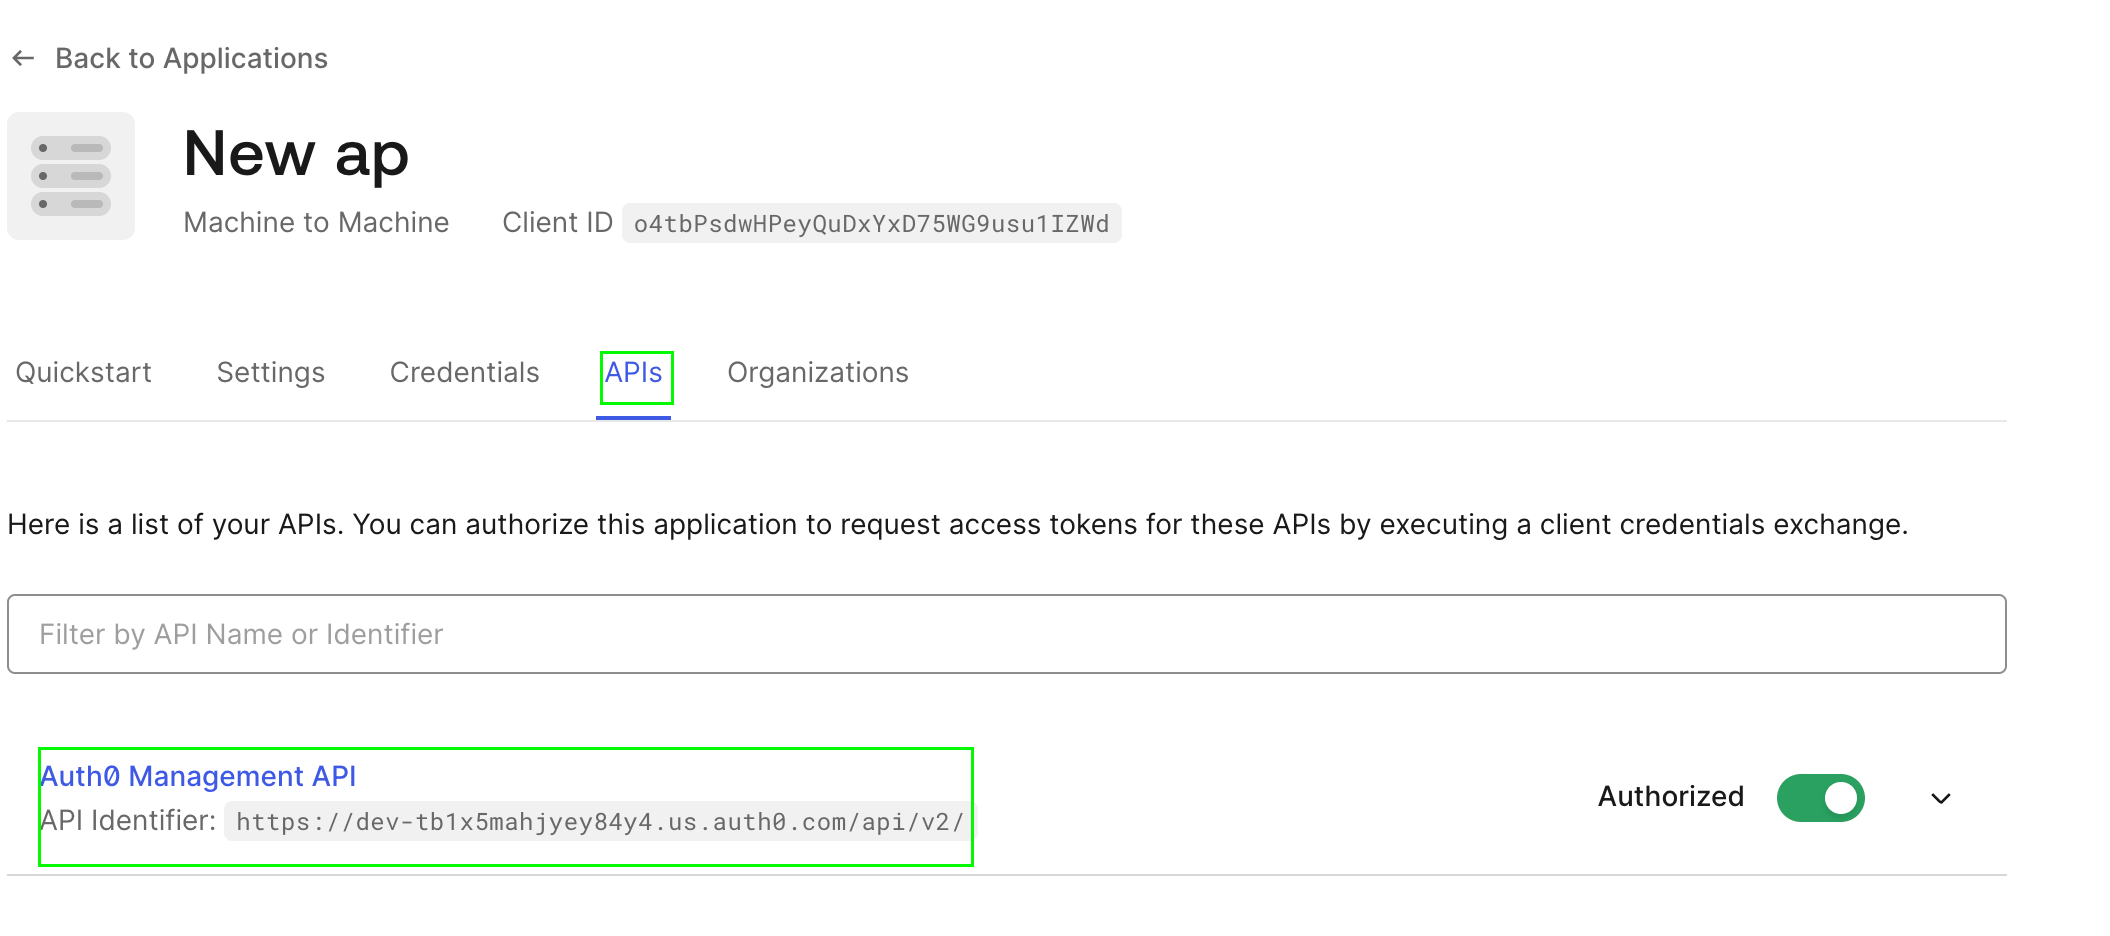
 1. Navigate to **Applications** → **APIs** in the Auth0 Dashboard.
2. Find the API you authorized in Step 2.
3. The **Identifier** field contains your **Audience** value.
1. Navigate to **Applications** → **APIs** in the Auth0 Dashboard.
2. Find the API you authorized in Step 2.
3. The **Identifier** field contains your **Audience** value.
 If your tenant uses Auth0 Organizations:
1. Navigate to **Organizations** in the Auth0 Dashboard.
2. Find the organization name or ID you want the integration to be associated with.
This field is optional. Only provide it if your tenant is configured to use Auth0 Organizations and you want to scope the integration to a specific organization.
***
## Part B — In the Living Security Platform
*The program owner completes this step, or the system admin if using delegated setup.*
| Field | Value |
| ----------------- | --------------------------------------------------------------- |
| **Client ID** | The Client ID from Part A, Step 3 |
| **Client Secret** | The Client Secret from Part A, Step 3 |
| **HostName** | The domain from Part A, Step 4 (e.g., `dev-xxxxx.us.auth0.com`) |
| **Audience** | The API identifier from Part A, Step 5 |
| **Organization** | *(Optional)* The organization name from Part A, Step 6 |
If your tenant uses Auth0 Organizations:
1. Navigate to **Organizations** in the Auth0 Dashboard.
2. Find the organization name or ID you want the integration to be associated with.
This field is optional. Only provide it if your tenant is configured to use Auth0 Organizations and you want to scope the integration to a specific organization.
***
## Part B — In the Living Security Platform
*The program owner completes this step, or the system admin if using delegated setup.*
| Field | Value |
| ----------------- | --------------------------------------------------------------- |
| **Client ID** | The Client ID from Part A, Step 3 |
| **Client Secret** | The Client Secret from Part A, Step 3 |
| **HostName** | The domain from Part A, Step 4 (e.g., `dev-xxxxx.us.auth0.com`) |
| **Audience** | The API identifier from Part A, Step 5 |
| **Organization** | *(Optional)* The organization name from Part A, Step 6 |
 You are now connected to Auth0 (Client Credentials).
***
## Troubleshooting
The credentials are invalid. Check:
1. Client ID and Client Secret are correct
2. Client Secret has not been rotated or revoked
3. HostName matches your Auth0 tenant domain exactly
The application is missing required permissions. Verify that:
1. The application is authorized for the correct API
2. The `read:users` and `read:logs` permissions are granted
3. The Audience value matches the API identifier
The Audience value does not match any API configured in your Auth0 tenant. Verify the API identifier in **Applications → APIs**.
***
Portions of this documentation are adapted from [Nango](https://nango.dev/docs/), used under the [Elastic License 2.0](https://github.com/NangoHQ/nango?tab=License-1-ov-file#readme).
You are now connected to Auth0 (Client Credentials).
***
## Troubleshooting
The credentials are invalid. Check:
1. Client ID and Client Secret are correct
2. Client Secret has not been rotated or revoked
3. HostName matches your Auth0 tenant domain exactly
The application is missing required permissions. Verify that:
1. The application is authorized for the correct API
2. The `read:users` and `read:logs` permissions are granted
3. The Audience value matches the API identifier
The Audience value does not match any API configured in your Auth0 tenant. Verify the API identifier in **Applications → APIs**.
***
Portions of this documentation are adapted from [Nango](https://nango.dev/docs/), used under the [Elastic License 2.0](https://github.com/NangoHQ/nango?tab=License-1-ov-file#readme).