> ## Documentation Index
> Fetch the complete documentation index at: https://docs.livingsecurity.com/llms.txt
> Use this file to discover all available pages before exploring further.
# CrowdStrike Falcon integration सेटअप
> एंडपॉइंट डिटेक्शन, मैलवेयर निष्कर्षों, होस्ट और इंसिडेंट के लिए CrowdStrike Falcon को Living Security से कनेक्ट करें।
export const EgressIpAllowlistBothSets = ({system}) =>
{system} को पतों के एक नहीं, बल्कि दो सेट चाहिए। Living Security इस integration का access token अपने स्वयं के इन्फ्रास्ट्रक्चर पर बनाता है और उसे लगातार रिफ़्रेश करता रहता है, इसलिए सेटअप ट्रैफ़िक और sync ट्रैफ़िक अलग-अलग नेटवर्क से आते हैं। {system} में दोनों सेट को allowlist करें और दोनों को बनाए रखें — यह केवल सेटअप के समय की आवश्यकता नहीं है।
Integration sync traffic — प्रत्येक region में समान:
52.34.139.153/32, 54.69.127.183/32, 44.247.133.183/32,{' '}
52.26.211.56/32
Platform traffic — केवल उसी region की पंक्ति का उपयोग करें जो आपके organization को होस्ट करता है:
United States: 98.91.60.249/32, 13.216.91.102/32
European Union: 34.246.236.210/32, 52.31.102.238/32
यदि आप केवल sync सेट को allowlist करते हैं, तो सेटअप कभी पूरा नहीं होता। यदि आप केवल platform सेट को allowlist करते हैं, तो सेटअप सफल हो जाता है, पर प्रत्येक sync विफल होता है। दोनों विफलता संकेतों और परिवर्तन नीति के लिए{' '}
Configuring Integration Egress IP Addresses
{' '}
देखें।
;
export const PublicIntegrationNextSteps = () => <>
संबंधित संसाधन
;
# अवलोकन
CrowdStrike Falcon सामान्यीकृत एंडपॉइंट डिटेक्शन, मैलवेयर निष्कर्ष, होस्ट संदर्भ और इंसिडेंट गतिविधि उपलब्ध करा सकता है। समीक्षा किए गए उदाहरणों में शामिल हैं:
* `detection.confirmed` — डिटेक्शन की पुष्टि हुई
* `malware.detected` — एंडपॉइंट मैलवेयर डिटेक्शन
* `incident.opened` — इंसिडेंट खोला गया
[Integrations का डेटा Signals में कैसे परिवर्तित होता है](/hi/signals/data-sources) देखें।
CrowdStrike के साथ प्रमाणीकरण करने के लिए आपको निम्नलिखित की आवश्यकता होगी:
1. **Client ID** - आपके API क्लाइंट के लिए एक विशिष्ट पहचानकर्ता।
2. **Client Secret** - एप्लिकेशन (क्लाइंट) की पहचान को प्रमाणित करने के लिए उपयोग की जाने वाली एक गोपनीय कुंजी।
3. **Base URL** - आपके CrowdStrike क्लाउड एनवायरमेंट के लिए API का बेस URL।
यह गाइड आपको CrowdStrike के भीतर ये क्रेडेंशियल प्राप्त करने की प्रक्रिया बताएगी।
### पूर्वापेक्षाएँ:
* आपके पास CrowdStrike Falcon कंसोल का एक्सेस होना चाहिए।
### निर्देश:
#### चरण 1: API Client बनाना
1. अपने [CrowdStrike Falcon कंसोल](https://falcon.crowdstrike.com/) में लॉग इन करें।
2. सर्च टूलबार में **API Clients and Keys** खोजें और उसे चुनें।
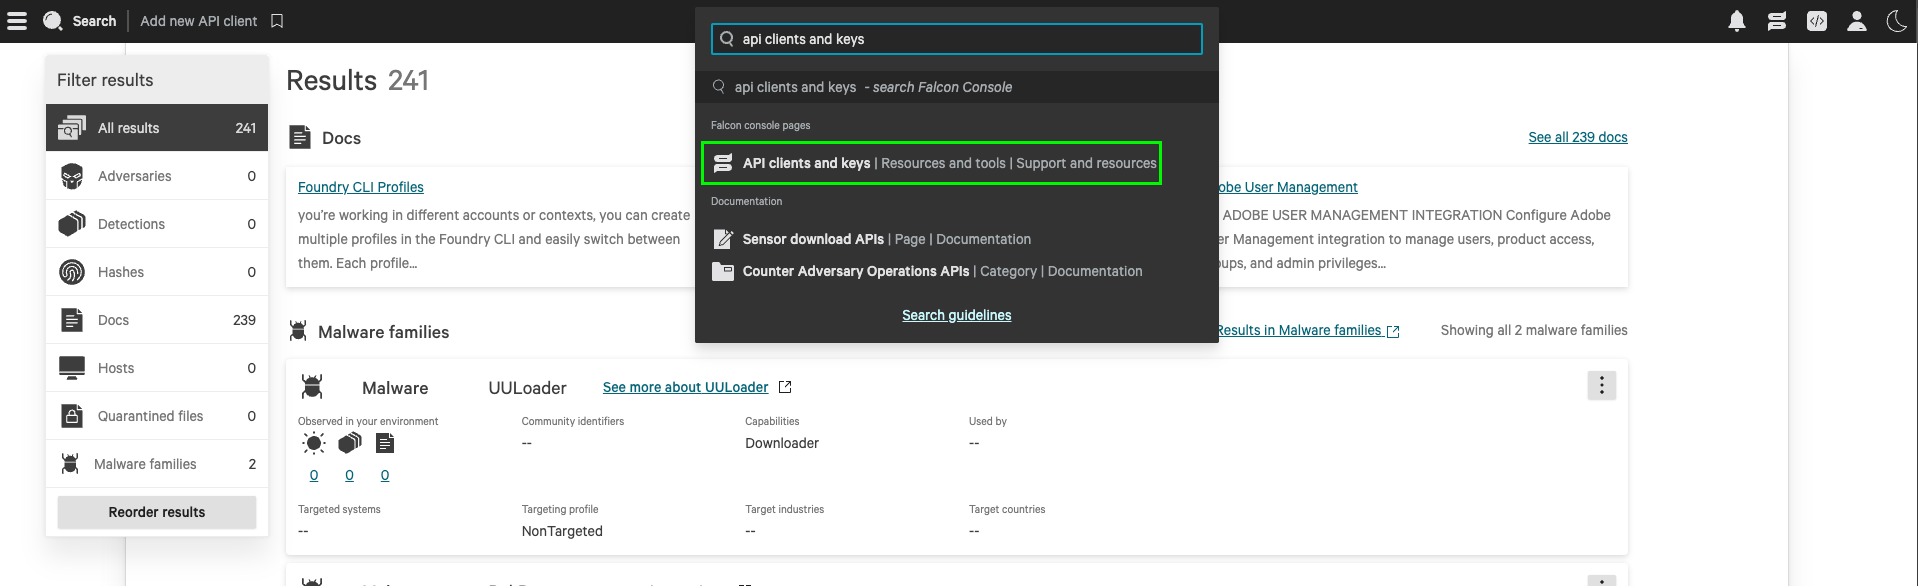 3. **Create API Client** पर क्लिक करें।
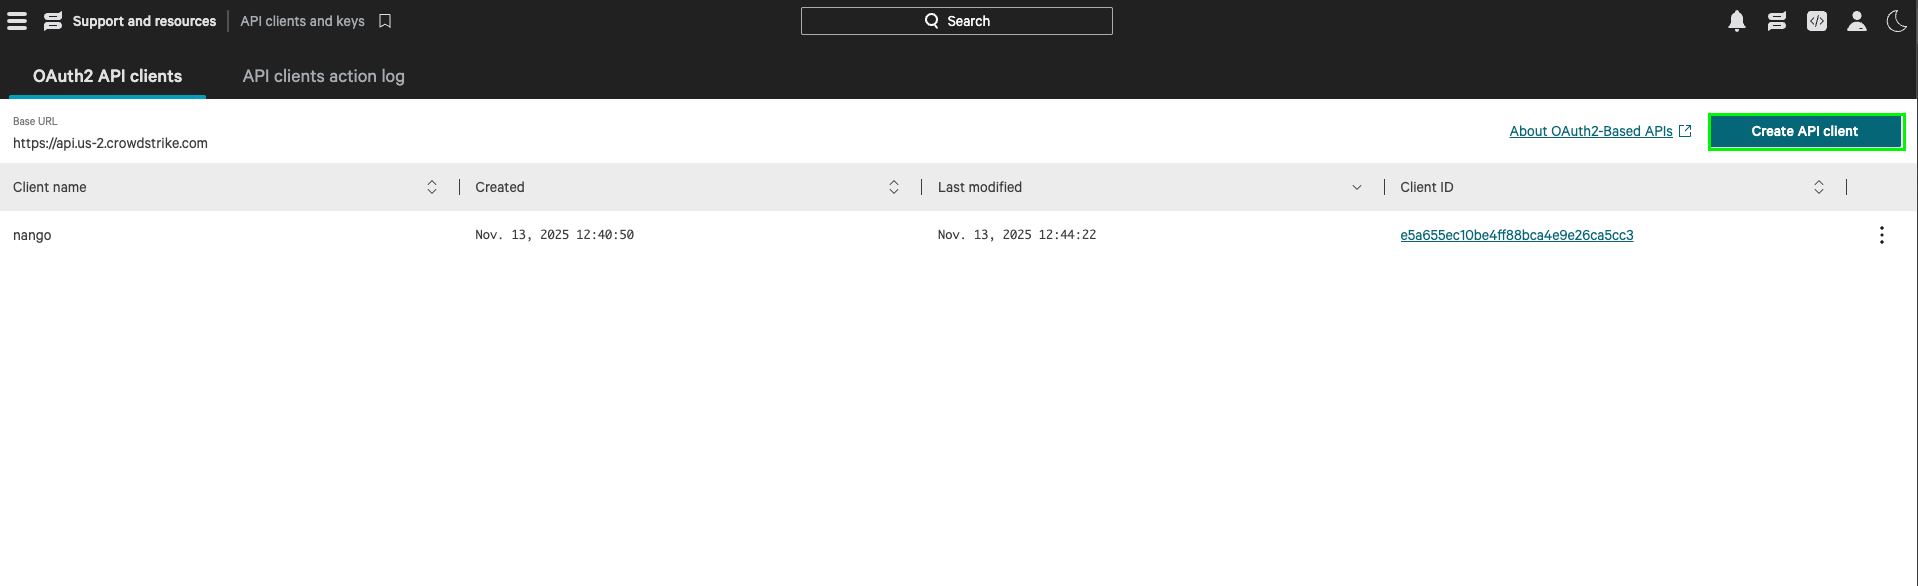 4. नाम और विवरण दर्ज करें, **Alerts: Read** और **Hosts: Read** स्कोप चुनें, और फिर **Create** पर क्लिक करें।
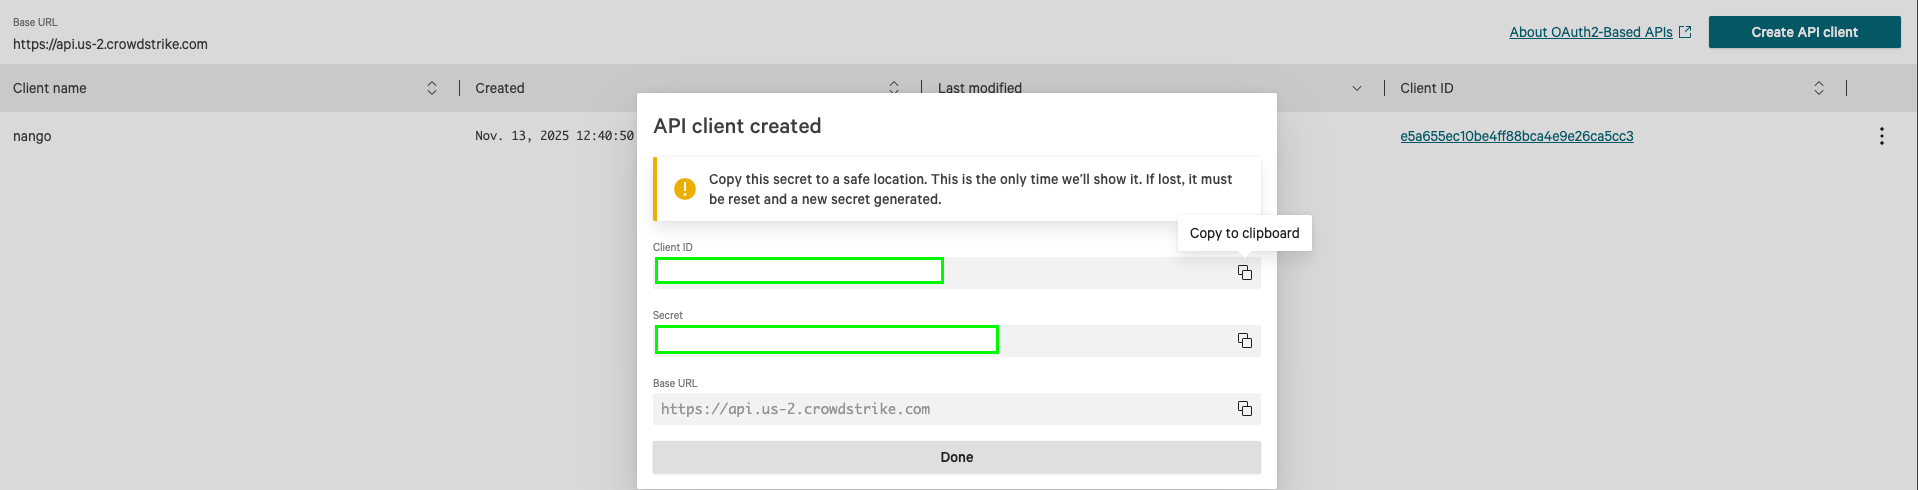
5. आपका **Client ID**, **Client Secret** और **Base URL** आपको दिखाए जाएँगे। **Base URL** डोमेन वाला भाग है (जैसे, `api.crowdstrike.com`), जिसमें `https://` उपसर्ग शामिल नहीं होता।
4. नाम और विवरण दर्ज करें, **Alerts: Read** और **Hosts: Read** स्कोप चुनें, और फिर **Create** पर क्लिक करें।
5. आपका **Client ID**, **Client Secret** और **Base URL** आपको दिखाए जाएँगे। **Base URL** डोमेन वाला भाग है (जैसे, `api.crowdstrike.com`), जिसमें `https://` उपसर्ग शामिल नहीं होता।
 #### चरण 2: Living Security Platform में क्रेडेंशियल दर्ज करना
जब आपके पास **Client ID**, **Client Secret** और **Base URL** हों:
1. वह फ़ॉर्म खोलें जिसमें आपको CrowdStrike के साथ प्रमाणीकरण करना है।
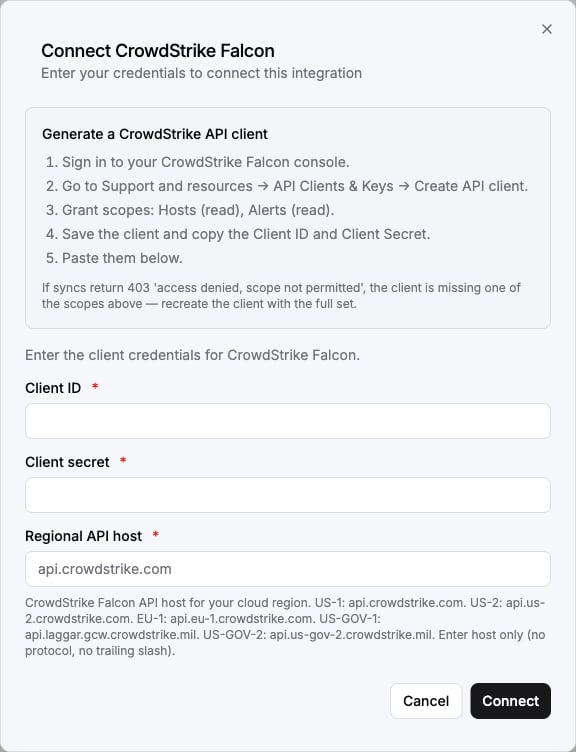
2. अपना **Base URL**, **Client ID** और **Client Secret** संबंधित फ़ील्ड में दर्ज करें।
3. फ़ॉर्म सबमिट करें, और प्रमाणीकरण सफलतापूर्वक पूरा हो जाएगा।
#### चरण 2: Living Security Platform में क्रेडेंशियल दर्ज करना
जब आपके पास **Client ID**, **Client Secret** और **Base URL** हों:
1. वह फ़ॉर्म खोलें जिसमें आपको CrowdStrike के साथ प्रमाणीकरण करना है।
2. अपना **Base URL**, **Client ID** और **Client Secret** संबंधित फ़ील्ड में दर्ज करें।
3. फ़ॉर्म सबमिट करें, और प्रमाणीकरण सफलतापूर्वक पूरा हो जाएगा।
 अब आप CrowdStrike से कनेक्ट हो गए हैं।
***
इस दस्तावेज़ के कुछ अंश [Nango](https://nango.dev/docs/) से रूपांतरित किए गए हैं, जिनका उपयोग [Elastic License 2.0](https://github.com/NangoHQ/nango?tab=License-1-ov-file#readme) के अंतर्गत किया गया है।
## नेटवर्क एक्सेस
यदि आपका Falcon टेनेंट स्रोत IP पते के आधार पर API एक्सेस को प्रतिबंधित नहीं करता है, तो इस अनुभाग को छोड़ दें। अधिकांश टेनेंट ऐसा नहीं करते हैं।
This documentation is built and hosted on [Mintlify](https://mintlify.com), a developer documentation platform.
अब आप CrowdStrike से कनेक्ट हो गए हैं।
***
इस दस्तावेज़ के कुछ अंश [Nango](https://nango.dev/docs/) से रूपांतरित किए गए हैं, जिनका उपयोग [Elastic License 2.0](https://github.com/NangoHQ/nango?tab=License-1-ov-file#readme) के अंतर्गत किया गया है।
## नेटवर्क एक्सेस
यदि आपका Falcon टेनेंट स्रोत IP पते के आधार पर API एक्सेस को प्रतिबंधित नहीं करता है, तो इस अनुभाग को छोड़ दें। अधिकांश टेनेंट ऐसा नहीं करते हैं।
This documentation is built and hosted on [Mintlify](https://mintlify.com), a developer documentation platform.